English
Advanced Types
The Record type allows you to define an object type that contains property keys taken from a specific type and values from another. It is often used to declare configuration types.
Here's an example of using Record to define a configuration type:
 const serviceConfig: Record<string, string | number | boolean> = {
port: 3000,
basePath: "http://localhost",
enableStripePayments: false,
};
console.log(serviceConfig.port); // prints 3000
When using the Record type, using string as property keys may not be very useful as it will accept any string as a key name even if it is not present. A more effective method is to provide a list of allowed keys using unions.
Here's an example that illustrates the use of union types to define specific keys with Record:
 type ServiceConfigParams = "port" | "basePath" | "enableStripePayments";
const serviceConfigChecked: Record<ServiceConfigParams, string | number | boolean> = {
     port: 3000,
     basePath: "http://localhost",
     enableStripePayments: false,
  };

The Partial type allows you to create a new type with all optional property keys from an existing type. This can be very useful when defining class constructor parameters with default values.
Here's an example of using Partial to define a User type with optional property keys:
 enum PRIORITY {
  DEFAULT,
  LOW,
  HIGH,
}
interface TodoItemProps {
  title: string;
  description: string;
  priority: PRIORITY;
}
class TodoItem {
  description?: string;
  title = "Default item title";
  priority = PRIORITY.DEFAULT;
  constructor(todoItemProps: Partial<TodoItemProps> =
     {}) {
     Object.assign(this, todoItemProps);
  }
}

const item = new TodoItem({ description: "Some description" });
console.debug(item.description); /* prints "Some description"*/
console.debug(item.title); /* prints "Some description"*/
The Partial type allows you to create a new type with all optional property keys from an existing type. The Required type, on the other hand, allows you to create a new type with all required property keys from an existing type.
Here's an example of using Partial and Required:
type OriginalTodoItemProps = Required<Partial<TodoItemProps>>; // type is same as TodoItemProps
The Pick type allows you to create a new type with only specific properties selected from an existing type. This feature is very useful when you have an interface with many properties and you want to extract a portion of it to use in your components.
Here's an example of using Pick to define a ButtonProps type with only the label and onClick properties from a ButtonInterface interface:
 type ButtonProps = Pick<HTMLAttributes<HTMLButtonElement>, 'onClick' | 'onSubmit' | 'className' | 'onFocus'>;
class LoggingButton extends React.Component<ButtonProps>
The Omit type allows you to create a new type by excluding one or more specific properties from an existing type. This feature is very useful when you want to reuse all existing properties of a type but want to redefine some with a different signature.
Here's an example of using Omit to define a ButtonProps type with all properties from a ButtonInterface interface except the size property:
 type OriginalThemeProps = {
     colors: string[],
     elevations: string[],
     margins: string[],
     defaultTypography: string;
}
type CustomThemeProps {
     colors: Set<string>;
}
type ThemeProps = Omit<OriginalThemeProps, 'colors'> & { colors?: CustomThemeProps }
The keyof operator allows you to capture all the keys of a type. This feature is very useful for creating union types from an existing variable or type.
Here's an example of using keyof to define a PersonKeys type with all property keys from a Person type:
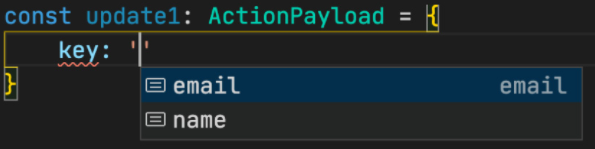
 interface SignupFormState {
  email: string;
  name: string;
}
interface ActionPayload {
  key: keyof SignupFormState;
  value: string;
}
When you begin declaring a variable with the keyof union type, your code editor (such as VSCode) will automatically complete the type for you, listing all available property keys for that type.
Here's an example to define a personKey variable with the PersonKeys type:
In TypeScript, if two types have the same structure (the same property names), they are considered compatible. Sometimes you may want to override this behavior and only allow certain specific types. This is what a nominal typing system allows you to do. Brand is a unique property that you can attach to a type to mark it as special:
type NominalTyped<Type, Brand> = Type & { __type: Brand };
Sure, here's an example use case:
 type Point2d = { x: number; y: number };
function distance1(first: Point2d, second: Point2d>) {
  return Math.sqrt(
     Math.pow(first.x - second.x, 2) + Math.pow(first.y –
       second.y, 2)
  );
}
You can call this function by providing an object with the same structure even if its type is not Point2d:
distance1({x: 1, y: 2}, {x: 3, y: 4})
You need to modify the function signature as follows to enforce the type:
function distance2(first: NominalTyped<Point2d, "Point2d">, second: NominalTyped<Point2d, "Point2d">)
The unique symbol is an additional method for emulating nominal typing in JavaScript. It can be used in class declarations, as shown in the following example:
 class User {
     readonly private static __type: unique symbol =
      Symbol();
     name: string;
     constructor(name: string) {
           this.name = name;
     }
}
type Account {
     name: string
}
function printUserName(o: User) {
     console.log(o.name);
}
printAccountName(new User("Theo"))
// printAccountName({name: "Alex"}) // fail to typecheck
Using unique symbols allows you to mark a type as a unique brand. This is useful for limiting acceptable types by a function, as is the case with printUserName which only accepts objects of type User.
When the type passed to this function has the same structure as an object of type Box, its value property is extracted to check its type. If the extracted type matches the expected type, then the parameter is considered to be of type Box. If the extracted type is E, the extracted type is returned. Otherwise, the type A is returned as-is.
 interface Box<T> {
  value: T
}
type UnpackBox<A> = A extends Box<infer E> ? E : A
The infer operator is used to infer a generic type from another type in TypeScript. In the case where a type is defined in A, we check if that type extends the Box type by using the extends operator.
 type intStash = UnpackBox<{value: 10}> // type is number
type stringStash = UnpackBox<{value: "123"}> // type is string
type booleanStash = UnpackBox<true> // type is boolean
Using advanced typing concepts in TypeScript allows you to generate sophisticated types that more accurately model domain objects that you want to use in your application. Ultimately, producing these types is beneficial to take advantage of the compilation process which can detect errors such as bad assignments or invalid operations as early as the compilation phase. This helps reduce the time and effort needed to debug code, as well as improve the quality and robustness of the application.
Creational Design Patterns
When declaring interfaces and classes in TypeScript, the compiler takes that information and uses it during type checks or other assertions at runtime. At runtime, when the browser or server evaluates the code, it creates and manages those objects throughout the lifecycle of the application. Other times, you may create objects on-the-fly using an object descriptor. Both approaches deal with creating objects and, specifically, how to instantiate an object type and store it somewhere:
- Creating an object of a specific type or for a specific purpose: You want to create an object occasionally when the application is running, but you want to keep a consistent and easy-to-use way of creating instances of those objects. Occasionally, you want to control the parameters to use, the category of objects to create, or how to reuse certain features and clone objects based on existing ones.
- Managing the object lifecycle: You want to control the number of existing object instances and where they are stored. You also want to be able to safely destroy those instances when they are no longer needed.
By separating the object creation process from its concrete implementation, you get a decoupled system. By using analogous method interfaces that describe the types of objects you create instead of how to create them, you can provide different implementors at runtime without changing the overall algorithm or conditional logic. Keeping object references at runtime can become problematic if you manage them at a microscopic level or let them drift as references. So you want a simple abstraction you can use to lease these objects on demand.
Singleton Pattern
The term Singleton describes something that has only one presence in the program. You use it when you want to get only one object instead of multiple different objects for multiple reasons. For example, you might want to keep only one instance of a particular class simply because its creation is expensive or it doesn't make sense to keep several throughout the program's lifetime.
Characteristics
- Global access point: one and only one point of access to the object instance.
- Instance is cached somewhere: you store it in a class instance as a static variable, but it can also be stored in an Inversion of Control (IoC) container.
- Instance is created on demand: The instance isn't created when it's declared, it's created on a first in, first out (FIFO) basis.
- Unique instance per class: the instance is unique per class in the sense that different classes have their own Singletons.
Use Cases
Singleton is used to control access to external resources such as database connections, API endpoints, or file systems. This means you don't want two or more objects containing references to these resources without some kind of coordination. Imagine if 100 different objects tried to open and modify the same file or database connection. This would create multiple problems with the file itself because one object might see different things than another, and if they both try to modify the file, the operating system will be invoked to make the final decision. Singleton ensures that there is only one instance of an object that handles these external resources, which allows access to be coordinated and ensures that all changes are consistent.
Implementation
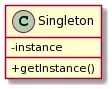
Firstly, to implement the singleton pattern, you need to prevent the construction of new instances of the class by making the constructor "private":
 export class Singleton {
  // Prevents creation of new instances
  private constructor() {}
}
You want to prevent the construction of new objects mainly to avoid errors and ensure that there is only one instance of the singleton object. Indeed, you need to protect yourself against manually creating singleton objects by design so that no valid operation creates more than one instance at runtime.
Next, to cache the global instance of the Singleton, you can use a static variable. This variable is specific to the class and not to the instance of the class. This means that the runtime will ensure that only one instance of the variable is reserved for each class.
 export class Singleton {
  // Stores the singleton instance
  private static instance: Singleton;
  // Prevents creation of new instances
  private constructor() {}
}
The cached instance is reserved for a single one per class, and it's private to prevent it from being retrieved outside the class. To access this instance from within the class, you can create a static method that returns this instance. This method must be public so that clients of the class can access it. This method can be called "getInstance", "get", or something similar. It must also be static so that you don't need to instantiate the class to access it.
 export class UsersAPISingleton {
  private static instance: UsersAPISingleton;
  private constructor() {}
  static getInstance() {
     if (!UsersAPISingleton.instance) {
        UsersAPISingleton.instance = new UsersAPISingleton();
     }
     return UsersAPISingleton.instance;
  }
  getUsers(): Promise<any> {
     return Promise.resolve(["Alex", "John", "Sarah"]);
  }
}
const usersPromise = UsersAPISingleton.getInstance().getUsers();
usersPromise.then((res) => {
  console.log(res);
});
Note that we are lazily creating the instance, not when the class is discovered at runtime. This allows you to avoid any side effects of instantiation, such as increased memory usage or calling external services. If this is not strictly required, you can eagerly create the instance upfront. The previous implementation represents the minimal algorithmic steps that you should include in every class that is a Singleton.
Additionally, you can leverage some language and environment features to get the Singleton behavior for free. Let's explore some alternative implementations in the following sections.
Using module resolution singletons: Instead of creating your own Singleton implementation and caching this instance within the class, you can leverage the module system loading mechanism. You simply create a class that has a single instance and export it. When the module is first loaded, the class is instantiated and stored in memory. When you import this module in other parts of your code, you always get the same instance. For example:
 class ApiServiceSingleton {}

export default new ApiServiceSingleton();
Using the Node.js module system allows exporting a default variable that points to an instance of ApiServiceSingleton to control Singletons. However, this seems like cheating as you essentially delegate control of the Singleton to the module system and you won't have the ability to modify that instance unless you mock the entire module instead.
Furthermore, it is important to understand the caveats of the Node.js module system as it caches modules based on the absolute required path of that module. As long as we import this file and it matches the same absolute path, the module system will use the same cached instance. This may not be the case if your code resides in node_modules.
Another alternative to control Singletons is to use an IoC (Inversion of Control) container. Inversify.js is a popular IoC container that allows leveraging its capabilities to resolve Singletons. With Inversify.js, you can declare your Singleton class by using a special "@singleton()" annotation on the class. Then, you can use the Inversify container to resolve the Singleton instance wherever you need it.
 import "reflect-metadata";
import { injectable, Container } from "inversify";
interface UsersApiService {
  getUsers(): Promise<string[]>;
}

let TYPES = {
  UsersApiService: Symbol("UsersApiService"),
};

@injectable()
class UsersApiServiceImpl implements UsersApiService {
  getUsers(): Promise<string[]> {
     return Promise.resolve(["Alex", "John", "Sarah"]);
  }
}
const container = new Container();
container
  .bind<UsersApiService>(TYPES.UsersApiService)
  .to(UsersApiServiceImpl)
  .inSingletonScope();

container
  .get<UsersApiService>(TYPES.UsersApiService)
  .getUsers()
  .then((res) => console.log(res));
Whenever you ask the container to resolve the TYPES.UsersApiService binding, it will return the same instance of UsersApiServiceImpl. The use of IoC containers can be considered an intermediate approach when implementing the Singleton pattern, as they are flexible, easy to test, and well abstracted.
Variation
One limitation of the Singleton pattern is that you cannot pass initialization parameters during the first object instantiation. If you were to do so, it would mean you need to create different objects each time.
One solution is to use the parametric Singleton pattern, where you cache multiple instances by a key. So when you pass two different parameters, it should return a different object, and passing the same parameters will return the same object:
 UsersAPISingleton.getInstance('/v1/users') === UsersAPISingleton.getInstance('/v1/users')
UsersAPISingleton.getInstance('/v1/users') !== UsersAPISingleton.getInstance('/v2/users')
export class ParametricSingleton {
  private param: string;
  // Stores the singletons instances
  private static instances: Map<string,
     ParametricSingleton>;
  // Prevents creation of new instances
  private constructor(param: string) {
     this.param = param;
  }
  // Method to retrieve instance
  static getInstance(param: string) {
     if (!ParametricSingleton.instances.has(param)) {
        ParametricSingleton.instances.set(param,
         new ParametricSingleton(param));
     }
     return ParametricSingleton.instances.get(param);
  }
}
The previous solution works effectively with few base parameters, but you will need to create your own scheme to create unique keys corresponding to each Singleton object.
| Global instance pollution | Not very testable | Hard to get |
|---|---|---|
| Singletons are used like a global variable, and many developers. Using global variables means ignoring any flexibility you can get from interfaces or other abstractions. This is perfectly valid, so if you decide to use Singletons, they should be treated like global static objects that perform a very specific and tightly-coupled job. | In addition to testing Singleton principles, if you want to test the behavior of the object, you will have to overcome some restrictions. | The Singleton is hard to implement, especially if you plan for testability and lazy initialization, and want to use it like a global variable. |
🔹 Prototype Pattern A prototype is a kind of object that takes its initial state and properties from existing objects. The main idea is to avoid manually creating an object and assigning properties to it from another object. Instead of creating a new object by calling the new operator, you take a divergent path. You build objects that adhere to the Prototype interface, which has only one method, clone(). When called, it will clone the existing instance of the object and its internal properties. You can avoid duplicating the logic of creating a new object and assigning common features.
When to use it?
- You have a bunch of objects and want to clone them at runtime: you have already created objects and kept references to them at runtime, and you want to quickly get identical copies without going back to the Factory method and assigning properties again.
- You want to avoid using the new operator directly: you want to avoid using the new operator as it can lead to additional overhead.
Implementation Here's the interface of the prototype type:

You want to avoid using the new operator directly as it can lead to additional overhead:
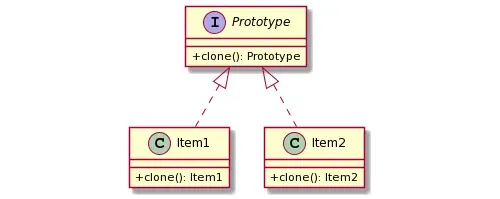
Now, clients will use and see only Prototype interfaces instead of the actual objects. This will allow them to call the clone method to return a copy of these objects. We follow the previous diagram to implement this pattern:
 interface HeroPrototype {
  clone(): HeroPrototype;
}
Next, you want to implement at least two Herotypes of this interface:
 class Wizard implements HeroPrototype {
  private spells: string[];
  private health: number;
  constructor(private name: string) {
     this.spells = [];
     this.health = 100;
  }

  clone(): Wizard {
     const cloned = Object.create(Wizard.prototype || null);
     Object.getOwnPropertyNames(this).map((key: string) => {
        if (key === "name") {
           cloned[key] = "Unknown";
        } else {
           cloned[key] = this[key];
        }
     });

     return cloned;
  }
}
class Warrior implements HeroPrototype {
  private weapon: string;
  private health: number;
  constructor(private name: string) {
     this.weapon = "Dagger";
     this.health = 150;
  }
  clone(): Warrior {
     const cloned = Object.create(Warrior.prototype ||
       null);
     Object.getOwnPropertyNames(this).map((key: string) => {
        if (key === "weapon") {
           cloned[key] = "Bare Hands";
        } else {
           cloned[key] = this[key];
        }
     });

     return cloned;
  }
}
Here's an example code for cloning an object using the Prototype pattern:
 let wiz: HeroPrototype = new Wizard("Theo");
let war: HeroPrototype = new Warrior("Mike");
console.debug(wiz.clone()); // Wizard { name: 'Unknown', spells: [], health: 100 }
console.debug(war.clone()); // Warrior { name: 'Mike', weapon: 'Bare Hands', health: 150 }
Sometimes, you may want to ignore certain properties such as IDs or unique fields when cloning, as you may have unique requirements.
Critique of the Pattern
When relying only on the Prototype interface, you may need to downcast the object to the right instance type because no other fields are accessible.
In addition, creating your own clone method for each object that implements this interface is tedious. If you decide to provide a basic clone method and then use inheritance for all subclasses, you are fundamentally contradicting yourself. You specifically tried to avoid using inheritance when creating new objects, but now you are using it for this method.
Builder Pattern
Builder is a creational design pattern that you can use to manage the step-by-step construction of objects that might have multiple possible representations. Very often, you create objects that take more than two or three parameters, and many of these parameters are not known in advance. They are, however, necessary to initialize the object with the correct state. We can have complex objects for various reasons. For example, the business domain may want to attach several coherent attributes to objects for easier access. In other cases, we want to have a conceptual class model such as User or SearchQuery or HTTPRequest. At first, you can have only one implementation of the class, but when you want to create multiple ones, you end up with duplicated code.
When to use it?
- A common set of steps to create an object: you want to provide an interface with common steps to create an object that is not tied to any implementation. These steps must be independent and must always return a usable object when requested.
- Multiple representations: You may have multiple representations of an object, perhaps as variants or subclass type. If you don't anticipate or need to have more than one representation in the future, then this pattern will seem over-designed and unnecessary.
For all the above reasons, you should consider using the Builder pattern as it will allow you to have an interface with common steps to create complex objects and the flexibility to provide multiple targets on demand. If you answer no to any of these questions, you probably don't need to use the Builder pattern yet. You will want to see how any additional requirements affect the model's fields over time and check again if you need to refactor the model using this pattern.
Implementation
The Product class may have its own setter or getter methods, but it's important to note that it can contain several optional parameters.

You need the interface that breaks down the steps of creating this Product class into a reusable format:

Once you have these two pieces, you'll also need a concrete builder to create the first type of representation:
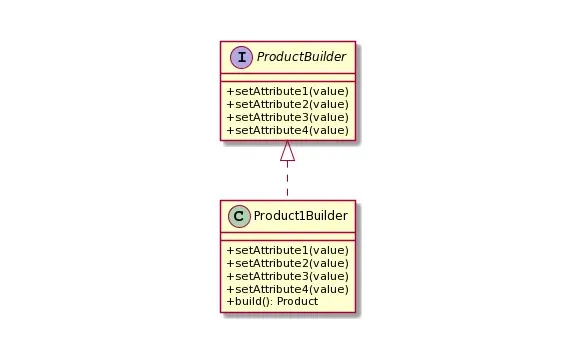
The key here is the build() method. When called from this class, it will return a Product type with the attributes we defined earlier. You can accept the Builder interface as a parameter or as a private variable:

First, we have a Product type. For convenience, we can use a real-world example with websites. We want to have a Builder that creates Website objects. We can have many different parameters for a website where their representations change depending on their type. However, you can rely on some generic steps to create a Website model.
Let's start with the website product as we described it:
 class Website {
  constructor(
     public name?: string,
     public host?: string,
     public port?: number,
     public isPremium?: boolean
  ) {}
}
You will need to create the Builder interface to provide a list of allowed web site creation methods with the build method:
 interface WebsiteBuilder {
  setName(name: string): WebsiteBuilder;
  setHost(host: string): WebsiteBuilder;
  setPort(port: number): WebsiteBuilder;  setIsPremium
    (isPremium: boolean): WebsiteBuilder;
  build(): Website;
}
Finally, you will need a concrete builder that creates a special representation of a Website model.
 class PremiumWebsiteBuilder implements WebsiteBuilder {
  constructor(private website: Website) {
     this.clear();
  }
  setName(name: string): WebsiteBuilder {
     this.website.name = name;
     return this;
  }
  setHost(host: string): WebsiteBuilder {
     this.website.host = host;
     return this;
  }
  setPort(port: number): WebsiteBuilder {
     this.website.port = port;
     return this;
  }  setIsPremium(): WebsiteBuilder {
     this.website.isPremium = true;
     return this;
  }
  build(): Website {
     const website = this.website;
     this.clear();
     return website;
  }

  clear(): void {
     this.website = new Website();
     this.website.isPremium = true;
  }
}
We have provided a specialized representation of a premium website model as indicated by the isPremium property. We have highlighted the code that prepopulates this property whenever you create an instance of the Website model. Here's an example call:
 const wb = new PremiumWebsiteBuilder();
wb.setName("example").setHost("localhost").setPort(3000);
const website = wb.build();
Some modern implementations of this model, using TypeScript, attempt to provide a reusable implementation that utilizes ES6 proxies and Object.assign. This is mainly to avoid manually repeating and providing setter methods for all Product properties.
 export type Builder<T> = {
  [k in keyof T]-?: (arg: T[k]) => Builder<T>;
} & {
  build(): T;
};
export function ModelBuilder<T>(): Builder<T> {
  const built: Record<string, unknown> = {};
  const builder = new Proxy(
     {},
     {
        get(target, prop) {
           if ("build" === prop) {
              return () => built;
           }

           return (x: unknown): unknown => {
              built[prop.toString()] = x;
              return builder;
           };
        },
     }
  );

  return builder as Builder<T>;
}
interface User {
  id: number;
  name: string;
  email: string;
}
const user = ModelBuilder<User>()
  .id(1)
  .name("Theo")
  .email("theo@example.com")
  .build();
console.debug(user);
In the previous code block, we highlighted the use of the Proxy class that delegates method calls and performs assignments. If the message sent is build, then it returns the object, otherwise it assigns the property to the object. This works for simple assignments, but if you want something more advanced, like adding or removing items from a list, you will end up back at square one. In general, you should stick to these abstractions only for simple cases.
Critiques:
- One concrete builder for each representation: To create different representations, you will have to write and maintain separate builders. This can become a maintenance problem if you create builders that differ only by a single property. It's better to provide a general builder for most cases and use a director to create complex objects or wait until you need to model a new concrete builder for special objects requiring a different approach.
- Avoid side effects: You will need to avoid side effects when creating objects such as network requests or ones that require access to the operating system. All calls should perform atomic mutable or immutable modifications.
- Can be simplified: Sometimes you can create objects in TypeScript by abstracting away certain parts using a function instead of using these excessive
Builderinterfaces and setter methods. If you decide to use a function, make sure it is properly documented.
Factory Pattern
This pattern deals with object creation and especially with delegating object creation using subclasses. The objects you want to create typically share a common characteristic; they are of the same nature or type, or they fit into a hierarchy. You use an interface with a distinct create method, then provide concrete classes that implement this factory and build objects of a particular subclass. Then this factory interface can be used where you have hard-coded types in parameters or variables.
A factory object is an abstraction responsible for object creation. How it creates them is the main differentiator. When you have multiple types of objects that inherit from a similar class or have a similar role, you may find that passing each type as a parameter is tedious. You will have to create all these different versions of functions or methods to handle these various types.
So instead of considering using the new operator to create these objects manually, we define a Factory method called create that accepts either an interface or a type describing what you want to create. This Factory method will extract all the internal details of creating the right object and return it for you. Using the Factory method assumes you want to avoid the traditional method of object creation and instead describe what you want to create.
When to use the Factory Method?
When you have a list of various objects with a parent-child relationship, such as Element, HTMLElement, HTMLSpanElement, etc., it's not ideal to generally create them using the new operator. You want a description of the elements you want to create, and the factory will create them for you.
Sometimes instead of passing a description and letting the factory create the object in question, you want to have a specialized factory to build that object. This way, you can use an interface for that factory and pass relevant Method Factory objects. At runtime, when you implement that interface, using polymorphism, it will call the correct Factory method. In any case, you get the same result.
Implementation
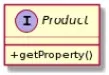
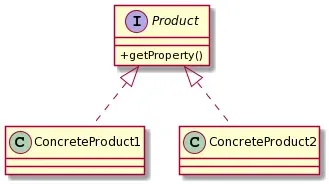
To start, you have the Product interface that describes the public methods of the concrete products:
Next, you have one or more concrete implementations of this interface in which you want to specialize:
On the other side, we also have a pair of Factory interfaces and concrete factory objects that represent the creation of new Product instances:
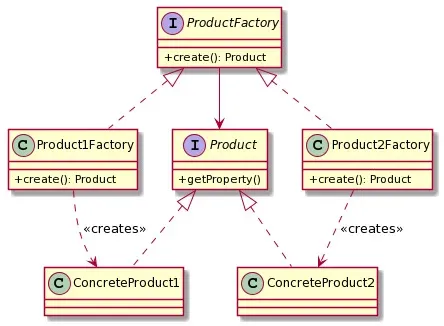
Looking at the previous diagram, it makes sense to use this pattern when you have at least two or more types of products that you want to create. It's relatively easy to implement the previous class diagram in TypeScript.
 interface Weapon {
  getName(): string;
  getDamage(): number;
  getRange(): number;
}
You want to have two kinds of weapons: LongSword and LongBow.
 class LongSword implements Weapon {
  getName(): string {
     return "LongSword";
  }
  getDamage(): number {
     return 10;
  }
  getRange(): number {
     return 2;
  }
}
class LongBow implements Weapon {
  getName(): string {
     return "LongBow";
  }
  getDamage(): number {
     return 8;
  }
  getRange(): number {
     return 16;
  }
}
En général, les modèles d'une application sont décrits de cette manière. Vous cherchez à éviter l'utilisation de l'opérateur "new" pour créer ces modèles, et préférez plutôt définir une "factory" pour chacune des armes :
 interface WeaponFactory {
  create(): Weapon;
}
class LongSwordFactory implements WeaponFactory {
  create(): Weapon {
     return new LongSword();
  }
}
class LongBowFactory implements WeaponFactory {
  create(): Weapon {
     return new LongBow();
  }
}
Using the Factory Method, you instantiate the objects only once during the lifetime of the program, and then you can reuse them every time you need a WeaponFactory interface.
 const lbf = new LongBowFactory();
const lsf = new LongSwordFactory();
const factories: WeaponFactory[] = [lbf, lsf, lbf];
factories.forEach((f: WeaponFactory) => {
  console.debug(f.create());
});
// Prints
LongBow {}
LongSword {}
LongBow {}