English
Introduction:
Before introducing OAuth 2.0 and OpenID Connect, it is important to clarify the concepts of authentication and authorization. Authentication allows identifying a user by validating their credentials such as a username and password. Authorization allows granting access to specific parts of an API to an authenticated user.
OAuth 2.0 is a widely accepted open authorization standard that allows a user to give consent for a third-party client application to access protected resources on their behalf. Authorization delegation is the act of giving the right to a third-party client application to act on behalf of the user by calling a protected API.
Key Concepts:
- Resource owner: the end user.
- Client: the third-party client application that wants to call protected APIs on behalf of the end user.
- Resource server: the server that exposes the APIs to protect.
- Authorization server: the server that issues tokens to the client once the end user has been authenticated. User authentication is typically delegated to an identity provider.
Example: To grant access to protected APIs on behalf of the user, an access token is issued by the authorization server for the client application to act on behalf of the user without having to share their credentials. Access tokens represent a limited set of access rights that expire over time. A refresh token may also be issued to obtain new access tokens without involving the user.
Authorization Grant Flows: The OAuth 2.0 specification defines four authorization grant flows for issuing access tokens. The authorization code grant flow is the most secure but also the most complex. It requires the user to interact with the authorization server using a web browser to authenticate and give consent to the client application.
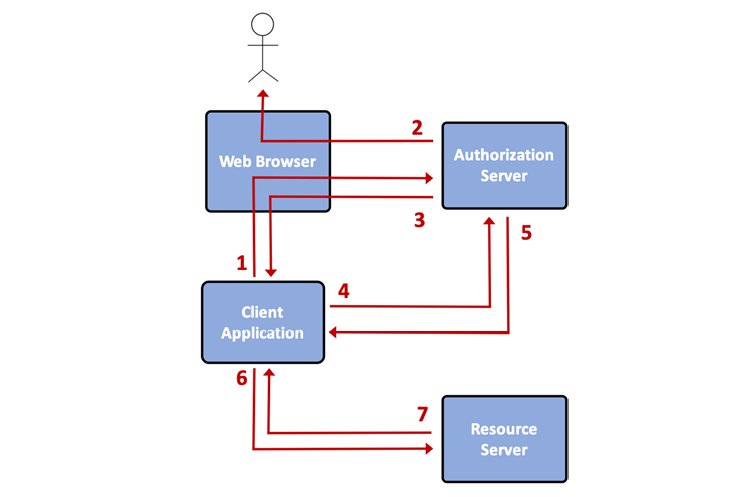
Authorization Code Grant Flow:
- The client (the third-party client application) sends the user to the authorization server in the web browser.
- The authorization server authenticates the user and requests their consent.
- The authorization server redirects the user back to the client application with an authorization code that can only be used once and for a short period.
- The client application exchanges the authorization code for an access token from the authorization server using its client ID and client secret. The client secret must be protected because it is sensitive.
- The authorization server issues an access token and optionally a refresh token.
- The client application can send a request to the protected API with the access token to access resources.
- The resource server validates the access token and serves the request upon successful validation. Steps 6 and 7 can be repeated as long as the access token is valid. When the access token lifetime has expired, the client can use its refresh token to obtain a new access token.
Other Authorization Grant Flows:
- Implicit grant flow: for client applications that cannot protect a client secret, the browser directly retrieves an access token from the authorization server. This flow does not allow requesting a refresh token.
- Resource owner password credentials grant flow: when the user needs to share their credentials with the client application to acquire an access token.
- Client credentials grant flow: for client applications that have no relationship with a specific user and use their own client ID and client secret to obtain an access token.
The complete OAuth 2.0 specification is available at https://tools.ietf.org/html/rfc6749. Other specifications detail various aspects of OAuth 2.0.
OAuth 2.1 is a consolidated and improved version of OAuth 2.0. The most significant improvements are the integration of PKCE into the authorization code grant flow, the deprecation of the implicit grant flow and the resource owner password credentials grant flow. Only the authorization code grant flow and the client credentials grant flow will be used in this chapter. The preliminary OAuth 2.1 specification is available at https://tools.ietf.org/html/draft-ietf-oauth-v2-1-01.
OpenID Connect
Here is an introduction to OAuth 2.0 and OpenID Connect, two important security standards used in modern computer systems.
OAuth 2.0 allows a user to give a third-party application the right to access protected resources on their behalf, without having to share their credentials with the application. Access tokens are issued by an authorization server and allow the application to act on behalf of the user by calling protected APIs. There are several authorization grant flows, such as the authorization code grant flow and the client credentials grant flow.
OpenID Connect is an add-on module to OAuth 2.0 that allows client applications to verify the identity of users using an identity token encoded as a JWT. Identity tokens are digitally signed and can contain information such as the user's identifier and email address.
OIDC also defines standardized endpoints for discovering URLs and obtaining public keys to verify digitally signed JWTs. A user info endpoint also allows obtaining additional information about the authenticated user.
OAuth 2.0 and OpenID Connect are two important security standards that help secure modern computer systems by authorizing access to protected resources and verifying the identity of users.
System Security
The system landscape will look like the following:
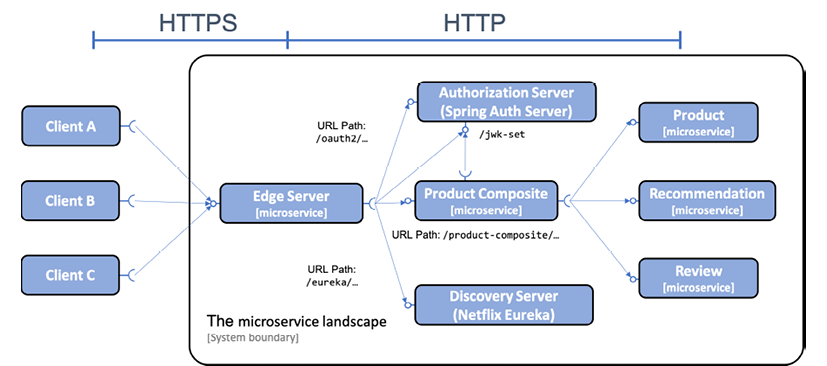
Based on the above diagram, we can observe that:
- HTTPS is used for external communications, while plain-text HTTP is used for internal communications within the system landscape.
- The local OAuth 2.0 authorization server will be accessible from the outside through the edge server.
- The edge server and the product-composite microservice will validate access tokens as signed JWTs.
- The edge server and the product-composite microservice will obtain the public keys of the authorization server from its jwk-set discovery point and use them to validate the signature of JWT-based access tokens.
- With this overview of the system landscape security, let's start by seeing how to protect external communications against interceptions using HTTPS.
Protecting external communications with HTTPS
In this section, we will learn how to prevent covert interception of external communications, such as those from the Internet, via the public APIs exposed by the edge server. For this, we will use HTTPS to encrypt communication. The steps to follow are as follows:
- Create a certificate: we will create our own self-signed certificate which will be sufficient for development purposes.
- Configure the edge server: it must be configured to only accept external HTTPS-based traffic using the certificate.
Here's the command to use to create a self-signed certificate:
keytool -genkeypair -alias localhost -keyalg RSA -keysize 2048 -storetype PKCS12 -keystore edge.p12 -validity 3650
To configure the edge server, the following elements are added to application.yml in the gateway project:
 server.port: 8443

server.ssl:
 key-store-type: PKCS12
 key-store: classpath:keystore/edge.p12
 key-store-password: password
 key-alias: localhost
The path to the certificate is specified in the server.ssl.key-store parameter and set to classpath:keystore/edge.p12. This means that the certificate will be retrieved from the classpath from the location keystore/edge.p12.
The password for the certificate is specified in the server.ssl.key-store-password parameter.
To indicate that the Edge server uses HTTPS instead of HTTP, we also change the port from 8080 to 8443 in the server.port parameter.
In addition to these changes in the Edge server, modifications must also be made to the following files to reflect the port and protocol changes, replacing HTTP with HTTPS and 8080 with 8443 in the docker-compose files.
Replacing a self-signed certificate at runtime
Including a self-signed certificate in the .jar file is only useful for development. For test and production environments, it is necessary to use certificates issued by trusted certification authorities.
It is also important to be able to specify the certificates to use during runtime without having to rebuild the .jar files or the Docker image. When Docker is used, we can map a volume in the Docker container to a certificate located on the Docker host. We can also configure environment variables for the Docker container that point to the external certificate in the Docker volume.
To replace the certificate packaged in the .jar file, follow these steps:
- Create a second certificate and set the password to "testtest" when prompted:
 mkdir keystore
keytool -genkeypair -alias localhost -keyalg RSA -keysize 2048 -storetype PKCS12 -keystore keystore/edge-test.p12 -validity 3650
- Update the Docker Compose file,
docker-compose.yml, with environment variables for the location and password of the new certificate, as well as a mapped volume to the folder where the new certificate is placed. The configuration for the Edge server will look like this after the modifications:
 gateway:
  environment:
    - SPRING_PROFILES_ACTIVE=docker
    - SERVER_SSL_KEY_STORE=file:/keystore/edge-test.p12
    - SERVER_SSL_KEY_STORE_PASSWORD=testtest
  volumes:
    - $PWD/keystore:/keystore
  build: spring-cloud/gateway
  mem_limit: 512m
  ports:
    - "8443:8443"
- If the Edge server is currently running, it must be restarted with the following commands:
 docker-compose up -d --scale gateway=0
docker-compose up -d --scale gateway=1
This concludes the section on securing external communications with HTTPS. In the next section, we will learn how to secure access to the discovery server, Netflix Eureka, using HTTP Basic authentication.
Adding a local authorization server
In order to be able to run fully automated local tests with secured APIs using OAuth 2.0 and OpenID Connect, we will add an authorization server compliant with these specifications to our system landscape. Unfortunately, Spring Security does not provide a ready-to-use authorization server. However, in April 2020, a community-led project led by the Spring Security team called Spring Authorization Server was announced with the aim of providing an authorization server. For more information, please refer to the following link: https://spring.io/blog/2020/04/15/announcing-the-spring-authorization-server.
The Spring authorization server supports the use of the OpenID Connect discovery endpoint and digital signature of access tokens. It also provides an endpoint accessible using discovery information to obtain keys for verifying the digital signature of a token. With support for these features, it can be used as an authorization server in local and automated tests that verify that the system landscape is functioning as intended.
The authorization server in this book is based on the authorization server example provided by the Spring Authorization Server project. The following modifications have been made to the example project:
- The build file has been updated to follow the build file structure of the other projects in this book.
- The port has been set to 9999.
- A Dockerfile has been added with the same structure as for the other projects in this book.
- The authorization server has been integrated with Eureka for service discovery in the same way as the other projects in this book.
- Public access has been added to the actuator endpoints.
To integrate the authorization server into the system infrastructure, modifications have been made to the following files:
- The server has been added to the common build file,
settings.gradle. - The server has been added to all three Docker Compose files,
docker-compose*.yml. - The Edge server,
spring-cloud/gateway:- A health check for the authorization server has been added in
HealthCheckConfiguration. - Routes to the authorization server for URIs starting with
/oauth,/login, and/errorhave been added in theapplication.ymlconfiguration file. These URIs are used to issue tokens for clients, authenticate users, and display error messages. - Since these three URIs need to be unprotected by the Edge server, they are configured in the new
SecurityConfigclass to allow all requests.
- A health check for the authorization server has been added in
Now that the authorization server has been added to the system landscape, let's move on to the next section and see how to use OAuth 2.0 and OpenID Connect to authenticate and authorize access to APIs.
Securing APIs using OAuth 2.0 and OpenID Connect
Now that the authorization server is in place, we can enhance the peripheral server and the product-composite service to become OAuth 2.0 resource servers, so that they require a valid access token to authorize access. The peripheral server will be configured to accept any access token that it can validate using the digital signature provided by the authorization server. The product-composite service will also require that the access token contain valid OAuth 2.0 scope fields:
- The
product:readscope field will be required to access read-only APIs. - The
product:writescope field will be required to access create and delete APIs.
The product-composite service will also be enhanced with a configuration that allows its Swagger UI component to interact with the authorization server to issue an access token. This will enable users of the Swagger UI web page to test the protected API.
The Spring Security dependencies must be added to the build.gradle file to support the OAuth 2.0 resource servers.
 implementation 'org.springframework.boot:spring-boot-starter-security'
implementation 'org.springframework.security:spring-security-oauth2-resource-server'
implementation 'org.springframework.security:spring-security-oauth2-jose'
Security configurations have been added to the new SecurityConfig classes in both projects:
 @EnableWebFluxSecurity
public class SecurityConfig {

  @Bean
  SecurityWebFilterChain springSecurityFilterChain(
      ServerHttpSecurity http) {
    http
      .authorizeExchange()
        .pathMatchers("/actuator/**").permitAll()
        .anyExchange().authenticated()
        .and()
      .oauth2ResourceServer()
        .jwt();
    return http.build();
  }
}
The explanations for the previous source code are as follows:
- The
@EnableWebFluxSecurityannotation enables Spring Security support for Spring WebFlux-based APIs. .anyExchange().authenticated()ensures that the user is authenticated before being authorized to access all other URLs, including unprotected Actuator endpoints. Therefore, care must be taken with exposed URLs without protection. For example, Actuator endpoints should be protected before going into production..oauth2ResourceServer().jwt()specifies that authorization will be based on OAuth 2.0 access tokens encoded as JWT.- The OIDC discovery endpoint of the authorization server has been registered in the
application.ymlconfiguration file:
 app.auth-server: localhost
spring.security.oauth2.resourceserver.jwt.issuer-uri: http://${app.auth-server}:9999
---

spring.config.activate.on-profile: docker
app.auth-server: auth-server
Modifications to the composite service
In addition to the common changes applied in the previous section, the following modifications have also been applied to the composite service:
- The security configuration in the
SecurityConfigclass has been refined by requiring OAuth 2.0 scope fields in the access token to authorize access:
 .pathMatchers(POST, "/product-composite/**")
  .hasAuthority("SCOPE_product:write")
.pathMatchers(DELETE, "/product-composite/**")
  .hasAuthority("SCOPE_product:write")
.pathMatchers(GET, "/product-composite/**")
  .hasAuthority("SCOPE_product:read")
A method, logAuthorizationInfo(), has been added to log relevant parts of the encoded JWT access token with each API call. The access token can be acquired using the Spring Security standard, SecurityContext, which in a reactive environment can be acquired using the static helper method, ReactiveSecurityContextHolder.getContext(). See the ProductCompositeServiceImpl class for more details.
The use of OAuth has been disabled when running Spring-based integration tests. To prevent the OAuth machinery from kicking in when we run integration tests, we disable it as follows:
- A security configuration,
TestSecurityConfig, is added to be used during tests. It allows access to all resources:
http.csrf().disable().authorizeExchange().anyExchange().permitAll();
In each Spring integration test class, we configure TestSecurityConfig to override the existing security configuration with the following:
@SpringBootTest(
classes = {TestSecurityConfig.class},
properties = {"spring.main.allow-bean-definition-
overriding=true"})