English
Introduction
Service discovery is an essential feature to enable a microservices landscape to work together in production. Netflix Eureka is the first discovery server supported by Spring Cloud.
However, using round-robin DNS to manage microservice instances is not a practical solution, as each instance would register its IP address under the same name in a DNS server, posing problems for managing volatile instances. A DNS client typically retains a functional IP address and does not take into account all available instances. Additionally, neither a typical DNS server implementation nor the DNS protocol are well-suited to managing microservice instances that come and go all the time.
To keep track of available microservice instances and account for their volatility, we need a more powerful discovery server. We need to consider the following points:
- New instances can start at any time.
- Existing instances can stop responding and potentially crash at any time.
- Some of the failing instances might be correct after some time and should start receiving traffic again, while others will not and should be removed from the service registry.
- Some microservice instances might take some time to start; i.e., just because they can receive HTTP requests does not mean that traffic should be routed to them.
- Involuntary network partitioning and other network-related errors can occur at any time.
This is why building a robust and resilient discovery server is a complex task. Netflix Eureka is a popular discovery server used with Spring Cloud that addresses these challenges.
Netflix Eureka in Spring Cloud
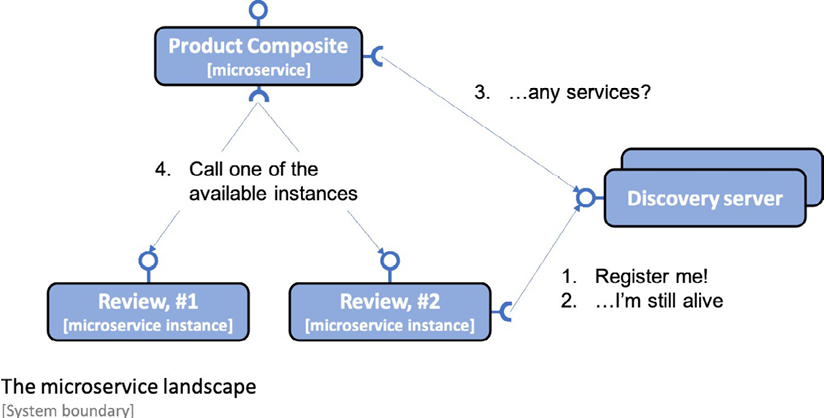
Eureka is a discovery client service that allows clients to communicate with the Netflix Eureka discovery server to obtain information about available microservice instances. Clients use a client library to regularly request information about available services, which is stored in the client library. When a client sends a request to another microservice, it chooses an available instance from its client library.
To facilitate the use of Netflix Eureka as a discovery service, Spring Cloud provides an abstraction called DiscoveryClient, which allows interacting with a discovery service to obtain information about available services and instances. The DiscoveryClient interface is capable of automatically registering a Spring Boot application with the discovery server.
Furthermore, Spring Cloud provides an interface called LoadBalancerClient for clients wishing to make requests via a load balancer to instances registered with the discovery service. The standard reactive HTTP client implementation, WebClient, can be configured to use the LoadBalancerClient implementation. By adding the @LoadBalanced annotation to a @Bean declaration that returns a WebClient.Builder object, a LoadBalancerClient implementation will be injected into the Builder instance as an ExchangeFilterFunction.
In summary, Spring Cloud makes it easy to use Netflix Eureka as a discovery service, providing abstractions such as DiscoveryClient and LoadBalancerClient to simplify interactions with the discovery service and allow clients to communicate with available microservice instances.
Configuring a Netflix Eureka Server
Configuring a Netflix Eureka server with Spring Cloud is straightforward. Just follow the following steps:
- Create a Spring Boot project using Spring Initializr.
- Add the spring-cloud-starter-netflix-eureka-server dependency.
- Add the @EnableEurekaServer annotation to the application class.
- Add a Dockerfile similar to those used for microservices, except that the default port for Eureka, 8761, is exposed rather than the default port for microservices, 8080.
- Add the Eureka server to your docker-compose file.
 eureka:
  build: spring-cloud/eureka-server
  mem_limit: 512m
  ports:
    - "8761:8761"
Now that we have set up a Netflix Eureka server to enable service discovery, we are ready to learn how to connect microservices to it.
Connecting Microservices
In this section, we will learn how to connect a microservice instance to a Netflix Eureka server. We will see how microservice instances register themselves with the Eureka server upon startup and how clients can use the Eureka server to find the microservice instances they want to call.
To register a microservice instance with the Eureka server, follow these steps:
- Add the "spring-cloud-starter-netflix-eureka-client" dependency in the build.gradle file:
Implementation 'org.springframework.cloud:spring-cloud-starter-netflix-eureka-client'
When running tests on a single microservice, it is preferable not to rely on the availability of the Eureka server. Therefore, we will disable the use of Netflix Eureka in all Spring Boot tests, i.e., JUnit tests annotated with @SpringBootTest. To do so, simply add the "eureka.client.enabled" property and set it to false, like this:
@SpringBootTest(webEnvironment=RANDOM_PORT, properties = {"eureka.client.enabled=false"})
There is a very important configuration property called "spring.application.name". This property allows giving each microservice a virtual hostname, which is used by the Eureka service to identify each microservice. Eureka clients will use this virtual hostname in the URLs used to make HTTP calls to the microservice.
To be able to search for available microservice instances via the Eureka server in the "product-composite" microservice, we also need to perform the following operations:
- Add a Spring bean in the main application class that creates a load balancer-aware WebClient-builder:
 @Bean
@LoadBalanced
public WebClient.Builder loadBalancedWebClientBuilder() {
    return WebClient.builder();
}
The WebClient bean can be used by the ProductCompositeIntegration integration class by injecting it into the constructor:
 private WebClient webClient;

@Autowired
public ProductCompositeIntegration(
  WebClient.Builder webClientBuilder,
  ...
) {
  this.webClient = webClientBuilder.build();
  ...
}
The constructor uses the injected builder to create the WebClient.
Once built, the WebClient is immutable. This means that it can be reused by concurrent requests without risking conflict.
Now it's time to get rid of the hard-coded code in the configuration of available microservices in application.yml:
 app:
  product-service:
    host: localhost
    port: 7001
  recommendation-service:
    host: localhost
    port: 7002
  review-service:
    host: localhost
    port: 7003
The corresponding code in the "ProductCompositeIntegration" integration class, which handled the hard-coded configuration, is simplified and replaced by a declaration of the base URLs to the main microservices APIs. Here is the corresponding code:
 private static final String PRODUCT_SERVICE_URL = "http://product";
private static final String RECOMMENDATION_SERVICE_URL = "http://recommendation";
private static final String REVIEW_SERVICE_URL = "http://review";
Now that we have seen how to connect microservice instances to a Netflix Eureka server, we can move on to configuring the Eureka server and the microservice instances that connect to it.
Configuration for Local Development
Now, we will address the trickiest part of configuring Netflix Eureka as a discovery service: setting up a working configuration for both the Eureka server and its clients, namely our microservice instances.
Netflix Eureka is a highly configurable discovery server that can be configured for a number of different use cases, and it provides robust, resilient, and fault-tolerant runtime features. However, this means that it has an almost overwhelming number of configuration options. Fortunately, Netflix Eureka comes with good default values for most of the configurable parameters, at least when it comes to using them in a production environment.
However, when it comes to using Netflix Eureka during development, the default values lead to long startup times. For example, it may take a long time before a client makes a successful initial call to a microservice instance registered with the Eureka server.
Using default configuration values can lead to up to two minutes of waiting time. This waiting time is added to the startup time of the Eureka service and microservices. The processes involved need to synchronize registration information with each other. The microservice instances need to register with the Eureka server and the client needs to collect information from the Eureka server. This communication is mainly based on heartbeats, which occur every 30 seconds by default. A few caches are also involved, which slows down the propagation of updates.
To minimize this waiting time, we will use a specific configuration that is useful during development. However, it is important to remember that default values should be used as a starting point for production use.
Let's start by learning what types of configuration parameters we need to know.
Eureka Configuration Parameters
There are 3 groups of parameters:
- Parameters for the Eureka server, prefixed with "eureka.server".
- Parameters for Eureka clients, prefixed with "eureka.client". These parameters are intended for clients that wish to communicate with an Eureka server.
- Parameters for Eureka instances, prefixed with "eureka.instance". These parameters are intended for microservice instances that wish to register with the Eureka server.
Configuring the Eureka Server
To configure the Eureka server for use in a development environment, the following configuration can be used:
 server:
  port: 8761

eureka:
  instance:
    hostname: localhost
  client:
    registerWithEureka: false
    fetchRegistry: false
    serviceUrl:
      defaultZone: http://${eureka.instance.hostname}:${server.port}/eureka/

  server:
    waitTimeInMsWhenSyncEmpty: 0
    response-cache-update-interval-ms: 5000
The first part of the configuration is for an Eureka instance and client, and is used to configure a standalone Eureka server. For more details, please refer to the Spring Cloud documentation. The last two parameters used for the Eureka server, "waitTimeInMsWhenSyncEmpty" and "response-cache-update-interval-ms", are used to minimize startup time.
Once the Eureka server is configured, we are ready to see how to configure the Eureka server clients, i.e., the microservice instances.
Configuring Clients on the Eureka Server
To be able to connect to the Eureka server, microservices have the following configuration:
 eureka:
  client:
    serviceUrl:
      defaultZone: http://localhost:8761/eureka/
    initialInstanceInfoReplicationIntervalSeconds: 5
    registryFetchIntervalSeconds: 5
  instance:
    leaseRenewalIntervalInSeconds: 5
    leaseExpirationDurationInSeconds: 5

---


spring.config.activate.on-profile: docker

eureka.client.serviceUrl.defaultZone: http://eureka:8761/eureka/
The "eureka.client.serviceUrl.defaultZone" parameter is used to find the Eureka server using the hostname "localhost" when running without Docker and the hostname "eureka" when running as Docker containers. The parameters are used to minimize startup time and the time it takes to unregister a stopped microservice instance.
Now everything is in place to test the discovery service using the Netflix Eureka server with our microservices.
Trying Out the Discovery Service
Now that everything is set up, we are ready to use Netflix Eureka.
First, we need to create the Docker images with the following commands:
./gradlew build && docker-compose build
Avec le paysage système opérationnel, nous pouvons commencer par tester comment augmenter le nombre d'instances pour l'un des microservices. Exécutez la commande suivante pour essayer de faire évoluer un service :
docker-compose up -d --scale review=3
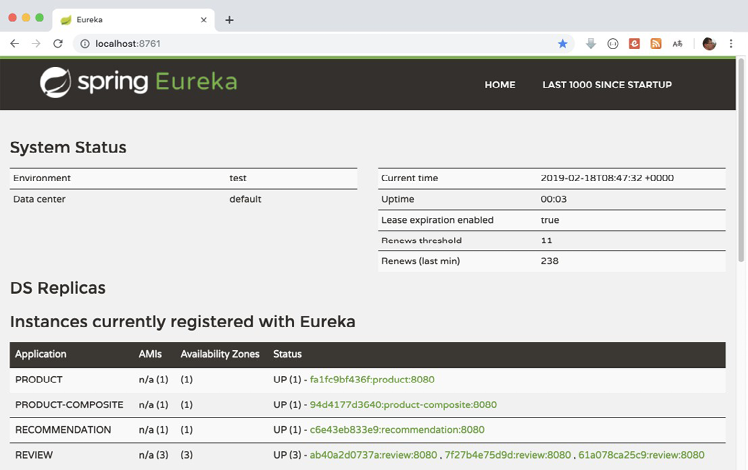
Once the new instances are up and running, go to http://localhost:8761/ and expect to see something like this:
One way to know when the new instances are up and running is to run this command:
docker-compose logs review | grep Started
Expect output that looks like this:

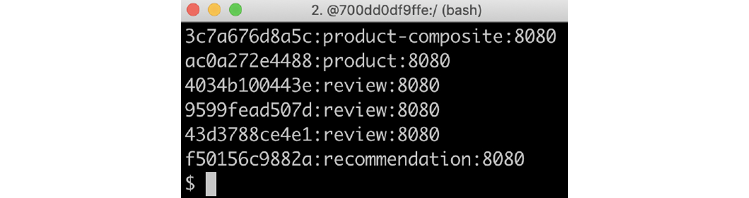
We can also use the REST API exposed by the Eureka service. To get a list of instance IDs, we can issue a curl command like this:
curl -H "accept:application/json" localhost:8761/eureka/apps -s | jq -r .applications.application[].instance[].instanceId
Expect a response like this:
Now that all instances are up and running, let's try client-side load balancing by making some requests and focusing on the service address in the responses, like so:
curl localhost:8080/product-composite/1 -s | jq -r .serviceAddresses.rev
Expect responses similar to these:

Notice that the service address changes in each response; the load balancer uses round-robin logic to call available instances, one at a time!
Disruptive Testing
To simulate a crash of the Eureka server, follow these steps:
- First, stop the Eureka server and keep the microservice instances running:
docker-compose up -d --scale review=2 --scale eureka=0
This will stop the Eureka server, but the microservice instances will continue to function because they have already read the information about the available instances before the Eureka server was stopped.
- Try making a request to a microservice instance:
curl localhost:8080/product-composite/1 -s | jq -r .serviceAddresses.rev
This should work because the information about the microservice instances has been cached locally by the client and does not require communication with the Eureka server to function. However, if a new microservice instance is added or an existing instance is terminated, the client will not be informed without the Eureka server, and calls to microservice instances that are no longer available will fail.
Here's how to simulate the crash of a microservice instance and add an additional instance of the product service:
Stopping an Instance
To further explore the effects of a failed Eureka server, let's also simulate the crash of a remaining microservice instance. Stop one of the two instances using the following command:
docker-compose up -d --scale review=1 --scale eureka=0
The client, i.e. the product-composite service, will not be notified that one of the review instances has disappeared since there is no Eureka server running. For this reason, it still thinks that there are two instances running. Every other call to the client will result in calling a review instance that no longer exists, causing the client's response to contain no information from the review service. The service address of the review service will be empty.
curl localhost:8080/product-composite/1 -s | jq -r .serviceAddresses.rev
This can be avoided, as described previously, by using resilience mechanisms such as timeouts and retries.
Starting an Additional Instance of the Product Service
As a final test of the effects of a failed Eureka server, let's see what happens if we start a new instance of the product microservice. Perform the following steps:
docker-compose up -d --scale review=1 --scale eureka=0 --scale product=2
Call the API several times and extract the address of the product service with the following command:
curl localhost:8080/product-composite/1 -s | jq -r .serviceAddresses.pro
Since no Eureka server is running, the client will not be informed about the new product instance, and thus all calls will go to the first instance.
Restarting the Eureka Server
To conclude the disruptive testing section, restart the Netflix Eureka server and see how the system landscape handles self-healing, i.e., resilience. Perform the following steps:
docker-compose up -d --scale review=1 --scale eureka=1 --scale product=2
Please execute the following call multiple times to extract the addresses of the product and service review:
curl localhost:8080/product-composite/1 -s | jq -r .serviceAddresses
Verify that the following events occur:
- All calls go to the remaining instance, demonstrating that the client has detected that the second instance has disappeared.
- Calls to the service are distributed over the two instances, demonstrating that the client has detected that there are two instances available.
The response should contain the same address for the remaining instance and two different addresses for the two instances.
Here's the translated response:
 {
  "rev": "",
  "pro": "192.168.128.7:8080"
}