English
Introduction
Many people claim to have a microservices-oriented architecture, but they often lack basic knowledge. Simply dividing an application into multiple services is not enough to create a microservices architecture, and it can even lead to misinterpretation.
In this article, we will focus on the fundamental concepts of microservices architecture, using NestJs. We will explore the microservices model and look at the API Gateway, which allows us to create an entry point to our microservices.
In traditional monolithic applications, API clients consume all functionalities from the same location. But with microservices architecture, the philosophy is different, and we need to create a separation between different services to avoid dependency and risks of failure.
Microservices
With Nest.js microservices, it is possible to extract a part of the business logic from our application and run it in a separate Nest.js context. However, contrary to what its name may suggest, this new Nest.js context does not run in a new thread or a new process, at least not by default. Therefore, if you use the default TCP transport, requests may take longer to complete.
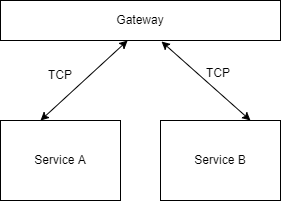
Despite this, there are benefits to offloading certain parts of your application into this new microservice context. In this article, we will focus on the TCP transport, but we will also explore concrete strategies for improving the performance of applications with Nest.js microservices.
Here is a diagram of what we will set up in this article:
To start, we will install the Nest.js CLI.
npm install -g @nestjs/cli
Let's create the first service
In a microservices-based architecture, there are multiple services that can be run on the same machine or on distributed machines. To start, let's create a new service by following these steps:
-
Create a new folder using the following command: mkdir back
-
Run the command nest new service-a to create a new Nest.js project with the dependency of your choice (npm, yarn, pnpm).
-
Delete the app.service.ts file as well as any dependencies that are not needed for this service.
-
Your file tree should now look like this:
 import { Controller, Get } from '@nestjs/common';

@Controller()
export class AppController {
  constructor() {}

  @Get()
  getHello(): string {
    return "Hello"
  }
}
For the module:
 // src/app.module.ts
import { Module } from "@nestjs/common";
import { AppController } from "./app.controller";

@Module({
  imports: [],
  controllers: [AppController],
  providers: []
})
export class AppModule {}
We will transform our service into a microservice using the TCP protocol. To do this, we need to install the @nestjs/microservices package using the command npm i --save @nestjs/microservices. Then, we need to update our main.ts file by adding createMicroservice and configuring our microservice with the necessary parameters.
To better understand the difference between HTTP and TCP, you can imagine that they are different languages. A traditional HTTP server speaks English, while a microservice using TCP speaks Spanish.
Structure:
- Let's use our command line: npm i --save @nestjs/microservices
- Let's update our main.ts file to add createMicroservice and configure our microservice with the necessary parameters.
 import { NestFactory } from "@nestjs/core";
import { Transport } from "@nestjs/microservices";
import { AppModule } from "./app.module";
import { Logger } from "@nestjs/common";

const logger = new Logger();

async function bootstrap() {
  const app = await NestFactory.createMicroservice(AppModule, {
    transport: Transport.TCP,
    options: {
      host: "127.0.0.1",
      port: 8888
    }
  });
  app.listen();
  logger.log("Microservice A is listening")
}
bootstrap();
Let's talk about configuring Nest.js. The createMicroservice function takes configuration parameters that depend on the transport we're using. A transport consists of a client and a server that work together to transmit microservice requests and responses between NestApplication and NestMicroservice contexts. Nest.js offers several built-in transports and allows for creating custom transports, with specific available parameters for each transport.
To configure the NestMicroservice context, we can specify the host with the "host" parameter, which defaults to localhost but can be changed if our NestMicroservice is running on a different host, such as a Kubernetes pod. The "port" parameter specifies the port on which the NestMicroservice context listens, with a default value of 3000, but we can use a different port if necessary. For the TCP transport, the "retryAttempts" and "retryDelay" parameters determine the number of reconnection attempts in case the server is disconnected, with a delay in milliseconds between each attempt.
By using the MessagePattern message model instead of the classic decorator, we can trigger a ping and receive a pong in response. To use this model, we need to update AppController.
 import { Controller } from "@nestjs/common";
import { MessagePattern } from "@nestjs/microservices";
import { of } from "rxjs";
import { delay } from "rxjs/operators";

@Controller()
export class AppController {
  @MessagePattern({ cmd: "ping" })
  ping(_: any) {
    return of("pong").pipe(delay(1000));
  }
}
Nest.js uses a message pattern to determine which microservice handler to execute. This pattern can be a simple string or a complex object. When a new microservice message is sent, Nest.js searches through all registered microservice handlers to find the handler that exactly matches the message pattern.
The microservice handler can execute the same business logic as a normal controller handler and can respond in a similar way. However, unlike a normal controller handler, it does not have an HTTP context, and decorators such as @Get, @Body, @Req do not make sense and should not be used in a microservice controller. To complete the processing of a message, the handler can simply return a value, a promise, or an RxJS Observable.
Gateway
We have a defined microservice, but the question is: how do we access it? We will create a new service that works as an HTTP server and maps our request to the appropriate microservice. We will propose a kind of proxy that:
- Composes requests
- Reduces bandwidth usage
How to do it?
- In the parent folder of our microservice: nest new api-gateway.
- Access the root folder of this created gateway: npm i --save @nestjs/microservices.
- Import our ServiceA created in the AppModule by registering it through the ClientModule.
 import { Module } from '@nestjs/common';
import { AppController } from './app.controller';
import { AppService } from './app.service';
import { ClientsModule, Transport } from "@nestjs/microservices";

@Module({
  imports: [
    ClientsModule.register([
      {
        name: "SERVICE_A",
        transport: Transport.TCP,
        options: {
          host: "127.0.0.1",
          port: 8888
        }
      }
    ])
  ],
  controllers: [AppController],
  providers: [AppService]
})
export class AppModule {}
We need to integrate this new service into the AppService by creating a method that will query ServiceA. This method will return the current time in milliseconds by sending a message to the service instance, then it will map this response to an object.
 import { Injectable, Inject } from "@nestjs/common";
import { ClientProxy } from "@nestjs/microservices";
import { map } from "rxjs/operators";

@Injectable()
export class AppService {
  constructor(
    @Inject("SERVICE_A") private readonly clientServiceA: ClientProxy
  ) {}

  pingServiceA() {
    const startTs = Date.now();
    const pattern = { cmd: "ping" };
    const payload = {};
    return this.clientServiceA
      .send<string>(pattern, payload)
      .pipe(
        map((message: string) => ({ message, duration: Date.now() - startTs }))
      );
  }
}
Let's add our changes to our controller:
 import { Controller, Get } from "@nestjs/common";
import { AppService } from "./app.service";

@Controller()
export class AppController {
  constructor(private readonly appService: AppService) {}

  @Get("/ping-a")
  pingServiceA() {
    return this.appService.pingServiceA();
  }
}
Once our gateway is in place, we can test it by running our service and our gateway with the "npm run start" command. To access the test URL, you can click on this link: "Test my gateway". Our gateway uses the service to query our Service-A microservice and returns the response "Pong" with the displayed duration. We could do this with a simple proxy, but things get complicated when we want to compose requests. Before we can do that, we need to create a new service.
To further illustrate our gateway, let's create a second service. Run the command nest new service-b using the dependency of your choice (npm, yarn, pnpm). Then, delete the app.service.ts file and any unnecessary dependencies. Let's transform it into a microservice by installing @nestjs/microservices with the command npm i --save @nestjs/microservices. Our module will listen on port 8889.
 import { NestFactory } from "@nestjs/core";
import { Transport } from "@nestjs/microservices";
import { AppModule } from "./app.module";
import { Logger } from "@nestjs/common";

const logger = new Logger();

async function bootstrap() {
  const app = await NestFactory.createMicroservice(AppModule, {
    transport: Transport.TCP,
    options: {
      host: "127.0.0.1",
      port: 8889
    }
  });
  app.listen();
  logger.log("Microservice B is listening")
}
bootstrap();
Let's define a controller that does essentially the same thing as our ServiceA:
 import { Controller } from "@nestjs/common";
import { MessagePattern } from "@nestjs/microservices";
import { of } from "rxjs";
import { delay } from "rxjs/operators";

@Controller()
export class AppController {
  @MessagePattern({ cmd: "ping" })
  ping(_: any) {
    return of("pong 2").pipe(delay(1000));
  }
}
Our microservice can now be added to our gateway to be called just like we did with microservice A:
 import { Module } from '@nestjs/common';
import { AppController } from './app.controller';
import { AppService } from './app.service';
import { ClientsModule, Transport } from "@nestjs/microservices";

@Module({
  imports: [
    ClientsModule.register([
      {
        name: "SERVICE_A",
        transport: Transport.TCP,
        options: {
          host: "127.0.0.1",
          port: 8888
        }
      },
      {
        name: "SERVICE_B",
        transport: Transport.TCP,
        options: {
          host: "127.0.0.1",
          port: 8889
        }
      }
    ])
  ],
  controllers: [AppController],
  providers: [AppService]
})
export class AppModule {}
Now that our microservice is set up properly, we can implement our pingServiceB which will do exactly the same thing as pingServiceA. Here's an example of code to create a pingServiceB:
 import { Injectable, Inject } from "@nestjs/common";
import { ClientProxy } from "@nestjs/microservices";
import { map } from "rxjs/operators";

@Injectable()
export class AppService {
  constructor(
    @Inject("SERVICE_A") private readonly clientServiceA: ClientProxy,
    @Inject("SERVICE_B") private readonly clientServiceB: ClientProxy

  ) {}

  pingServiceA() {
    const startTs = Date.now();
    const pattern = { cmd: "ping" };
    const payload = {};
    return this.clientServiceA
      .send<string>(pattern, payload)
      .pipe(
        map((message: string) => ({ message, duration: Date.now() - startTs }))
      );
  }

  pingServiceB() {
    const startTs = Date.now();
    const pattern = { cmd: "ping" };
    const payload = {};
    return this.clientServiceB
      .send<string>(pattern, payload)
      .pipe(
        map((message: string) => ({ message, duration: Date.now() - startTs }))
      );
  }
Now we define our endpoint, but let's add an endpoint that allows calling all the microservices:
 import { Controller, Get } from '@nestjs/common';
import { AppService } from './app.service';
import { zip } from 'rxjs';
import { map } from 'rxjs/operators';

@Controller()
export class AppController {
  constructor(private readonly appService: AppService) {}

  @Get('/ping-a')
  pingServiceA() {
    return this.appService.pingServiceA();
  }

  @Get('/ping-b')
  pingServiceB() {
    return this.appService.pingServiceB();
  }

  @Get('/ping-all')
  pingAll() {
    return zip(
      this.appService.pingServiceA(),
      this.appService.pingServiceB(),
    ).pipe(
      map(([pongServiceA, pongServiceB]) => ({
        pongServiceA,
        pongServiceB,
      })),
    );
  }
}
The ping-all result should be something like:
 {
pongServiceA: {
message: "pong",
duration: 1022
},
pongServiceB: {
message: "pong 2",
duration: 1005
}
}
If you are not familiar with RxJS, it may seem mysterious, but in reality, it's quite simple. We want to launch the execution of our asynchronous calls simultaneously and group all the responses into one.
Exception Filters
Exception filters allow us to transform exceptions thrown by microservice handlers into meaningful objects. For example, the rpcCreate method can generate a variety of different errors, including errors generated by the service or the ORM. Currently, this method generates an error as a string. The only way for the calling method to know what happened is to parse this error string, which is not ideal. So, we need to fix that.
Let's start by creating a new exception class. Note that our microservice exception extends the RpcException class and does not pass an HTTP status code in the constructor. These are the only differences between microservice exceptions and normal Nest.js API exceptions.
 export class RpcValidationException extends RpcException {
    constructor(public readonly validationErrors:ValidationError[]) {
        super('Validation failed');
    }
}
Enfin, il est temps de créer un filtre d'exception pour transformer les exceptions en objets significatifs. Les filtres d'exception de microservice diffèrent de ceux de l'API normale car ils étendent la classe RpcExceptionFilter et renvoient un ErrorObservable. Ce filtre interceptera l'exception RpcValidationException que nous avons créée et renverra un objet contenant un code d'erreur spécifique.
 @Catch(RpcValidationException)
export class RpcValidationFilter implements RpcExceptionFilter {
    public catch(exception: RpcValidationException): ErrorObservable {
        return throwError({
            error_code: 'VALIDATION_FAILED',
            error_message: exception.getError(),
            errors:exception.validationErrors
        });
    }
}
Conclusion
So far, we have covered everything you need to set up and start writing and using microservices in Nest.js. However, we have also described some of the downsides of implementing microservices with Nest.js, particularly the fact that microservices do not run in a separate thread or process, which can limit performance gains.
However, this does not mean that you cannot benefit from the advantages of microservices with Nest.js. Nest.js simply does not provide the ready-to-use tools for this. In most Node.js application deployment documents, the only general recommendation is to use the Node.js cluster.
This is just a taste of what microservices can bring to your architecture. There are many other patterns, such as API Gateway, that you can explore. I hope this article has shown you the ease of implementing Nest.js and convinced you of its usefulness in your future projects.