English
Description
The Command design pattern allows the transformation of an action to be executed into an autonomous object containing all the details of the action. Through this transformation, we can:
- Parameterize methods with different actions.
- Schedule the execution of methods.
- Put actions in a queue.
- Undo performed operations.
Mise en situation
🎮 We are going to develop the functioning of a console:
🕹️ We will have a controller that defines the basic keys. 👾 We will have a game that defines the appropriate movements.
In this case, we have two actors who will interact. One could simply think of creating a button object and simply linking actions to it, by means of a lot of subclasses. The further you go, the more bugs you discover, because the component of your button (key) remembers the previous class, you have subclasses that no longer work, etc.
This is where the Command pattern comes to the rescue:
- Implementation of a separation of concerns.
- You have a command interface to implement for each new command.
- Each game will have its commands that will be executed by the controller. Since every command implements the command, we just have to execute the game method to know the action to perform.
Avantages et inconvénients
| Avantages | Inconvénients |
|---|---|
| ✔️Single Responsibility: decoupling of processing classes and execution classes. This allows commands to be differentiated. | ❌Complexity by adding many layers between the receiver and the command emitter. |
| ✔️Flexibility: adding a new command has no impact on the rest of the code. | |
| ✔️Composite command: allows multiple commands to be combined into a more complex command. |
Quand l'utiliser ?
💡It is often used on the GUI side. 💡You can use it in the implementation of actions that need to be decoupled.
Diagramme UML
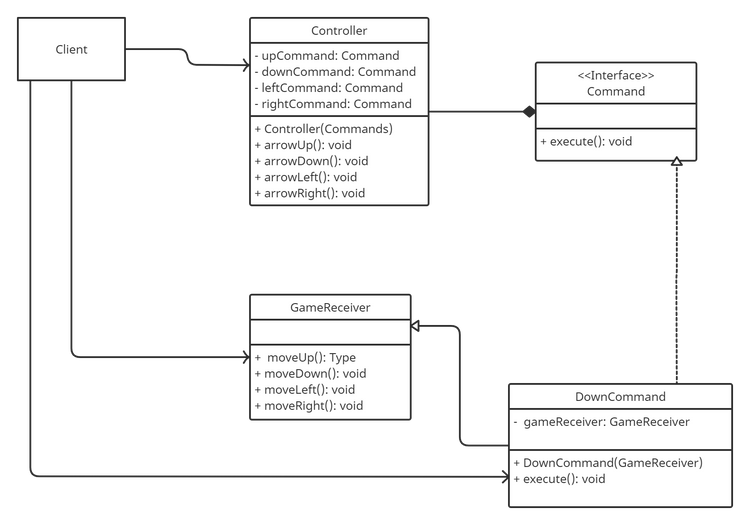
In this example, we are developing a simulation of an online console controller that will take into account the movements of a game. In our case, we will take Zelda as an example.
Implementation
Let's start by creating the base of our design pattern: the Command interface.
 package com.design.command.command;

public interface Command {
    void execute();
}
Our base interface is not very complicated for now, it asks for the implementation of an execute function that will define the action of our controller. Now that we have finished our interface, let's add our receiver which will be the game that will give the commands according to the action.
ZeldaCharacterReceiver
 package com.design.command.character;

public class ZeldaCharacterReceiver {
    private String name;


    public void moveUp() {
        System.out.println(getName() + " Jumping up");
    }

    public void moveDown() {
        System.out.println(getName() + " Jumping down");
    }

    public void moveLeft() {
        System.out.println(getName() + " Moving left");
    }

    public void moveRight() {
        System.out.println(getName() + " Moving right");
    }


    public String getName() {
        return name;
    }

    public void setName(String name) {
        this.name = name;
    }
}
Our game is created, it defines the following actions:
move_up: which will display a message of a movement upwards.move_down: which will display a message of a movement downwards.move_left: which will display a message of a movement to the left.move_right: which will display a message of a movement to the right.
But also a property that will define the name of the game, just to allow you to add several games of the same structure in the future.
Now, let's define the controller of our game, the controller. This controller will easily allow for the definition of several controllers in the future:
Controller
 package com.design.command.model;

import com.design.command.command.Command;

public class Controller {
    private Command upCommand, downCommand, leftCommand, rightCommand;

    public Controller(Command upCommand, Command downCommand, Command leftCommand, Command rightCommand) {
        //concrete Command
        upCommand = upCommand;
        downCommand = downCommand;
        leftCommand = leftCommand;
        rightCommand = rightCommand;
    }

    public void arrowUp() {
        upCommand.execute();
    }
    public void arrowDown() {
        downCommand.execute();
    }
    public void arrowLeft() {
        leftCommand.execute();
    }
    public void arrowRight() {
        rightCommand.execute();
    }
}
Our controller is defined! Now, as you can see, we need 4 commands to define the actions of our controller. These actions will react according to the receiver (game) they use:
ZeldaUpCommand
 package com.design.command.command.zelda;

import com.design.command.character.ZeldaCharacterReceiver;
import com.design.command.command.Command;

public class ZeldaUpCommand implements Command {

    private ZeldaCharacterReceiver zeldaCharacterReceiver;


    public ZeldaUpCommand(ZeldaCharacterReceiver zeldaCharacterReceiver) {
        this.zeldaCharacterReceiver = zeldaCharacterReceiver;
    }

    @Override
    public void execute() {
        zeldaCharacterReceiver.moveUp();
    }
}
ZeldaDownCommand
 package com.design.command.command.zelda;

import com.design.command.character.ZeldaCharacterReceiver;
import com.design.command.command.Command;

public class ZeldaDownCommand implements Command {

    private ZeldaCharacterReceiver zeldaCharacterReceiver;


    public ZeldaDownCommand(ZeldaCharacterReceiver zeldaCharacterReceiver) {
        this.zeldaCharacterReceiver = zeldaCharacterReceiver;
    }

    @Override
    public void execute() {
        zeldaCharacterReceiver.moveDown();
    }
}
ZeldaLeftCommand
 package com.design.command.command.zelda;

import com.design.command.character.ZeldaCharacterReceiver;
import com.design.command.command.Command;

public class ZeldaLeftCommand implements Command {

    private ZeldaCharacterReceiver zeldaCharacterReceiver;


    public ZeldaLeftCommand(ZeldaCharacterReceiver zeldaCharacterReceiver) {
        this.zeldaCharacterReceiver = zeldaCharacterReceiver;
    }

    @Override
    public void execute() {
        zeldaCharacterReceiver.moveLeft();
    }
}
ZeldaRightCommand
 package com.design.command.command.zelda;

import com.design.command.character.ZeldaCharacterReceiver;
import com.design.command.command.Command;

public classZeldaRightCommand implements Command {

    private ZeldaCharacterReceiver zeldaCharacterReceiver;


    public ZeldaRightCommand(ZeldaCharacterReceiver zeldaCharacterReceiver) {
        this.zeldaCharacterReceiver = zeldaCharacterReceiver;
    }

    @Override
    public void execute() {
        zeldaCharacterReceiver.moveRight();
    }
}
Great! Our 4 commands are implemented and each of them uses the receiver object assigned to it. This way, it will use the command defined above. Let's test our code in the Main class of our application:
Main
 import com.design.command.command.zelda.ZeldaUpCommand;
import com.design.command.model.Controller;

public class Main {
    public static void main(String[] args) {

        //Create receivers
        ZeldaCharacterReceiver zeldaCharacterReceiver = new ZeldaCharacterReceiver();
        zeldaCharacterReceiver.setName("Zelda");

        //Commands
        ZeldaUpCommand zeldaUpCommand = new ZeldaUpCommand(zeldaCharacterReceiver);
        ZeldaDownCommand zeldaDownCommand = new ZeldaDownCommand(zeldaCharacterReceiver);
        ZeldaLeftCommand zeldaLeftCommand = new ZeldaLeftCommand(zeldaCharacterReceiver);
        ZeldaRightCommand zeldaRightCommand = new ZeldaRightCommand(zeldaCharacterReceiver);

        //Invoker
        Controller nintendo = new Controller(zeldaUpCommand, zeldaDownCommand, zeldaLeftCommand, zeldaRightCommand);

        nintendo.arrowDown();
        nintendo.arrowLeft();
        nintendo.arrowRight();
        nintendo.arrowUp();

    }
}
Result:
 Zelda Jumping down
Zelda Moving left
Zelda Moving right
Zelda Jumping up
Here, we have finished our implementation. What we can notice:
- We have different commands for our game, which will allow us to add more commands if we want to add a game.
- Our controller only uses objects of type command, which will increase flexibility by taking commands implementing the interface.
- Adding a game will be done in the same way as implementing Zelda.
- We have gained flexibility where each action is a
Commandobject.