English
Introduction
Node has revolutionized the world of web applications. One of the reasons is the lightweight hardware specifications required to run a Node web server. Traditional web server engines such as Apache or Microsoft's IIS web server needed powerful servers to handle thousands of HTTP requests per second.
Node uses a single-threaded architecture, where each instruction that needs to wait is placed in a queue to be processed later. The server therefore only runs one execution thread at a time, but can handle many simultaneous requests with very little CPU or RAM. As a result, many Node web servers can be run on a single physical device, compared to other traditional web servers.
Many cloud services have taken this concept further by offering the ability to run code without the need for a server. The code is provided with a runtime environment that has all the dependencies we might need. For example, with Node, as long as the core Node modules are available at runtime, configuring the code to handle a single web request only requires a few lines of code.
This code execution architecture to handle requests is known as serverless architecture. We don't have to worry about maintaining a server to handle a particular request; the cloud service provider takes care of it for us.
Serverless
Before creating our first Lambda function, we'll explore the different AWS architecture elements we'll use to respond to a web request. These elements are represented in the diagram below:

The diagram represents the different architectural elements used to respond to a client request via an HTTP GET request to the /users endpoint of the API.
- The first architectural element is Amazon API Gateway, which provides the infrastructure for HTTP and WebSocket calls to clients.
- We've set up a GET handler for the /users endpoint to call an AWS Lambda function named users-get.js, which needs to access an Amazon DynamoDB table.
- To allow Lambda functions to access the DynamoDB table, we'll use the IAM service to provide the appropriate permissions.
- Amazon offers a configuration API to automate these processes, as well as a command-line interface called AWS CLI and another interface called AWS SAM CLI, which uses YAML or JSON template files to configure the architectural components.
We'll use AWS SAM CLI to configure and deploy our Lambda functions and DynamoDB tables, allowing us to create serverless applications.
Installing the SAM CLI
Before starting to use AWS SAM, it's necessary to install the following components:
- AWS CLI: the AWS command-line interface used by the AWS SAM CLI for some of its functions.
- Docker: the virtual container that simulates the Lambda environment in which the functions will be executed.
- Homebrew (for macOS systems): the package manager used by the AWS SAM CLI for installation on macOS systems.
- AWS SAM: the AWS-specific command-line option for working with serverless applications.
It's also necessary to have an active AWS account to create resources within AWS. Fortunately, it's possible to create a free account and use many AWS services for free using the free tier of services.
You can find the installation guide for your operating system on the AWS website. Once installed, you can verify that SAM is installed by running the sam --version command in your terminal.
 sam --version
SAM CLI, version 1.64.0
Before we can use the SAM CLI from the command line, we need to make sure that the credentials have been properly configured for the AWS CLI.
To configure the credentials we'll use from the command line to connect to AWS, we use the aws configure command, which is used to configure the AWS CLI. This command asks for the access identification keys and the default region for the AWS CLI. This information is stored in the ~/.aws/credentials and ~/.aws/config files on our local computer.
 ~/.aws$ aws configure
AWS Access Key ID [None]: [ paste enter access key ]
AWS Secret Access Key [None]: [ paste secret access key ]
Default region name [us-east-1]:
Default output format [None]:
Once the credentials have been properly configured, we can use the SAM CLI from the command line to create and manage serverless applications on AWS.
Initializing a SAM Application
After configuring the credentials for the AWS CLI, we can initialize a SAM application using the sam init command followed by the --name option to name the application.
For example, to create an application named "api-app," we run the following command:
sam init --name api-app
This launches the initialization routine that asks several questions on the command line, such as the package type to use (zip or image), the runtime for the Lambda functions (e.g., nodejs14.x or python3.8), and the quick start template to use for the application (e.g., hello-world or Step Functions Sample App).
Here are examples of questions asked by the sam init command:
 Which runtime would you like to use?
	1 - nodejs14.x
	2 - python3.8
	3 - java11
	4 - go1.x
	5 - dotnetcore3.1
Runtime:
This command launches the initialization routine which asks several questions on the command line, such as the type of package to use (zip or image), the runtime for Lambda functions (e.g., nodejs14.x or python3.8), and the quick start template to use for the application (e.g., hello-world or Step Functions Sample App).
Here are examples of the questions asked by the sam init command:
 What package type would you like to use?
	1 - Zip (artifact is a zip uploaded to S3)
	2 - Image (artifact is an image uploaded to an ECR image repository)
Package type:
Here, we can choose option 1 to use Zip artifacts uploaded via an S3 bucket.
 Which runtime would you like to use?
	1 - nodejs14.x
	2 - python3.8
	3 - java11
	4 - go1.x
	5 - dotnetcore3.1
Runtime:
Here, we choose option 1 to use the nodejs14.x runtime. There are several other runtime options available, such as python3.8, java11, go1.x, and dotnetcore3.1.
 AWS quick start application templates:
	1 - Hello World Example
	2 - Step Functions Sample App (Stock Trader)
	3 - Quick Start: From Scratch
	4 - Quick Start: Scheduled Events
	5 - Quick Start: S3
	6 - Quick Start: SQS
	7 - Quick Start: IoT
	8 - Quick Start: Web Backend
	9 - Quick Start: Web Frontend
Template selection:
Here, we choose the "Hello World Example" template. There are also other quick start templates available, such as Step Functions Sample App (Stock Trader), Quick Start: Scheduled Events, Quick Start: S3, Quick Start: SQS, Quick Start: IoT, Quick Start: Web Backend, and Quick Start: Web Frontend.
     -----------------------
    Generating application:
    -----------------------
    Name: api-app
    Runtime: nodejs14.x
    Dependency Manager: npm
    Application Template: hello-world
    Output Directory: .

    Next steps can be found in the README file at ./api-app/README.md
Structure
Fichiers et dossiers créés par la CLI SAM
Here is a description of the files and folders created by the SAM CLI when we initialized our application:
 .
└── api-app
    ├── template.yaml
    ├── README.md
    ├── hello-world
    │   ├── tests
    │   │   └── test-handler.js
    │   ├── package-lock.json
    │   ├── package.json
    │   └── app.js
    └── events
        └── event.json
- The api-app directory corresponds to the name we used when initializing the application.
- The template.yaml file is used to describe all the AWS resources we will need in our application. This includes the endpoint names that Amazon API Gateway will use, the names of the JavaScript files that will be used as Lambda handler functions, as well as IAM access control parameters. We can also include elements describing DynamoDB tables and assign different database access rights to each of our Lambda functions. Here is an example of what is in the template.yaml file:
 Resources:
  HelloWorldFunction:
    Type: AWS::Serverless::Function
    Properties:
      CodeUri: hello-world/
      Handler: app.lambdaHandler
      Runtime: nodejs14.x
      Events:
        HelloWorld:
          Type: Api
          Properties:
            Path: /hello
            Method: get
Here, we have a resource named HelloWorldFunction of type AWS::Serverless::Function. This resource has a set of properties, including one named CodeUri. This CodeUri property specifies the directory in which to find the source of this serverless function and is set to hello-world/. The Handler property tells us to look in a file named app.js for an exported function named lambdaHandler, which will be executed when this Lambda is called. The Runtime property specifies the environment in which to run this Lambda function, which is set to nodejs14.x. We also have an Events section, which lists HelloWorld as an Api type event. This section describes the configuration of the API Gateway, which has a Path property of /hello and a Method property of get. This means that we have configured a GET operation at the /hello endpoint, which will call our Lambda function.
- The hello-world folder contains the source code for our Lambda function. It also contains a tests folder that has unit tests for our function.
- The events folder contains an event.json file that is used to test our Lambda function locally. This file contains JSON event data that would be sent to our function in a production environment.
This is how the SAM CLI organizes our project and provides us with a starting point to begin developing Lambda functions.
Deploying a SAM Application
We can deploy our SAM application on AWS using the sam deploy command from the command-line interface. The first time we run this command, we will need to answer a few questions about our configuration, which will be stored for later use. Here is an example command
 sam deploy --guided

Setting default arguments for 'sam deploy'
=========================================
Stack Name [sam-app]: api-app
AWS Region [us-east-1]:
# Shows you resources changes to be deployed and require a 'Y' to initiate deploy
Confirm changes before deploy [Y/n]: Y
# SAM needs permission to be able to create roles to connect to the resources in your template
Allow SAM CLI IAM role creation [Y/n]: Y
HelloWorldFunction may not have authorization defined, Is this okay? [y/N]: Y
Save arguments to configuration file [Y/n]: Y
SAM configuration file [samconfig.toml]:
SAM configuration environment [default]:
In this example, we have specified the stack name and the AWS region. The options are stored in a file named samconfig.toml, so that we do not have to specify them again the next time we run the sam deploy command.
Once the command is finished, we will see the complete URL that will call our Lambda function. We can copy and paste this value into a browser to test the deployed version of our function. Here is an example response:
 https://d6vnhxnc83.execute-api.us-east-1.amazonaws.com/Prod/hello/

{
    message: "hello world"
}
With just a few simple steps, we have initialized and deployed an AWS serverless application using the SAM command-line interface, and we can now test the deployed version of our Lambda function almost immediately.
Building an API
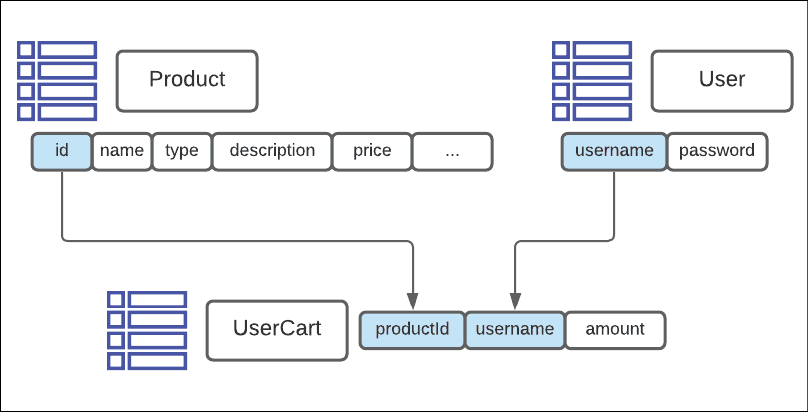
To support the functionality our applications require, we will need three DynamoDB database tables: ProductTable, UserTable, and UserCartTable.
We can define the ProductTable in our template.yaml file as follows:
 Resources:
  ProductTable:
    Type: AWS::DynamoDB::Table
    Properties:
      TableName: ProductTable
      AttributeDefinitions:
        - AttributeName: "id"
          AttributeType: "S"
      KeySchema:
        - AttributeName: "id"
          KeyType: "HASH"
      ProvisionedThroughput:
        ReadCapacityUnits: 5
        WriteCapacityUnits: 5
  HelloWorldFunction:
    # Existing Lambda attributes
We can also define the UserTable in our template.yaml file by adding the following to the definition of the ProductTable:
 UserTable:
  Type: AWS::DynamoDB::Table
  Properties:
    TableName: UserTable
    AttributeDefinitions:
      - AttributeName: "username"
        AttributeType: "S"
    KeySchema:
      - AttributeName: "username"
        KeyType: "HASH"
    ProvisionedThroughput:
      ReadCapacityUnits: 5
      WriteCapacityUnits: 5
Finally, we can define the UserCartTable in our template.yaml file as follows:
 UserCartTable:
  Type: AWS::DynamoDB::Table
  Properties:
    TableName: UserCartTable
    AttributeDefinitions:
      - AttributeName: "username"
        AttributeType: "S"
      - AttributeName: "productId"
        AttributeType: "S"
    KeySchema:
      - AttributeName: "username"
        KeyType: "HASH"
      - AttributeName: "productId"
        KeyType: "RANGE"
    ProvisionedThroughput:
      ReadCapacityUnits: 5
      WriteCapacityUnits: 5
Note that the UserCartTable has a composite primary key consisting of two fields, username and productId. Both of these fields must be defined in both the AttributeDefinitions property and the KeySchema property.
Once we have defined our database tables in our template.yaml file, we can run the "sam deploy" command to create the DynamoDB tables on our AWS account.
NoSQL
Using NoSQL Workbench for DynamoDB
When working with DynamoDB tables, Amazon offers a graphical interface utility called NoSQL Workbench for DynamoDB. This tool allows you to query data in a table and generate code to read and write data. Here's how to install and configure NoSQL Workbench for DynamoDB.
Installation
To install NoSQL Workbench, you first need to find the appropriate download link for your operating system in the AWS documentation: https://docs.aws.amazon.com/amazondynamodb/latest/developerguide/workbench.settingup.html.
Configuration
Once installed, you'll need to add a remote connection to your DynamoDB instance by specifying an access key ID and a secret access key. We'll assume that you've already set up a connection and that the region is properly defined. Here's how to access NoSQL Workbench:
- Open NoSQL Workbench for DynamoDB.
- Select "New Connection" from the sidebar.
- In the "Connection Type" section, select "AWS Profile" or "AWS Access Key".
If you selected "AWS Profile", select the appropriate AWS profile from the dropdown menu. If you selected "AWS Access Key", enter the appropriate access key ID and secret access key. 4. In the "Connection Settings" section, select the appropriate region. 5. Click "Connect".
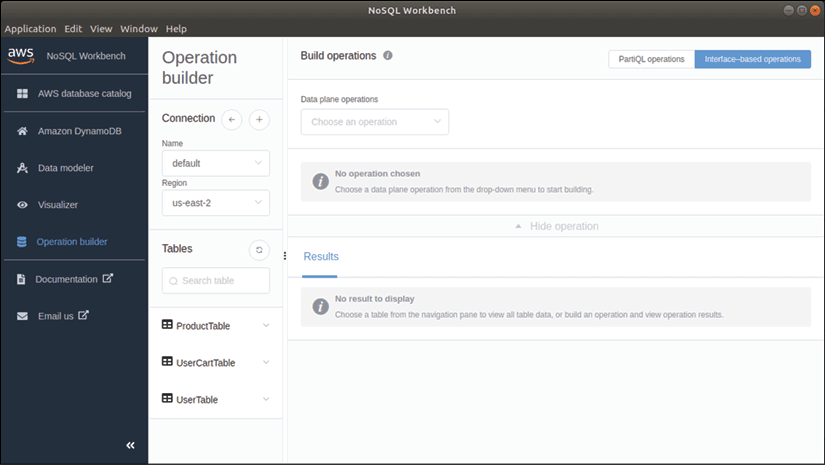
Once connected, you should see a list of available DynamoDB tables in your AWS account. You can now query data in a table and generate code to read and write data.
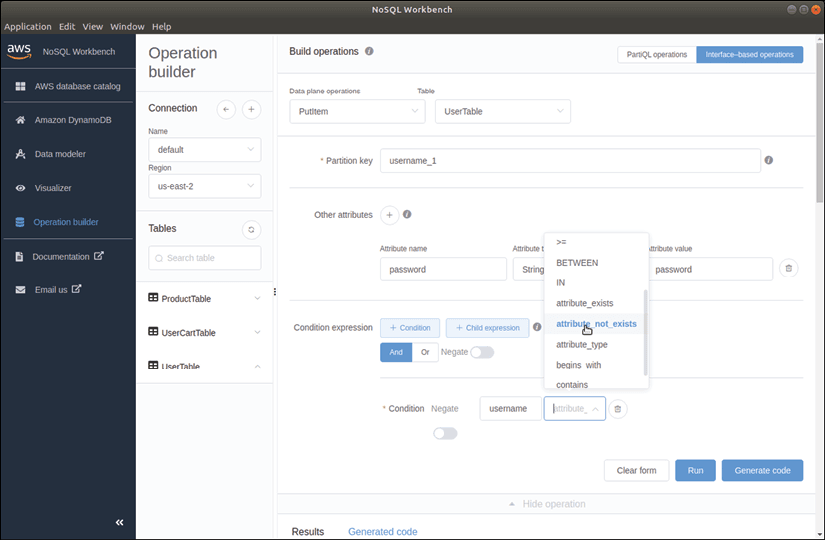
We are currently in operation builder mode, displayed on the left panel, with the three tables displayed in the tables list. To build a PUT operation, or putItem, on the ProductTable with the specified attributes, let's select the PutItem operation in the Build operations panel and choose ProductTable. Since ProductTable has a primary key named id, the Partition Key field must be specified.
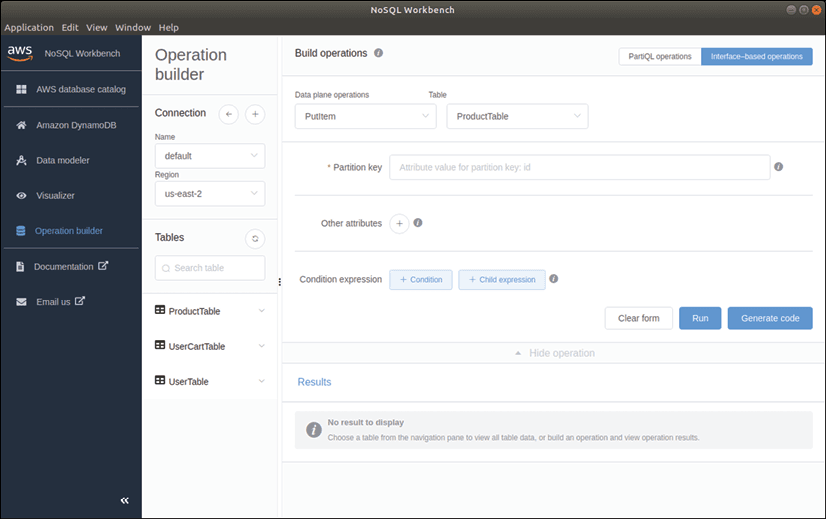
We can add additional attributes to this PUT operation by clicking the + button next to "Additional Attributes" and specifying an attribute name, attribute type, and attribute value.
The screen features a "Run" button in the lower right corner to execute this operation and insert data into the table, but to generate code, let's click on the "Generate Code" button, which will produce sample Python, JavaScript, and Java code in three tabs at the bottom of the screen.

By selecting the JavaScript tab, the generated code has three main objectives:
- Create a connection to the database.
- Build a putItem statement.
- Execute this statement.
Let's focus on the second objective:
 function createPutItemInput(
    productId: string,
    productName: string,
    productType: string,
    price: number
) {
    return {
      "TableName": "ProductTable",
      "Item": {
        "id": {
          "S": `${productId}`
        },
        "name": {
          "S": `${productName}`
        },
        "type": {
          "S": `${productType}`
        },
        "price": {
          "N": `${price}`
        }
      }
    }
  }
The createPutItemInput function returns an object with a TableName property, which is the table where the data will be inserted, and an Item property, which contains child properties for each of the fields in the table that we're trying to insert.
Once the object can be used to insert values into the table, we can turn our attention to the generated code that executes the insertion statement:
 const region = 'us-east-2';
const dynamoDbClient = createDynamoDbClient(region);
function createDynamoDbClient(regionName) {
  // Set the region
  AWS.config.update({region: regionName});
  return new AWS.DynamoDB();
}
// Create the input for putItem call
const putItemInput =
    createPutItemInput("1", "Holy Panda", "Tactile", 1.90);
async function executePutItem(dynamoDbClient, putItemInput) {
  // Call DynamoDB's putItem API
  try {
    const putItemOutput =
        await dynamoDbClient.putItem(putItemInput).promise();
    console.info('Successfully put item.');
    // Handle putItemOutput
  } catch (err) {
    handlePutItemError(err);
  }
We created a constant named dynamoDbClient, which is the result of calling the createDynamoDbClient function with a region as an argument. The createDynamoDbClient function calls the AWS.config.update function and then returns a new instance of the AWS.DynamoDB class.
API Endpoint
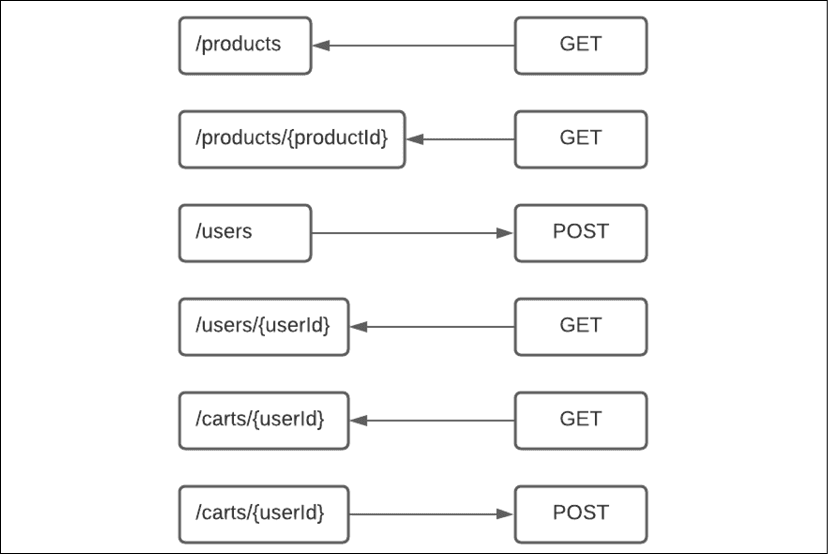
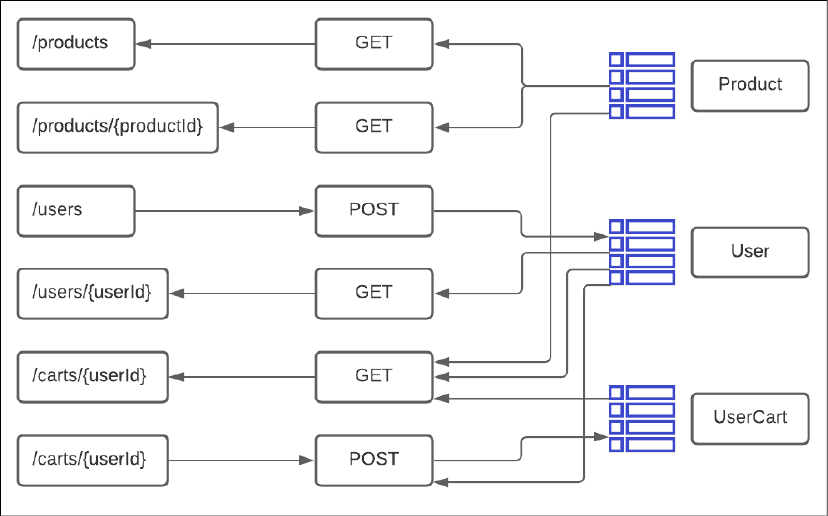
Here are the different endpoints for our API:
- GET /products: retrieves all products available for sale.
- GET /products/{productId}: retrieves a specific product.
- POST /users: used when a user registers with the application.
- GET /users/{userId}: retrieves data for a particular user.
- GET /carts/{userId}: retrieves the contents of the user's cart. A POST call will update the cart's contents.
The following schema illustrates the mapping of the database tables used by each API call:
Lambda function
We'll start with the /users endpoint of our API POST. To do this, we need to define a Lambda function in our template.yaml file as follows:
   UserApiFunction:
    Type: AWS::Serverless::Function
    Properties:
      CodeUri: api-handlers/
      Handler: users.postHandler
      Runtime: nodejs14.x
      Events:
        UserPostEvent:
          Type: Api
          Properties:
            Path: /users
            Method: post
      Policies:
        - DynamoDBCrudPolicy:
            TableName: !Ref UserTable
We defined a section with the name CreateUserFunction and the type AWS::Serverless::Function. We configured some properties for this serverless function, including the path to our handler file, the name of the function we'll be using, the runtime type (nodejs14.x), and the events we want to monitor. We also specified a DynamoDBCrudPolicy access policy that grants this Lambda function CRUD rights on the specified table.
 import {
    APIGatewayProxyEvent,
    Context
} from 'aws-lambda';
import { dynamoDbClient } from './db-functions';
export const postHandler = async (
    event: APIGatewayProxyEvent, context: Context
) => {
    let response = {};
    try {
        let bodyJson = JSON.parse(<string>event.body);
        let username: string = bodyJson.username;
        let password: string = bodyJson.password;
        await dynamoDbClient.putItem({
            "TableName": "UserTable",
            "Item": {
                "username": {
                    "S": username
                },
                "password": {
                    "S": password
                }
            },
            "ConditionExpression": "attribute_not_exists(#3f9c0)",
            "ExpressionAttributeNames": {
                "#3f9c0": "username"
            }
        }).promise();
        response = {
            'statusCode': 200,
            'body': `User created`
        }
    } catch (err) {
        console.log(err);
        // return err;
        response = {
            'statusCode': err.statusCode,
            'body': `${err.message} : an item with this id already exists`
        }
    }
    return response;
};
In our api-handlers/users.js file, we exported a function named postHandler, which takes two parameters: an event of type APIGatewayProxyEvent and a context of type Context. We used the aws-lambda library to import these types into our code.
Our Lambda function begins by creating a bodyJson variable, which is the result of JSON.parse(event.body) to extract the username and password values from the POST request.
Our Lambda function then calls a putItem function on our dynamoDbClient connection to store the information in the UserTable. We included a ConditionExpression property to ensure that an entry with the same username does not already exist in the table. We also used the NoSQL Workbench graphical interface to generate the code we need for this conditional expression.
Our Lambda function returns an object with a statusCode of 200 and a body of "User Created" if the putItem operation succeeds. If it violates the attribute_not_exists condition, our catch clause will be triggered and respond with a statusCode set for the error status code and a message.
Compile the Lambda function
To compile our TypeScript code into JavaScript for our Lambda functions, we need to set up a TypeScript and Node environment in the api-handlers subdirectory. We can do this by running the following commands in the terminal:
 cd api-handlers
npm init
tsc --init
npm install aws-sdk
npm install aws-lambda
npm install @types/aws-lambda --save-dev
The first command allows us to navigate to the api-handlers directory, the second initializes a new Node.js project and creates a package.json file. The third command creates a tsconfig.json file that configures the TypeScript compiler, and the last command installs the aws-sdk and aws-lambda packages, as well as the types for aws-lambda.
It's important to note that the Node.js runtime we'll be using in AWS is version 14, which supports newer JavaScript versions than browsers. For this reason, we can modify the target property in our tsconfig.json file to ES2019 which will generate ES2019 JavaScript to use in our Lambdas. This will simplify the generated JavaScript for our Lambda functions.
launch the Lambda locally
When developing Lambda functions for AWS, we need to deploy them to the cloud before we can test them. However, this can be time-consuming and costly. To avoid this, we can use the SAM (Serverless Application Model) command-line interface to run our Lambda functions locally on our machine.
The command:
sam local start-api
Allows us to run the Lambda functions locally on our machine without the need to deploy them to AWS. Once we have run this command, we can see which API functions are available, their endpoints, and the HTTP methods they support.
 Mounting HelloWorldFunction at http://127.0.0.1:3000/hello [GET]
Mounting UserApiFunction at http://127.0.0.1:3000/users [POST]
You can now browse to the above endpoints to invoke your functions.
2021-02-13 17:10:29  * Running on http://127.0.0.1:3000/ (Press CTRL+C to quit)
In the given example, we have two Lambda functions running on port 3000, with a GET handler at the /hello endpoint and a POST handler at the /users endpoint.
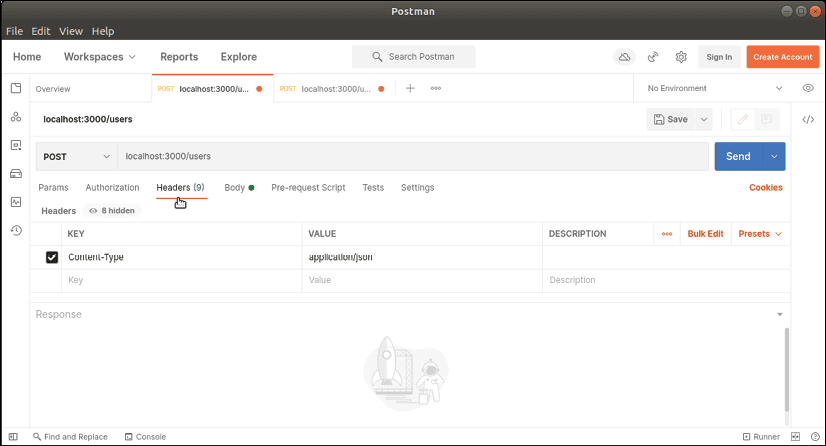
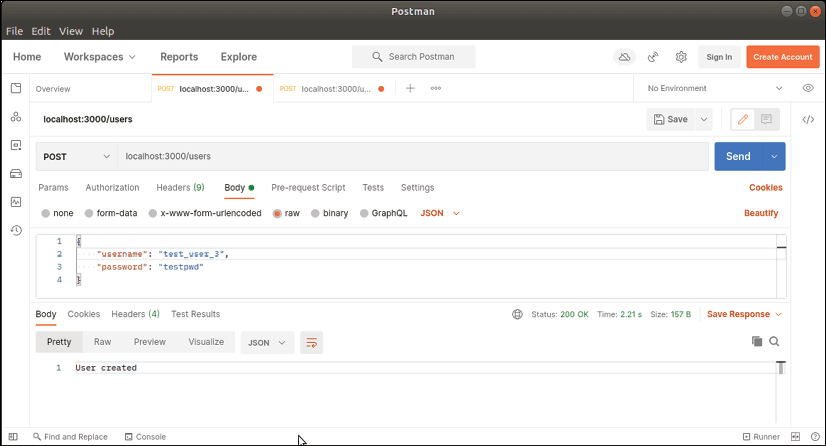
To test our Lambda function, we can use a tool such as Postman to generate a POST event. To do this, we provide the URL of our /users endpoint and specify the content type as application/json. We must also include a JSON payload in the body of the request. After sending the request, our /users endpoint should respond with a 200 OK message and display the "User created" message in the response.

By using the SAM command-line interface to run our Lambda functions locally, we can save time and money by avoiding deployment to AWS before testing. This can also help speed up the development process by allowing developers to quickly and efficiently test their Lambda functions.
Lambda Path Parameters
Lambda Path Parameters allow for handling requests with specific parameters in the URL.
 UserGetApiFunction:
  Type: AWS::Serverless::Function
  Properties:
    CodeUri: api-handlers/
    Handler: users.getHandler
    Runtime: nodejs14.x
    Events:
      HelloWorld:
        Type: Api
        Properties:
          Path: /users/{userId}
          Method: get
    Policies:
      - DynamoDBCrudPolicy:
          TableName: !Ref UserTable
To support this syntax, we modified the definition of our GET Lambda function in our template.yaml file. We specified that the handler function is called getHandler, and that the Path property uses substitution syntax to indicate that this API function handles anything matching a GET request to the path /users/{userId}.
Before writing the handler, we created a utility function called userExists to check if the user exists in our DynamoDB database.
 export async function userExists(
    username: string
): Promise<boolean> {
    const scanOutput = await dynamoDbClient.scan({
        "TableName": "UserTable",
        "ConsistentRead": false,
        "FilterExpression": "#87ea0 = :87ea0",
        "ExpressionAttributeValues": {
            ":87ea0": {
                "S": `${username}`
            }
        },
        "ExpressionAttributeNames": {
            "#87ea0": "username"
        }
    }).promise();
    if (scanOutput.Items && scanOutput.Items?.length > 0) {
        return true;
    } else {
        return false;
    }
}
This function performs a search in the UserTable table to find records with a username field equal to the provided value.
<pre>
<code id="htmlViewer" style="color:rgb(220, 220, 220); font-weight:400;background-color:rgb(30, 30, 30);background:rgb(30, 30, 30);display:block;padding: .5em;"><span style="color:rgb(86, 156, 214); font-weight:400;">export</span> <span style="color:rgb(86, 156, 214); font-weight:400;">const</span> <span class="hljs-title function_">getHandler</span> = <span style="color:rgb(86, 156, 214); font-weight:400;">async</span> (<span style="color:rgb(220, 220, 220); font-weight:400;">
event: APIGatewayProxyEvent, context: Context
</span>) => {
<span style="color:rgb(86, 156, 214); font-weight:400;">let</span> response = {};
<span style="color:rgb(86, 156, 214); font-weight:400;">try</span> {
<span style="color:rgb(86, 156, 214); font-weight:400;">let</span> userId = (<<span style="color:rgb(78, 201, 176); font-weight:400;">any</span>>event.<span style="color:rgb(220, 220, 220); font-weight:400;">pathParameters</span>).<span style="color:rgb(220, 220, 220); font-weight:400;">userId</span>;
<span style="color:rgb(86, 156, 214); font-weight:400;">let</span> isUser = <span style="color:rgb(86, 156, 214); font-weight:400;">await</span> <span class="hljs-title function_">userExists</span>(userId);
<span style="color:rgb(86, 156, 214); font-weight:400;">if</span> (isUser) {
response = {
<span style="color:rgb(214, 157, 133); font-weight:400;">'statusCode'</span>: <span style="color:rgb(184, 215, 163); font-weight:400;">200</span>,
<span style="color:rgb(214, 157, 133); font-weight:400;">'body'</span>: <span style="color:rgb(214, 157, 133); font-weight:400;">`User exists`</span>
}
} <span style="color:rgb(86, 156, 214); font-weight:400;">else</span> {
response = {
<span style="color:rgb(214, 157, 133); font-weight:400;">'statusCode'</span>: <span style="color:rgb(184, 215, 163); font-weight:400;">404</span>,
<span style="color:rgb(214, 157, 133); font-weight:400;">'body'</span>: <span style="color:rgb(214, 157, 133); font-weight:400;">`Not found`</span>
}
}
} <span style="color:rgb(86, 156, 214); font-weight:400;">catch</span> (err) {
<span class="hljs-variable language_">console</span>.<span class="hljs-title function_">log</span>(err);
<span style="color:rgb(87, 166, 74); font-weight:400;">// return err;</span>
response = {
<span style="color:rgb(214, 157, 133); font-weight:400;">'statusCode'</span>: err.<span style="color:rgb(220, 220, 220); font-weight:400;">statusCode</span>,
<span style="color:rgb(214, 157, 133); font-weight:400;">'body'</span>:
<span style="color:rgb(214, 157, 133); font-weight:400;">`<span style="color:rgb(220, 220, 220); font-weight:400;">${err.message}</span> : an item with this id already exists`</span>
}
}
<span style="color:rgb(86, 156, 214); font-weight:400;">return</span> response;
};</code></pre>
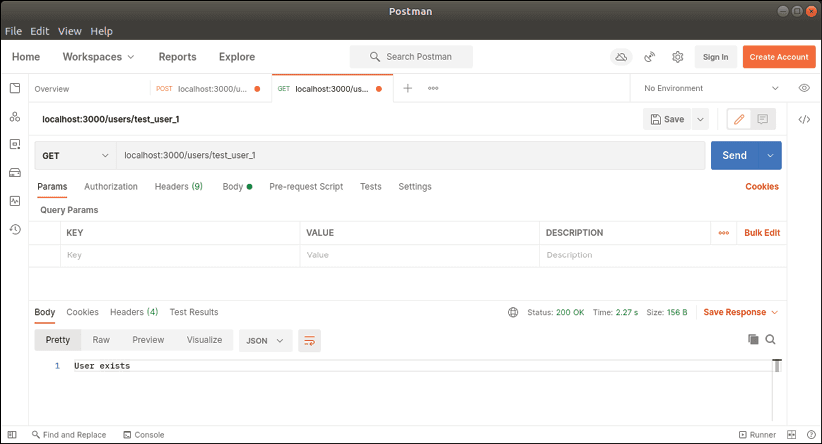
In our Lambda function, we invoked the userExists function to check if the username exists in our database, and then responded with a 200 OK response if the user is found, and a 404 Not found response otherwise.
We can use Postman to test our Lambda function, by sending a GET request with a specific userId parameter in the URL.
Processing of database records
Our Lambda function handles a GET request on the endpoint /products.
 export const getHandler = async (
    event: APIGatewayProxyEvent,
    context: Context
) => {
    let response = {};
    try {
        let scanResults =
            await executeScan(
                dynamoDbClient,
                getProductScanParameters()
            );
        let outputArray = [];
        if (scanResults?.Items) {
            for (let item of scanResults.Items) {
                outputArray.push(getProduct(item));
            }
        }
        response = {
            'statusCode': 200,
            'body': JSON.stringify(outputArray)
        }
    } catch (err) {
        console.log(err);
        return err;
    }
    return response;
};
This Lambda function uses the executeScan method to perform a query on our DynamoDB table and return all the records.
If the database query returns any records, we iterate through each record and call the getProduct function with that database record to convert it into an IProduct object. The getProduct function takes an AttributeMap object returned by DynamoDB and converts it into an IProduct object. The function returns the IProduct object.
 export function getProduct(item: DynamoDB.AttributeMap): IProduct {
    let product: IProduct = {
        id: parseInt(<string>item["id"].S),
        name: <string>item["name"].S,
        type: <string>item["type"].S,
        image: <string>item["image"].S,
        longDescription: <string>item["longDescription"].S,
        specs: {
            actuationForce: <string>item["actuationForce"].N,
            actuationPoint: <string>item["actuationPoint"].N,
            bottomOut: <string>item["bottomOut"].N,
            bottomOutTravel: <string>item["bottomOutTravel"].N,
            price:
                item["price"].N ?
                    (parseInt(item["price"].N) / 100)
                        .toFixed(2) : "",
        }
    }
    return product;
}
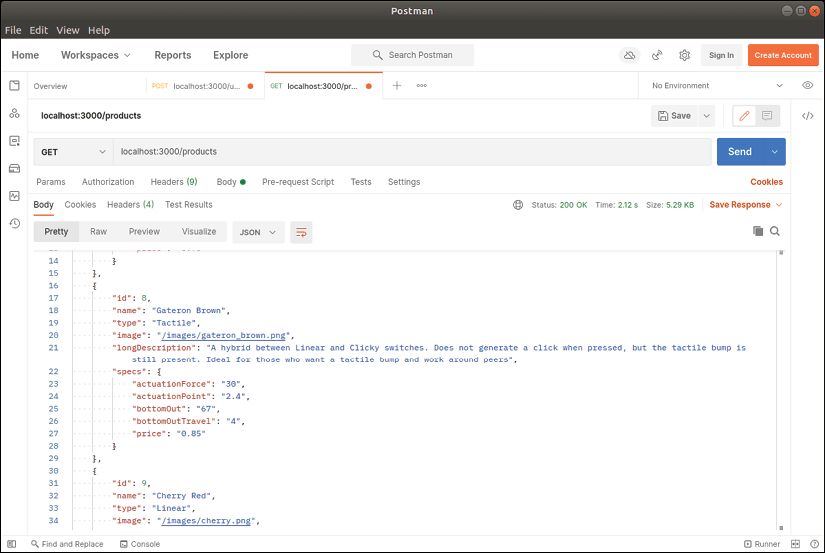
Our Lambda function returns a 200 OK response with a collection of IProduct objects as a JSON string. We can test this function by sending a GET request to our /products endpoint. The response returned should contain all the products stored in our DynamoDB table.
Conclusion
We explored the architecture of an AWS Lambda function and learned to use the SAM command-line interface to generate, deploy, and run Lambda functions locally. We also discussed the NoSQL database DynamoDB and worked on examples of using NoSQL Workbench to generate code for interacting with our data.
We created several TypeScript-based Lambda functions, which used either data sent as part of a POST operation or path parameters to guide their behavior. We also covered the syntax of substitution in our API function definition, which allows us to use path parameters to handle requests with specific parameters in the URL.
Finally, we learned to test our Lambda functions using tools such as Postman, by sending HTTP requests to our API endpoints to verify that our functions return the expected responses.