Introduction
In a cooperative microservices environment, failures must be considered a normal state and the system landscape must be designed to handle them. For this purpose, there are open source resilience libraries such as Resilience4j.
Resilience4j has been recommended since the release of Spring Cloud Greenwich because it offers a wider range of fault tolerance mechanisms compared to Netflix Hystrix. Here are some examples:
- The Circuit Breaker is used to prevent a failing reaction chain if a remote service stops responding.
- The Rate Limiter is used to limit the number of requests to a service during a specified period of time.
- Bulkhead is used to limit the number of simultaneous requests to a service.
- Retries are used to handle random errors that may occur from time to time.
- The Timeout Limiter is used to avoid waiting too long for a response from a slow or unresponsive service.

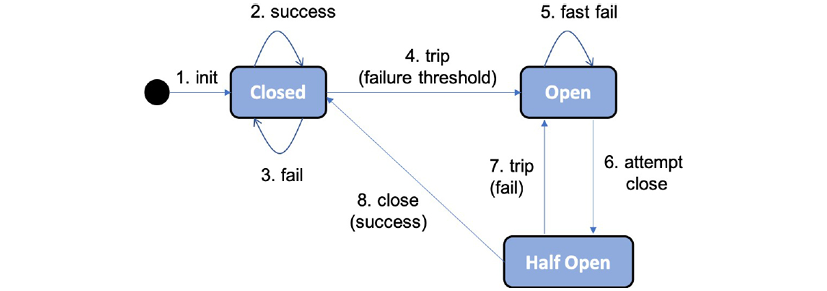
The Circuit Breaker follows the classic design of a circuit breaker, which can be illustrated by the following state diagram:
- It starts in a closed state, allowing requests to be processed.
- As long as requests are successfully processed, it stays in the closed state.
- If failures begin to occur, a counter starts counting.
- If a threshold of failures is reached within a specified time frame, the Circuit Breaker will trip, moving to the open state and not allowing further requests to be processed.
- Instead, a request will be in fast fail mode, meaning it will immediately return with an exception.
- After a configurable amount of time, the Circuit Breaker will enter a half-open state and allow one request to pass through as a probe to see if the failure has been resolved.
- If the probe request fails, the Circuit Breaker switches back to the open state.
- If the probe request succeeds, the Circuit Breaker returns to the initial closed state, allowing new requests to be processed.
By using Resilience4j and properly configuring fault tolerance mechanisms, you can improve the stability and resilience of your system, enabling effective and predictable failure management.
Resilience4j
Resilience4j is an open source resilience library that can be used to protect a REST service, such as myService, from internal errors, such as the inability to reach a dependent service.
If the protected service starts producing errors, the Resilience4j Circuit Breaker opens after a configurable number of retries, preventing further requests and returning an error message such as "CircuitBreaker 'myService' is open". When the error is resolved and a new retry is attempted (after a configurable waiting time), the Circuit Breaker allows a new retry as a probe. If the call succeeds, the Circuit Breaker returns to the closed state, meaning it is working normally:
curl $HOST:$PORT/actuator/health -s | jq .components.circuitBreakers
If it is working normally, meaning the circuit is closed, it will respond with something like the following:

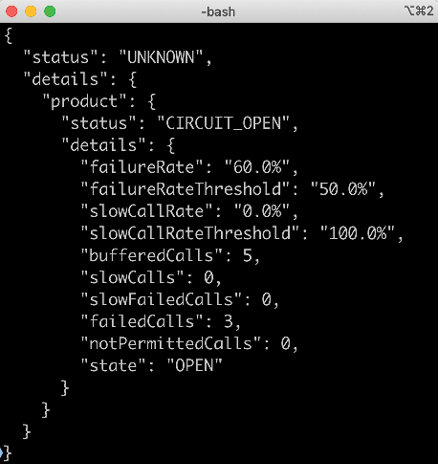
If something goes wrong and the circuit is open, it will respond with something like the following:

With the introduction of Resilience4j, we have seen how the Circuit Breaker can be used to manage errors for a REST client. The Circuit Breaker, Timeout Limiter, and Retries mechanisms can be useful in any synchronous communication between two software components, such as microservices.
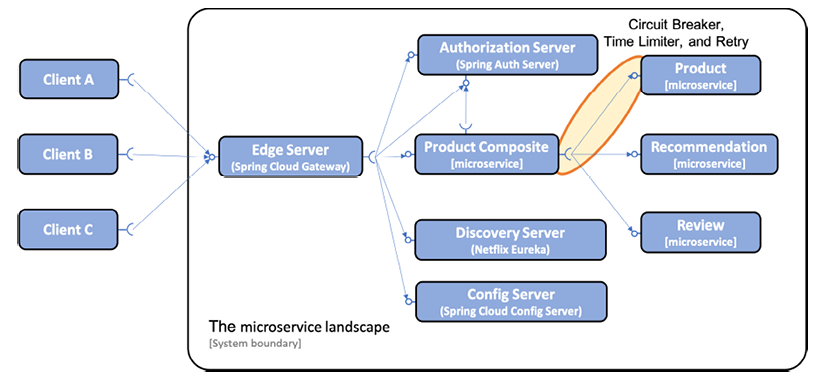
In this section, we will apply these mechanisms in one place, namely the calls from the product-compositeservice to the productservice. This approach is illustrated in the following figure:

Note that synchronous calls to discovery and configuration servers from other microservices are not represented in the above diagram. This omission is made for the purpose of making the diagram easier to read.
Circuit Breaker Overview

Key Features of a Circuit Breaker and Configuration with Resilience4j
The key features of a Circuit Breaker are as follows:
- If a Circuit Breaker detects too many failures, it will trip its circuit, meaning it will not allow new calls.
- When the circuit is open, a Circuit Breaker performs fast failure logic. This means it redirects the call directly to a fallback method that can apply various business logic to produce an optimal response. This prevents a microservice from becoming unresponsive if the services it depends on stop responding normally.
- After a certain time, the Circuit Breaker will be half-open, allowing new calls to see if the problem causing the failures has gone away. If new failures are detected, the Circuit Breaker will trip the circuit and return to the fail-fast logic. Otherwise, it will close the circuit and return to normal operation.
Resilience4j exposes information about Circuit Breakers at runtime in several ways:
- The current state of a Circuit Breaker can be monitored using the microservice's actuator health endpoint, /actuator/health.
- The Circuit Breaker also publishes events to an actuator endpoint, for example, state transitions, /actuator/circuitbreakerevents.
- Circuit Breakers are integrated with the Spring Boot metrics system and can use it to publish metrics to monitoring tools such as Prometheus.
To control the logic in a circuit breaker, Resilience4j can be configured using standard Spring Boot configuration files. The following configuration parameters are used:
- slidingWindowType: To determine if a circuit breaker should open, Resilience4j uses a sliding window, counting the most recent events to make the decision. Sliding windows can be based on a fixed number of calls or a fixed elapsed time. This parameter is used to configure the type of sliding window used. We'll use a count-based sliding window by setting this parameter to COUNT_BASED.
- slidingWindowSize: The number of calls in a closed state that are used to determine if the circuit should open. We'll set this parameter to 5.
- failureRateThreshold: The threshold, in percentage, for failed calls that will cause the circuit to open. We'll set this parameter to 50%.
- automaticTransitionFromOpenToHalfOpenEnabled: Determines if the circuit breaker will automatically transition to the half-open state once the wait period is over. We'll set this parameter to true.
- waitDurationInOpenState: Specifies how long the circuit remains in an open state, i.e., before it transitions to the half-open state. We'll set this parameter to 30 seconds.
management.health.circuitbreakers.enabled: true
Introduction to TimeLimiter
To help a circuit breaker manage slow or unresponsive services, a timeout mechanism can be useful. Resilience4j's timeout mechanism, called TimeLimiter, can be configured using standard Spring Boot configuration files.
We'll use the following configuration parameter:
- timeoutDuration: Specifies how long a TimeLimiter instance waits for a call to complete before throwing a timeout exception. We'll set it to 2 seconds.
Introduction to Retry
The retry mechanism is very useful for random and infrequent errors, such as temporary network issues. This mechanism can simply retry a failed request a certain number of times with a configurable delay between retries. However, a very important restriction on its use is that the services it retries must be idempotent, i.e., calling the service once or multiple times with the same request parameters should give the same result. For example, reading information is idempotent, but creating information generally isn't.
Resilience4j exposes retry information in the same way as circuit breakers with respect to events and metrics but provides no health information. Retry events are accessible on the actuator endpoint, /actuator/retryevents.
To control the retry logic, Resilience4j can be configured using standard Spring Boot configuration files. We'll use the following configuration parameters:
- maxAttempts: The number of attempts before giving up, including the first call. We'll set this parameter to 3, allowing a maximum of two retries after a failed first call.
- waitDuration: The wait time before the next retry attempt. We'll set this value to 1000 ms, meaning we'll wait 1 second between retries.
- retryExceptions: A list of exceptions that will trigger a retry attempt. We'll only trigger retries on InternalServerError exceptions, i.e., when HTTP requests respond with a 500 status code.
Implementation Example
Resilience mechanisms such as circuit breakers, time limiters, and retries are useful for managing errors in synchronous communications between two software components, such as microservices. We'll use these mechanisms in calls from the composite-product service to the product service.
The key features of a circuit breaker are:
- If it detects too many failures, it will open its circuit and disallow new calls.
- It executes fast failure logic when the circuit is open,
- It immediately redirects the call to a fallback method instead of waiting for another error.
- The fallback method can return data from a local cache or simply return an immediate error message to prevent a microservice from becoming unresponsive.
- After a certain time, the circuit breaker will be half-open, allowing new calls to see if the problem causing the failures has disappeared.
- Resilience4j exposes information about circuit breakers to monitor their state.
The timeout mechanism called TimeLimiter can be used to help a circuit breaker manage slow or unresponsive services. Resilience4j also exposes a retry mechanism that can handle random and infrequent errors.
To test these mechanisms, it's necessary to be able to control when errors occur. For this, we added two optional query parameters to the getProduct API of the microservice:
- delay: Forces the getProduct API to delay its response, by specifying the delay in seconds.
- faultPercentage: Forces the getProduct API to randomly throw an exception with the probability specified by the query parameter.
These query parameters were defined in the Java interfaces of the project.
ProductCompositeService :
 Mono<ProductAggregate> getProduct(
    @PathVariable int productId,
    @RequestParam(value = "delay", required = false, defaultValue =
    "0") int delay,
    @RequestParam(value = "faultPercent", required = false,
    defaultValue = "0") int faultPercent
);
ProductService
 Mono<Product> getProduct(
     @PathVariable int productId,
     @RequestParam(value = "delay", required = false, defaultValue
     = "0") int delay,
     @RequestParam(value = "faultPercent", required = false,
     defaultValue =
The query parameters have default values that disable the use of error mechanisms. They are optional and their use is not mandatory. If none of these parameters are used in a request, no delay will be applied, and no error will be generated.
Changes to the Product-Composite Microservice
The product-composite microservice acts as an intermediary by simply passing the parameters to the product API. When it receives an API request, the service passes the parameters to the integration component that calls the product API.
The call to the product API is made from the ProductCompositeServiceImpl class by calling the integration component.
 public Mono<ProductAggregate> getProduct(int productId,
  int delay, int faultPercent) {
    return Mono.zip(
        ...
        integration.getProduct(productId, delay, faultPercent),
        ....
The API call to the product from the ProductCompositeIntegration class looks like this:
 public Mono<Product> getProduct(int productId, int delay,
  int faultPercent) {

    URI url = UriComponentsBuilder.fromUriString(
      PRODUCT_SERVICE_URL + "/product/{productId}?delay={delay}"
      + "&faultPercent={faultPercent}")
      .build(productId, delay, faultPercent);
  return webClient.get().uri(url).retrieve()...
Modifications to the Microservice
The product microservice implements actual delay and random error generation in the ProductServiceImpl class. This implementation is done by extending the existing stream used to read information produced from the MongoDB database.
Here's what it looks like:
 public Mono<Product> getProduct(int productId, int delay,
  int faultPercent) {

  ...
  return repository.findByProductId(productId)
    .map(e -> throwErrorIfBadLuck(e, faultPercent))
    .delayElement(Duration.ofSeconds(delay))
    ...
}
When the stream returns a response from the Spring Data repository, it first applies the throwErrorIfBadLuck method to determine whether an exception should be thrown. Then, it applies a delay using the delayElement function of the Mono class.
The random error generator, throwErrorIfBadLuck(), creates a random number between 1 and 100, and then throws an exception if it is greater than or equal to the specified error percentage. If no exception is thrown, the product entity is passed on in the stream.
Here's what the source code looks like:
 private ProductEntity throwErrorIfBadLuck(
  ProductEntity entity, int faultPercent) {

  if (faultPercent == 0) {
    return entity;
  }

  int randomThreshold = getRandomNumber(1, 100);

  if (faultPercent < randomThreshold) {
    LOG.debug("We got lucky, no error occurred, {} < {}",
      faultPercent, randomThreshold);

  } else {
    LOG.debug("Bad luck, an error occurred, {} >= {}",
      faultPercent, randomThreshold);

    throw new RuntimeException("Something went wrong...");
  }

  return entity;
}

private final Random randomNumberGenerator = new Random();

private int getRandomNumber(int min, int max) {

  if (max < min) {
    throw new IllegalArgumentException("Max must be greater than min");
  }

  return randomNumberGenerator.nextInt((max - min) + 1) + min;
Now that the exceptions have been implemented, we're ready to add resilience mechanisms to the code. We'll start by setting up the circuit breaker and the timeout limiter.
Adding a Circuit Breaker and a Timeout Limiter
As mentioned earlier, to set up a circuit breaker and a timeout limiter, we need to add dependencies to the appropriate Resilience4j libraries in the build.gradle build file.
In addition to this, we'll need to add annotations and specific configuration, as well as code to implement fallback logic for fast failure scenarios.
 ext {
   resilience4jVersion = "1.7.0"
}
dependencies {
    implementation "io.github.resilience4j:resilience4j-spring-
boot2:${resilience4jVersion}"
    implementation "io.github.resilience4j:resilience4j-reactor:${resilience4jVersion}"
    implementation 'org.springframework.boot:spring-boot-starter-aop'
    ...
To prevent Spring Cloud from replacing the version of Resilience4j we want to use with an older version included in its own dependency management, we need to list all sub-projects we want to use as well and explicitly specify the version to use.
We add this additional dependency in the dependencyManagement section to emphasize that it's a necessary workaround due to Spring Cloud's dependency management:
 dependencyManagement {
    imports {
        mavenBom "org.springframework.cloud:spring-cloud-dependencies:${springCloudVersion}"
    }
    dependencies {
        dependency "io.github.resilience4j:resilience4j-spring:${resilience4jVersion}"
        ...
    }
}
To apply a circuit breaker, we can annotate the method it's supposed to protect with @CircuitBreaker(...). In this case, the getProduct() method of the ProductCompositeIntegration class is the one that needs to be protected by the circuit breaker. The circuit breaker is triggered by an exception, not by a timeout itself.
If we want to trigger the circuit breaker after a timeout, we'll need to add a timeout limiter that can be applied with the @TimeLimiter(...) annotation. Here's what the source code looks like:
 @TimeLimiter(name = "product")
@CircuitBreaker(
     name = "product", fallbackMethod = "getProductFallbackValue")

public Mono<Product> getProduct(
  int productId, int delay, int faultPercent) {
  ...
}
The name annotation parameter of the circuit breaker and timeout limiter, "product", is used to identify the configuration that will be applied. The fallback parameter of the method annotated with @CircuitBreaker is used to specify the fallback method to call, getProductFallbackValue in this case, when the circuit breaker is open. For more information on its usage, it's recommended to refer to the Resilience4j documentation.
To activate the circuit breaker, the annotated method needs to be invoked as a Spring bean. In our case, it's the integration class that's injected by Spring into the ProductCompositeServiceImpl service implementation class and therefore used as a Spring bean:
 private final ProductCompositeIntegration integration;

@Autowired
public ProductCompositeServiceImpl(... ProductCompositeIntegration integration) {
  this.integration = integration;
}

public Mono<ProductAggregate> getProduct(int productId, int delay, int faultPercent) {
  return Mono.zip(
    ...,
    integration.getProduct(productId, delay, faultPercent),
    ...
Adding Fast Failure Fallback Logic
To be able to apply fallback logic when the circuit breaker is open, i.e., when the request fails fast, we can specify a fallback method on the @CircuitBreaker annotation as shown in the previous source code.
The fallback method must follow the signature of the method for which the circuit breaker is applied and also have an additional last argument used to pass along the exception that triggered the circuit breaker. In our case, the signature of the fallback method looks like this:
 private Mono<Product> getProductFallbackValue(int productId,
  int delay, int faultPercent, CallNotPermittedException ex) {
The last parameter specifies that we want to be able to handle exceptions of type CallNotPermittedException. We're only interested in exceptions thrown when the circuit breaker is in its open state, so that we can apply fast failure logic. When the circuit breaker is open, it doesn't allow calls to the underlying method; instead, it will immediately throw a CallNotPermittedException exception. Therefore, we're only interested in exceptions of type CallNotPermittedException.
The fallback logic can look up information based on productId from alternative sources, such as an internal cache. In our case, we'll return hard-coded values based on the productId, to simulate a cache hit. To simulate a cache miss, we'll throw a NotFoundException exception in case the productId is 13. The implementation of the fallback method looks like this:
 private Mono<Product> getProductFallbackValue(int productId,
  int delay, int faultPercent, CallNotPermittedException ex) {

  if (productId == 13) {
    String errMsg = "Product Id: " + productId
      + " not found in fallback cache!";
    throw new NotFoundException(errMsg);
  }

  return Mono.just(new Product(productId, "Fallback product"
    + productId, productId, serviceUtil.getServiceAddress()));
}
Finally, the configuration of the circuit breaker and time limiter is added to the product-composite.yml file in the configuration repository. The configuration may look like this:
 resilience4j.timelimiter:
  instances:
    product:
      timeoutDuration: 2s

management.health.circuitbreakers.enabled: true

resilience4j.circuitbreaker:
  instances:
    product:
      allowHealthIndicatorToFail: false
      registerHealthIndicator: true
      slidingWindowType: COUNT_BASED
      slidingWindowSize: 5
      failureRateThreshold: 50
      waitDurationInOpenState: 10000
      permittedNumberOfCallsInHalfOpenState: 3
      automaticTransitionFromOpenToHalfOpenEnabled: true
      ignoreExceptions:
        - se.magnus.api.exceptions.InvalidInputException
        - se.magnus.api.exceptions.NotFoundException
The previous sections have already described the configuration values for the circuit breaker and timeout limiter.
Adding a Retry Mechanism
Just like for the circuit breaker, the retry mechanism can be implemented by adding dependencies, annotations, and configuration. To apply this mechanism to a specific method, simply annotate it with @Retry(name="nnn"), where nnn is the name of the configuration entry to use for this method. In our case, the method to use is getProduct() in the ProductCompositeIntegration class.
  @Retry(name = "product")
  @TimeLimiter(name = "product")
  @CircuitBreaker(name = "product", fallbackMethod =
    "getProductFallbackValue")
  public Mono<Product> getProduct(int productId, int delay,
    int faultPercent) {
The configuration for the retry mechanism is added in the same way as for the circuit breaker and timeout limiter in the product-composite.yml file of the configuration repository. Here's an example configuration:
 resilience4j.retry:
  instances:
    product:
      maxAttempts: 3
      waitDuration: 1000
      retryExceptions:
      - org.springframework.web.reactive.function.client.WebClientResponseException$InternalServerError
That's all the necessary dependencies, annotations, source code, and configuration. To conclude, we can extend the test script by adding tests that verify the proper functioning of the circuit breaker in a deployed system environment.
Automated Tests
In order to perform certain required checks, we need to access the actuator endpoints of the product-composite microservice, which are not exposed via the Edge server. To access them, we'll run a curl command inside the product-composite container using the Docker Compose exec command. Since the base image used by the microservices contains curl, we can use this command to obtain the necessary information. Here's an example command for extracting the circuit breaker status:
docker-compose exec -T product-composite curl -s http://product-composite:8080/actuator/health | jq -r .components.circuitBreakers.details.product.details.state
This command will return the current state of the circuit breaker, which can be CLOSED, OPEN, or HALF_OPEN. In the test script, we start by verifying that the circuit breaker is closed before running the tests using the above command.
Next, to force the circuit breaker to open, we run three commands in a row that all fail due to a timeout caused by a slow response from the product service (the delay parameter is set to 3 seconds). Here's an example command used in the test script:
 for ((n=0; n<3; n++))
do
    assertCurl 500 "curl -k https://$HOST:$PORT/product-composite/$PROD_ID_REVS_RECS?delay=3 $AUTH -s"
    message=$(echo $RESPONSE | jq -r .message)
    assertEqual "Did not observe any item or terminal signal within 2000ms" "${message:0:57}"
done
This command will fail three times in a row and force the circuit breaker to open.
After forcing the circuit breaker to open, we expect fast behavior and the fallback method to be called to return a response. We can verify this with the following code in the test script:
 assertEqual "OPEN" "$(docker-compose exec -T product-composite curl -s http://product-composite:8080/actuator/health | jq -r .components.circuitBreakers.details.product.details.state)"

assertCurl 200 "curl -k https://$HOST:$PORT/product-composite/$PROD_ID_REVS_RECS?delay=3 $AUTH -s"
assertEqual "Fallback product$PROD_ID_REVS_RECS" "$(echo "$RESPONSE" | jq -r .name)"

assertCurl 200 "curl -k https://$HOST:$PORT/product-composite/$PROD_ID_REVS_RECS $AUTH -s"
assertEqual "Fallback product$PROD_ID_REVS_RECS" "$(echo "$RESPONSE" | jq -r .name)"
We can also verify that the fallback method returns a 404 NOT_FOUND error for a non-existent product ID (e.g., ID 13):
 assertCurl 404 "curl -k https://$HOST:$PORT/product-composite/$PROD_ID_NOT_FOUND $AUTH -s"
assertEqual "Product Id: $PROD_ID_NOT_FOUND not found in fallback cache!" "$(echo $RESPONSE | jq -r .message)"
Depending on the configuration, the circuit breaker will transition to the half-open state after a few seconds. To verify this, the test waits for a few seconds before continuing:
 echo "Will sleep for 10 sec waiting for the CB to go Half Open..."
sleep 10
After verifying the expected state (half-open), the test performs three normal requests to bring the circuit breaker back to its normal state, which is also verified:
 assertEqual "HALF_OPEN" "$(docker-compose exec -T product-composite curl -s http://product-composite:8080/actuator/health | jq -r .components.circuitBreakers.details.product.details.state)"

for ((n=0; n<3; n++))
do
assertCurl 200 "curl -k https://$HOST:$PORT/product-composite/$PROD_ID_REVS_RECS $AUTH -s"
assertEqual "product name C" "$(echo "$RESPONSE" | jq -r .name)"
done

assertEqual "CLOSED" "$(docker-compose exec -T product-composite curl -s http://product-composite:8080/actuator/health | jq -r .components.circuitBreakers.details.product.details.state)"
The test also verifies that the response contains data from the underlying database by comparing the returned product name with the value stored in the database. For example, for the product with ID 1, the name should be "product name C".
The test ends by using the /actuator/circuitbreakerevents API of the actuator, which is exposed by the circuit breaker to reveal internal events. This API allows us to know the state transitions performed by the circuit breaker. To verify that the last three state transitions are the expected ones (i.e., closed to open, open to half-open, and half-open to closed), the test uses the following code:
 assertEqual "CLOSED_TO_OPEN" "$(docker-compose exec -T product-composite curl -s http://product-composite:8080/actuator/circuitbreakerevents/product/STATE_TRANSITION | jq -r .circuitBreakerEvents[-3].stateTransition)"

assertEqual "OPEN_TO_HALF_OPEN" "$(docker-compose exec -T product-composite curl -s http://product-composite:8080/actuator/circuitbreakerevents/product/STATE_TRANSITION | jq -r .circuitBreakerEvents[-2].stateTransition)"

assertEqual "HALF_OPEN_TO_CLOSED" "$(docker-compose exec -T product-composite curl -s http://product-composite:8080/actuator/circuitbreakerevents/product/STATE_TRANSITION | jq -r .circuitBreakerEvents[-1].stateTransition)"
These commands allow to verify that the breaker's state transitions occurred as expected.
We added multiple steps to the test script, but this allows us to automatically verify that the expected basic behavior of our breaker is in place. In the next section, we will try the breaker by running automated tests using the test script.
Verify that the circuit is closed under normal operation
Before being able to call the API, it is necessary to acquire an access token by executing the following commands:
 unset ACCESS_TOKEN
ACCESS_TOKEN=$(curl -k https://writer:secret@localhost:8443/oauth2/token -d grant_type=client_credentials -s | jq -r .access_token)
echo $ACCESS_TOKEN
Once the access token has been acquired, you can perform a normal request using the following code to verify that it returns the HTTP response code 200:
curl -H "Authorization: Bearer $ACCESS_TOKEN" -k https://localhost:8443/product-composite/1 -w "%{http_code}\n" -o /dev/null -s
To verify that the breaker is closed, you can use the health API with the following command:
docker-compose exec product-composite curl -s http://product-composite:8080/actuator/health | jq -r .components.circuitBreakers.details.product.details.state
You need to wait for the response to be CLOSED.
Conclusion
In summary, we have seen that Resilience4j is a Java library that allows building resilient microservices by adding functionalities such as circuit breaker, timeout, and retry mechanism. The circuit breaker manages unresponsive services by closing the circuit when the limit is reached, while the timeout maximizes the wait time before the circuit breaker triggers. The retry mechanism can randomly retry failed requests from time to time. It is important to apply it only to idempotent services. The circuit breakers and retry mechanisms are implemented following Spring Boot conventions, and Resilience4j exposes information about their health, events, and metrics via the actuator endpoints.

 English


