Introduction
If you haven't followed Part 1: React - Trello - Part 1
In the previous part, we created all the necessary components. Now, we need to assemble these components and make them available in the layout. We will also introduce the concept of state in this chapter which will allow you to manipulate data.
Another important point will be the use of a reducer that will allow you to make changes to the state, but also to execute actions that will alter this state.
State and reducers
Our component is now finished, but we need to add our AddNewItem component to the layout of our application. Initially, the goal will be to display logs to make sure everything works as we want. Let's open our App.tsx and import our component:
 import React from "react";
import "./styles/index.scss";
import { AppContainer } from "./styled-components/container";
import { Card } from "./components/card";
import { Column } from "./components/column";
import { AddNewItem } from "./components/add-new-item";
Now we can add the component:
     <AppContainer>
      <Column text="To Do">
        <Card text="Generate app scaffold" />
      </Column>
      <Column text="In Progress">
        <Card text="Learn Typescript" />
      </Column>
      <Column text="Done">
        <Card text="Begin to use static typing" />
      </Column>
      <AddNewItem toggleButtonText="+ Add another list" onAdd={console.log} />
    </AppContainer>
As previously stated, each click will add a log to the console to ensure proper functionality. Now, our button is available in our layout:

All we have to do now is add this button to our columns. To do this, we need to go to our Column component.
 import React from "react";
import { ColumnContainer } from "../styled-components/container";
import { ColumnTitle } from "../styled-components/title";
import { AddNewItem } from "./add-new-item";

interface ColumnProps {
  text?: string;
}

export const Column = ({
  text,
  children,
}: React.PropsWithChildren<ColumnProps>) => {
  return (
    <ColumnContainer>
      <ColumnTitle>{text}</ColumnTitle>
      {children}
      <AddNewItem
        toggleButtonText="+ Add another task"
        onAdd={console.log}
        dark
      />
    </ColumnContainer>
  );
};
WELL! Now we can verify that everything is working fine:

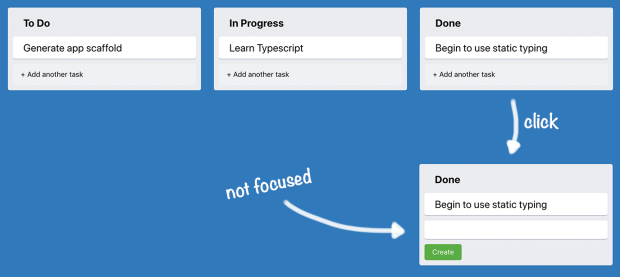
OK, everything seems to be working here, but there is a potential issue: when we click on 'Add another task/list', the user types on the keyboard and nothing appears. This is because we are missing the autofocus at the time of the click. To solve this, React offers us a simple solution:
Refs: provide a way to access the DOM nodes (only React elements)useRef: Hook that allows us to access the targeted ref element.
We will put all of this into practice by adding a utils folder. Often in your applications, it is recommended to use this type of file to avoid redundancy! Here, let's create this folder at the root of the src folder and add the use-focus.ts file:
 import { useRef, useEffect } from "react"
export const useFocus = () => {
    const ref = useRef<HTMLInputElement>(null)
    useEffect(() => {
        ref.current?.focus()
    }, [])
    return ref
}
Some explanations:
useRef: allows access to the input elementHTMLInputElement: refers to the type of element thatrefneeds to provide to Typescript.ref.current?: makes thecurrentoptional and avoids a future erroruseEffect: effect hook that will allow us to apply focus to our input
Now let's import this util into our NewItemForm class:
 import React, { useState } from "react";
import { NewItemButton } from "../styled-components/button";
import { NewItemFormContainer } from "../styled-components/container";
import { NewItemInput } from "../styled-components/form";
import { useFocus } from "../utils/use-focus";
Well, as we explained previously, refs allow access to a React node in the DOM. To point to this node, we need to target it with the ref element. This directive is available directly on the pointed element:
 export const NewItemForm = ({ onAdd }: NewItemFormProps) => {
  const [text, setText] = useState("");
  const inputRef = useFocus();
  return (
    <NewItemFormContainer>
      <NewItemInput
        ref={inputRef}
        value={text}
        onChange={(e) => setText(e.target.value)}
      />
      <NewItemButton onClick={() => onAdd(text)}>Create</NewItemButton>
    </NewItemFormContainer>
  );
};
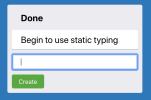
Now if you test the application, you should see the autofocus activate when you click:

State, Redux and drag and drop:
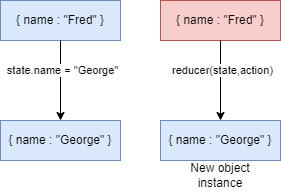
In this subsection, we will add the Global state, which will allow us to add business logic at the same time. The idea is to manage this state using useReducer. Let's detail what useReducer is: it is a hook that React provides us to manage complex objects (with multiple fields). The main idea is that instead of creating a mutation on the original object, we create a new instance with the desired values:

Reducer will therefore calculate a new state by combining the old state with a new object. So we have 3 things to remember:
- The original state that will be destroyed to be recreated
- An action that will allow us to create the calculation function. It must contain the new value(s) for the field(s) to be changed.
- The new state that will then be created.
To call the reducer function, we need to call the function as follows:
const [state, dispatch] = useReducer(reducer, initialState)
The dispatch function will allow us to send actions to the reducer.
Well after this theory, let's create our state. I suggest creating a states folder (we want to share information), and adding the app-state-context.tsx file to it. Before we start, we will define the typing of our objects:
We want to execute/delete/modify tasks, these tasks are defined by a text, but to differentiate them, we will add an ID.
 interface Task {
    id: string
    text: string
}
These tasks are grouped together in a block like "Todo", "In progress", ... which also have a name, a list of tasks, but also an ID:
 interface Column {
    id: string
    text: string
    tasks: Task[]
}
Finally, our state represents a list of "columns":
 export interface AppState {
  lists: Column[];
}
Perfect, now let's define our state, with mocked data:
 export const appData: AppState = {
  lists: [
    {
      id: "0",
      text: "To Do",
      tasks: [{ id: "c0", text: "Generate app scaffold" }],
    },
    {
      id: "1",
      text: "In Progress",
      tasks: [{ id: "c2", text: "Learn Typescript" }],
    },
    {
      id: "2",
      text: "Done",
      tasks: [{ id: "c3", text: "Begin to use static typing" }],
    },
  ],
};
We now need to create the context. We need to define the type of this context:
 interface AppStateContextProps {
  state: AppState;
}
For now, we just want to make appState available through the context, which is why it's the only field in our type. By default, when creating our context, React asks for an object. This object is only used if we don't want to integrate our application into our AppStateProvider (which we will define later). So we can forget about this and pass an empty object when creating our context:
 import React, { createContext } from "react";

export const AppStateContext = createContext<AppStateContextProps>({} as AppStateContextProps)
Let's define our AppStateProvider in a new file in our states folder (app-state-provider.tsx):
 import { AppStateContext } from "./app-state-context";
import { appData } from "./app-state-context";

export const AppStateProvider = ({ children }: React.PropsWithChildren<{}>) => {
  return (
    <AppStateContext.Provider value={{ state: appData }}>
      {children}
    </AppStateContext.Provider>
  );
};
To make our state available, and to "dispatch" it through our different components, we need to import it into our index.tsx:
 import { AppStateProvider } from "./states/app-state-provider";

ReactDOM.render(
  <AppStateProvider>
    <App />
  </AppStateProvider>,
  document.getElementById("root")
);
We can make the state and dispatch accessible by creating a hook, for that, in our app-state-context.tsx, we need to add the useContext hook:
 import React, { createContext, useReducer, useContext } from "react"

export const useAppState = () => {
  return useContext(AppStateContext);
};
In a few words, this function allows us to retrieve the value of AppStateContext using useContext. Now, we can import this function into our App.tsx, and then create a loop that will dynamically add our data to the columns:
 import React from "react";
import "./styles/index.scss";
import { AppContainer } from "./styled-components/container";
import { Card } from "./components/card";
import { Column } from "./components/column";
import { AddNewItem } from "./components/add-new-item";
import { useAppState } from "./states/app-state-context";

const App = () => {
  const { state } = useAppState();

  return (
    <AppContainer>
      {state.lists.map((list, i) => (
        <Column text={list.text} key={list.id} index={i} />
      ))}
      <AddNewItem toggleButtonText="+ Add another list" onAdd={console.log} />
    </AppContainer>
  );
};

export default App;
We have an issue: index is not included in our ColumnProps typing present in the Column.tsx file. Here are the steps that will change:
- Our interface must add a
indexproperty of typenumber - We will remove the wrapping:
React.PropsWithChildrenfrom ourColumncomponent - We will import our state into our component
- We now need to remove the import of the
Cardcomponent from ourApp.tsxfile and implement it in ourColumncomponent.
The implementation is not complicated, following the previous steps, you should get the following code:
 import React from "react";
import { ColumnContainer } from "../styled-components/container";
import { ColumnTitle } from "../styled-components/title";
import { AddNewItem } from "./add-new-item";
import { useAppState } from "../states/app-state-context";
import { Card } from "../components/card";

interface ColumnProps {
  text: string;
  index: number;
}

export const Column = ({ text, index }: ColumnProps) => {
  const { state } = useAppState();

  return (
    <ColumnContainer>
      <ColumnTitle>{text}</ColumnTitle>
      {state.lists[index].tasks.map((task) => (
        <Card text={task.text} key={task.id} />
      ))}
      <AddNewItem
        toggleButtonText="+ Add another task"
        onAdd={console.log}
        dark
      />
    </ColumnContainer>
  );
};
Now it's time to use our reducer (explained earlier) which will allow us to apply changes to the objects. For this, I suggest creating a app-state-actions.tsx file in our states folder. We will define two actions:
Add_task: which will allow us to add tasks to our state.Add_list: which will allow us to add actions to our state.
 type Action =
| {
type: "ADD_LIST"
payload: string
}
| {
type: "ADD_TASK"
payload: { text: string; listId: string }
}
Here, we use the Discriminated Union technique. We define an Action type that has 2 interfaces separated by a vertical line. In other words, each interface has a property type that is our discriminator: typescript can look at this property and tell us what the other properties of the interface are.
Let's create our Reducer that will use this state in a app-state-reducer.tsx file:
 import { AppState } from "./app-state-context";
import { Action } from "./app-state-action";

export const appStateReducer = (state: AppState, action: Action): AppState => {
  switch (action.type) {
    case "ADD_LIST": {
      // Reducer logic here...
      return {
        ...state,
      };
    }
    case "ADD_TASK": {
      // Reducer logic here...
      return {
        ...state,
      };
    }
    default: {
      return state;
    }
  }
};
We should not define constants for our actions, TypeScript will give an error if we try to compare types.
Our actions and our reducer are ready! Now we need to create our dispatch function that will launch our actions. To do this, in app-state-context.tsx, we will add this function:
 import React, { createContext, useReducer, useContext } from "react";
import {Action} from "./app-state-action"
export const AppStateContext = createContext<AppStateContextProps>(
  {} as AppStateContextProps
);

interface AppStateContextProps {
  state: AppState;
  dispatch: React.Dispatch<Action>;
}
Next, we need to add this prop to our app-state-provider.tsx:
 import { appData } from "./app-state-context";
import { useReducer } from "react";
import { AppStateContext } from "./app-state-context";
import { appStateReducer } from "./app-state-reducer";

export const AppStateProvider = ({ children }: React.PropsWithChildren<{}>) => {
  const [state, dispatch] = useReducer(appStateReducer, appData);

  return (
    <AppStateContext.Provider value={{ state, dispatch }}>
      {children}
    </AppStateContext.Provider>
  );
};
There are some notable changes:
- We import our state and dispatch through the React hook:
useReducer - We import our previously defined reducer
- We pass both values through the props
Our actions lack business logic. We will implement ADD_LIST, to create a new instance of the object on the fly. What do we need to do?
- We will use operators (spreads) to get all the fields of the previous object
- We will apply the fields list to a new array with old fields + new ones
- We need to give the following fields: text, id, and tasks to create a new column
- The creation of the ID must be done dynamically via
nanoidwhich is a free library
Let's import nanoid:
npm install nanoid
Next, we can implement our action to look like this:
<pre>
<code id="htmlViewer" style="color:rgb(220, 220, 220); font-weight:400;background-color:rgb(30, 30, 30);background:rgb(30, 30, 30);display:block;padding: .5em;"><span style="color:rgb(86, 156, 214); font-weight:400;">import</span> { <span class="hljs-title class_">AppState</span> } <span style="color:rgb(86, 156, 214); font-weight:400;">from</span> <span style="color:rgb(214, 157, 133); font-weight:400;">"./app-state-context"</span>;
<span style="color:rgb(86, 156, 214); font-weight:400;">import</span> { <span class="hljs-title class_">Action</span> } <span style="color:rgb(86, 156, 214); font-weight:400;">from</span> <span style="color:rgb(214, 157, 133); font-weight:400;">"./app-state-action"</span>;
<span style="color:rgb(86, 156, 214); font-weight:400;">import</span> { nanoid } <span style="color:rgb(86, 156, 214); font-weight:400;">from</span> <span style="color:rgb(214, 157, 133); font-weight:400;">"nanoid"</span>;
<span style="color:rgb(86, 156, 214); font-weight:400;">export</span> <span style="color:rgb(86, 156, 214); font-weight:400;">const</span> appStateReducer = (<span style="color:rgb(156, 220, 254); font-weight:400;">state</span>: <span class="hljs-title class_">AppState</span>, <span style="color:rgb(156, 220, 254); font-weight:400;">action</span>: <span class="hljs-title class_">Action</span>): <span style="color:rgb(220, 220, 220); font-weight:400;"><span style="color:rgb(220, 220, 220); font-weight:400;">AppState</span> =></span> {
<span style="color:rgb(86, 156, 214); font-weight:400;">switch</span> (action.<span style="color:rgb(220, 220, 220); font-weight:400;">type</span>) {
<span style="color:rgb(86, 156, 214); font-weight:400;">case</span> <span style="color:rgb(214, 157, 133); font-weight:400;">"ADD_LIST"</span>: {
<span style="color:rgb(86, 156, 214); font-weight:400;">return</span> {
...state,
<span style="color:rgb(156, 220, 254); font-weight:400;">lists</span>: [
...state.<span style="color:rgb(220, 220, 220); font-weight:400;">lists</span>,
{ <span style="color:rgb(156, 220, 254); font-weight:400;">id</span>: <span class="hljs-title function_">nanoid</span>(), <span style="color:rgb(156, 220, 254); font-weight:400;">text</span>: action.<span style="color:rgb(220, 220, 220); font-weight:400;">payload</span>, <span style="color:rgb(156, 220, 254); font-weight:400;">tasks</span>: [] },
],
};
}
<span style="color:rgb(86, 156, 214); font-weight:400;">case</span> <span style="color:rgb(214, 157, 133); font-weight:400;">"ADD_TASK"</span>: {
<span style="color:rgb(87, 166, 74); font-weight:400;">// Reducer logic here...</span>
<span style="color:rgb(86, 156, 214); font-weight:400;">return</span> {
...state,
};
}
<span style="color:rgb(156, 220, 254); font-weight:400;">default</span>: {
<span style="color:rgb(86, 156, 214); font-weight:400;">return</span> state;
}
}
};</code></pre>
The ADD_TASK action will be a bit more complicated. Indeed, these tasks must be added to task lists. So we will need to find the list in question by its ID through the findItemIndexById method which we can add to our util folder. Let's create our arrayUtils.ts file:
 interface Item {
  id: string;
}

export const findItemIndexById = <T extends Item>(items: T[], id: string) => {
  return items.findIndex((item: T) => item.id === id);
};
We used a generic type that extends Item to constrain our type to contain the fields defined in our Item interface. Now that we have this object, we just need to implement our object. To do this, we will proceed as follows:
We need to create a function that will override the push function: overrideItemAtIndex. But why? Simply because push creates a direct mutation of the object which we no longer want.
To implement this function, we will create a new method in our util.
Implementation:
 export function overrideItemAtIndex<T>(
  array: T[],
  newItem: T,
  targetIndex: number
) {
  return array.map((item, index) => {
    if (index !== targetIndex) {
      return item;
    }
    return newItem;
  });
}
Regarding our action, we need to create a new list of objects with the new task to be added. Then, we use the previously defined utility to override the target list with its updated version.
Based on these explanations, we can define our action as follows:
 import { AppState } from "./app-state-context";
import { Action } from "./app-state-action";
import { nanoid } from "nanoid";
import { overrideItemAtIndex, findItemIndexById } from "../utils/array-utils";

export const appStateReducer = (state: AppState, action: Action): AppState => {
  switch (action.type) {
    case "ADD_LIST": {
      return {
        ...state,
        lists: [
          ...state.lists,
          { id: nanoid(), text: action.payload, tasks: [] },
        ],
      };
    }
    case "ADD_TASK": {
      const targetListIndex = findItemIndexById(
        state.lists,
        action.payload.listId
      );
      const targetList = state.lists[targetListIndex];
      const updatedTargetList = {
        ...targetList,
        tasks: [
          ...targetList.tasks,
          { id: nanoid(), text: action.payload.text },
        ],
      };
      return {
        ...state,
        lists: overrideItemAtIndex(
          state.lists,
          updatedTargetList,
          targetListIndex
        ),
      };
    }
    default: {
      return state;
    }
  }
};
Now, let's adapt our App to use the dispatch function of our useAppState hook:
 import React from "react";
import "./styles/index.scss";
import { AppContainer } from "./styled-components/container";
import { Column } from "./components/column";
import { AddNewItem } from "./components/add-new-item";
import { useAppState } from "./states/app-state-context";

const App = () => {
  const { state, dispatch } = useAppState();

  return (
    <AppContainer>
      {state.lists.map((list, i) => (
        <Column id={list.id} text={list.text} key={list.id} index={i} />
      ))}
      <AddNewItem
        toggleButtonText="+ Add another list"
        onAdd={(text) => dispatch({ type: "ADD_LIST", payload: text })}
      />
    </AppContainer>
  );
};

export default App;
Nous devons maintenant mettre à jour ColumnProps afin d'accepter le champ id :
 interface ColumnProps {
  text: string;
  index: number;
  id: string;
}
After creating this prop, we also need to update our component:
 export const Column = ({ text, index, id }: ColumnProps) => {
  const { state, dispatch } = useAppState();
  return (
    <ColumnContainer>
      <ColumnTitle>{text}</ColumnTitle>
      {state.lists[index].tasks.map((task, i) => (
        <Card text={task.text} key={task.id} index={i} />
      ))}
      <AddNewItem
        toggleButtonText="+ Add another card"
        onAdd={(text) =>
          dispatch({ type: "ADD_TASK", payload: { text, listId: id } })
        }
        dark
      />
    </ColumnContainer>
  );
};;export const Column = ({ text, index, id }: ColumnProps) => {
  const { state, dispatch } = useAppState();
  return (
    <ColumnContainer>
      <ColumnTitle>{text}</ColumnTitle>
      {state.lists[index].tasks.map((task, i) => (
        <Card text={task.text} key={task.id} index={i} />
      ))}
      <AddNewItem
        toggleButtonText="+ Add another card"
        onAdd={(text) =>
          dispatch({ type: "ADD_TASK", payload: { text, listId: id } })
        }
        dark
      />
    </ColumnContainer>
  );
};export const Column = ({ text, index, id }: ColumnProps) => {
  const { state, dispatch } = useAppState();
  return (
    <ColumnContainer>
      <ColumnTitle>{text}</ColumnTitle>
      {state.lists[index].tasks.map((task, i) => (
        <Card text={task.text} key={task.id} index={i} />
      ))}
      <AddNewItem
        toggleButtonText="+ Add another card"
        onAdd={(text) =>
          dispatch({ type: "ADD_TASK", payload: { text, listId: id } })
        }
        dark
      />
    </ColumnContainer>
  );
};
CardProp also requires our attention:
 interface CardProps {
  text: string;
  index: number;
}
We can now update the component:
 export const Column = ({ text, index, id }: ColumnProps) => {
  const { state, dispatch } = useAppState();
  return (
    <ColumnContainer>
      <ColumnTitle>{text}</ColumnTitle>
      {state.lists[index].tasks.map((task, i) => (
        <Card text={task.text} key={task.id} index={i} />
      ))}
      <AddNewItem
        toggleButtonText="+ Add another card"
        onAdd={(text) =>
          dispatch({ type: "ADD_TASK", payload: { text, listId: id } })
        }
        dark
      />
    </ColumnContainer>
  );
};
Let's take a look at the final result:

End of Part 2
Great! We have created our state and reducer. In the next chapter, we will:
- Create the drag and drop functionality for our columns
- Add the necessary actions for this drag and drop
- Override the drag and drop preview to create our own
You can find the next part of this tutorial here: React - Trello - Part 3.

 English


