Introduction
This section explains how to use the new React Hooks, their rules, and how you can create your own Hooks. As you know, React is evolving very quickly and since React 16.8, the new React Hooks have been introduced, which changes the game in terms of React development in that they will increase coding speed and improve the performance of our applications. React allows us to write React applications using only functional components, which means that it is no longer necessary to use class components.
What are Hooks?
React Hooks is a new addition in React 16.8. They allow you to use state and other features of React without writing a React class component. React hooks are also backward compatible, which means they contain no breaking changes and do not replace your knowledge of React concepts.
In this chapter, we will have an overview of Hooks for experienced React users, and we will also learn some of the most common React Hooks such as:
- useState
- useEffect
- useReducer
- useRef
- useImperativeHandle
- useLayoutEffect
- useMemo
- useCallback
- useDispatch && useSelector
- memo
- useDebugValue
Rules
React Hooks are essentially JavaScript functions, but you must follow two rules to use them:
- Only call hooks at the top level: Official Documentation. In other words, avoid calling hooks inside loops, conditions, or nested functions. I quote: "By following this rule, you ensure that hooks are called in the same order on every render of a component.''
- Only call hooks from React functions: Official Documentation. They are called from React function components or from custom hooks.
React provides a linter plugin to enforce these rules for you.
npm install --save-dev eslint-plugin-react-hooks
useState
You probably know how to use component state by using it in a class with this.setState(). Now, you can use component state by using the new React Hook: useState.
Import the useState Hook from React:
import { useState } from 'react'
Next, you need to declare the state you want to use by defining a state variable and the setter for that specific state:
 const Counter = () => {
  const [counter, setCounter] = useState<number>(0)
}
To test our state, we need to create a method that will be triggered by the onClick event:
 const Counter = () => {
  const [counter, setCounter] = useState<number>(0)

  const handleCounter = (operation: 'add' | 'subtract') => {
    if (operation === 'add') {
      return setCounter(counter + 1)
    }

    return setCounter(counter - 1)
  }
}
Finally, we can display the counter state and some buttons to increase or decrease the state:
 return (
  <p>
    Counter: {counter} <br />
    <button onClick={() => handleCounter('add')}>+ Add</button>
    <button onClick={() => handleCounter('subtract')}>- Subtract</button>
  </p>
)
As you can see, the useState Hook changes the game in React and makes state management in a functional component easier.
Migrating from a Class Component to a Functional Component
Let's consider an example of migrating a component that uses a class to React Hooks.
 class Issues extends Component<Props, State> {
  constructor(props: Props) {
    super(props)

    this.state = {
      issues: []
    }
  }
}
First, we need to tear down the class to turn it into a functional component:
 type Props = {
  propX: string
  propY: number
  propZ: boolean
}

const Issues: FC<Props> = () => {...}
The next step is to tear down the constructor (we're no longer in a class) and add the useState Hook to it:
 // Le Hook useState remplace la méthode this.setState()
const [issues, setIssues] = useState<Issue[]>([])
useReducer
The useReducer Hook is often preferable to useState when you have complex local state logic (object with multiple levels) or when the next state depends on the previous state of that object. useReducer also allows you to optimize performance for components that trigger deep updates, as you can provide dispatch instead of callback functions.
 const initialState = { count: 0 };

function reducer(state, action) {
  switch (action.type) {
    case 'increment':
      return { count: state.count + 1 };
    case 'decrement':
      return { count: state.count - 1 };
    default:
      throw new Error();
  }
}

function Counter() {
  const [state, dispatch] = useReducer(reducer, initialState);
  return (
    <>
      Total : {state.count}
      <button onClick={() => dispatch({type: 'decrement'})}>-</button>
      <button onClick={() => dispatch({type: 'increment'})}>+</button>
    </>
  );
}
useRef
The useRef Hook returns a mutable ref object whose current property is initialized with the provided argument (initialValue). The returned object will persist for the entire lifetime of the component. It allows access to a node in the DOM, which can, for example, be used to call a method on the child or capture an event.
 function TextInputWithFocusButton() {
  const inputEl = useRef(null);
  const onButtonClick = () => {
    // `current` fait référence au champ textuel monté dans le DOM
    inputEl.current.focus();
  };
  return (
    <>
      <input ref={inputEl} type="text" />
      <button onClick={onButtonClick}>Donner le focus au champ</button>
    </>
  );
}
useImperativeHandle
The useImperativeHandle Hook customizes the instance that is exposed to the parent component when using a ref. As always, it's best to refrain from using imperative code that manipulates refs in most cases.
 function FancyInput(props, ref) {
  const inputRef = useRef();
  useImperativeHandle(ref, () => ({
    focus: () => {
      inputRef.current.focus();
    }
  }));
  return <input ref={inputRef} ... />;
}

FancyInput = forwardRef(FancyInput);
useLayoutEffect
The signature is identical to useEffect, but useLayoutEffect runs synchronously after all DOM mutations have taken place. Use it to inspect the layout of the DOM and perform a new render synchronously. Updates scheduled in useLayoutEffect will be handled synchronously before the browser has a chance to paint. Prefer using standard useEffect whenever possible to avoid blocking visual updates.
If you're migrating code from a class component, be aware that useLayoutEffect runs in the same phase as componentDidMount and componentDidUpdate. We recommend starting with useEffect and only attempting to use useLayoutEffect if you encounter issues.
useEffect
When working with useEffect, you need to think in terms of effects. If you want to achieve the equivalent effect of the componentDidMount method with useEffect, you can do the following:
Let's migrate the class component to accept our useEffect (based on the example above):
 useEffect(() => {
  // Here you perform your side effect
}, [])

componentDidMount() {
  axios
   .get('https://api.github.com/repos/ContentPI/ContentPI/issues')
   .then((response: any) => {
      this.setState({
        issues: response.data
      })
    })
}
The first parameter is the effect callback you want to run, and the second parameter is the array of dependencies. If you pass an empty array ([]) on the dependencies, state and props will have their original initial values. If you pass an array of dependencies, the useEffect Hook will only run if any of these dependencies change:
⚠️ However, it's important to mention that even though it's the closest equivalent to componentDidMount, it doesn't have the same behavior. Unlike componentDidMount and componentDidUpdate, the function we pass to useEffect is called after the component has been laid out. This works normally for many common side effects, such as setting up subscriptions and event handlers, because most types of work don't need to block the browser from updating the screen.
If you need to trigger an effect conditionally, you need to add a dependency to the dependency array, otherwise you'll run the effect multiple times and this can lead to an infinite loop.
We used the lifecycle method called componentDidMount, which runs when the component is mounted and will only run once. Our useEffect Hook will now handle all lifecycle methods using a different syntax for each, let's see how to achieve the same effect as componentDidMount:
 useEffect(() => {
  // When you pass an array of dependencies the useEffect hook will only
  // run if one of the dependencies changes.
}, [dependencyA, dependencyB])

// When we use the useEffect hook with an empty array [] on the
// dependencies (second parameter)
// this represents the componentDidMount method (will be executed when the
// component is mounted).
useEffect(() => {
  axios
    .get('https://api.github.com/repos/ContentPI/ContentPI/issues')
    .then((response: any) => {
      // Here we update directly our issue state
      setIssues(response.data)
    })
}, [])
useCallback, useMemo, and memo
To understand the difference between useCallback, useMemo, and memo, let's make an example of a task list. (The entire code is in the sidebar, on the main branch):
You can delete all the unnecessary files and change your App to look like this:
 // Dependencies
import { useState, useEffect, useMemo, useCallback } from 'react'

// Components
import List, { Todo } from './List'

const initialTodos = [
  { id: 1, task: 'Go shopping' },
  { id: 2, task: 'Pay the electricity bill'}
]

function App() {
  const [todoList, setTodoList] = useState(initialTodos)
  const [task, setTask] = useState('')

  useEffect(() => {
    console.log('Rendering <App />')
  })

  const handleCreate = useCallback(() => {
    const newTodo = {
      id: Date.now(),
      task
    }

    // Pushing the new todo to the list
    setTodoList(prevTodoList => [...prevTodoList, newTodo])

    // Resetting input value
    setTask('')
  }, [task])

  return (
    <>
      <input
        type="text"
        value={task}
        onChange={(e) => setTask(e.target.value)}
      />

      <button onClick={handleCreate}>Create</button>

      <List todoList={todoList} />
    </>
  )
}

export default App
We define some initial tasks and create the todoList state, which we will pass through the List component. Let's create the List.tsx component:
 // Dependencies
import { FC, useEffect, memo } from 'react'

// Components
import Task from './Task'

// Types
export type Todo = {
  id: number
  task: string
}

interface Props {
  todoList: Todo[]
}

const List: FC<Props> = memo(({ todoList }) => {
  useEffect(() => {
    // This effect is executed every new render
    console.log('Rendering <List />')
  })

  return (
    <ul>
      {todoList.map((todo: Todo) => (
        <Task key={todo.id} id={todo.id} task={todo.task} />
      ))}
    </ul>
  )
})

export default List
A list without tasks is useless, so let's create this component:
 import { FC, useEffect, memo } from 'react'

interface Props {
  id: number
  task: string
}

const Task: FC<Props> = memo(({ task }) => {
  useEffect(() => {
    console.log('Rendering <Task />', task)
  })

  return (
    <li>{task}</li>
  )
})

export default Task
We won't dwell on the design here, the goal is to show the difference between the hooks. Let's see the result:

As you can see, just by typing "Hello", we have new batches of renders. So we can determine that this component does not have good performance, and that's where memo will help us improve performance.
Memo
memo is a higher-order component (HOC), similar to PureComponent. It performs a shallow comparison of props (i.e. a superficial check), so if we try to render a component with the same props all the time, the component will only be rendered once and will be memoized. The component will only be rendered when a prop's value changes.
To fix our components to avoid multiple renders when we type in the input, we need to wrap our components with the memo HOC:
 import { FC, useEffect, memo } from 'react'

...

export default memo(List)
Too :
 import { FC, useEffect, memo } from 'react'

...

export default memo(Task)
The result:
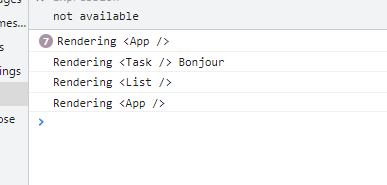
Now we no longer have multiple renders every time we type in the input. We just get the first batch of renders the first time, then when we type, we simply get two more renders of the App component, which is perfectly fine because the task state (input value) that we are modifying is actually part of the App component.
As you can see, we have greatly improved performance, and we are just running what is needed. At this point, you're probably thinking that the right way is to always add memo to our components, or maybe you're wondering why React doesn't do it for us by default?
⚠️ The reason for this is performance, which means it's not a good idea to add memo to all our components unless it's absolutely necessary. Otherwise, the process of shallow comparisons and memoization will have lower performance than not using it.
I have a rule for determining whether it's a good idea to use memo: don't use it. Normally, when we have small components or basic logic, we don't need it unless you're working with large data from an API or your component needs to perform many renders (usually huge lists), or when you notice that your application is slowing down. Only in this case would I recommend using memo.
useMemo
Let's say we now want to implement a search function in our task list. The first thing we need to do is add a new state called term:
 function App() {
  const [todoList, setTodoList] = useState(initialTodos)
  const [task, setTask] = useState('')
  const [term, setTerm] = useState('')
Ensuite, nous devons créer une fonction appelée handleSearch et ajoutons le bouton:
 const filteredTodoList = todoList.filter((todo: Todo) => {
  console.log('Filtering...')
  return todo.task.toLowerCase().includes(term.toLocaleLowerCase())
})
return (
  <>
    <input
      type="text"
      value={task}
      onChange={(e) => setTask(e.target.value)}
    />

    <button onClick={handleCreate}>Create</button>
    <button onClick={handleSearch}>Search</button>

    <List todoList={filteredTodoList} />
  </>
)
You should get this result:
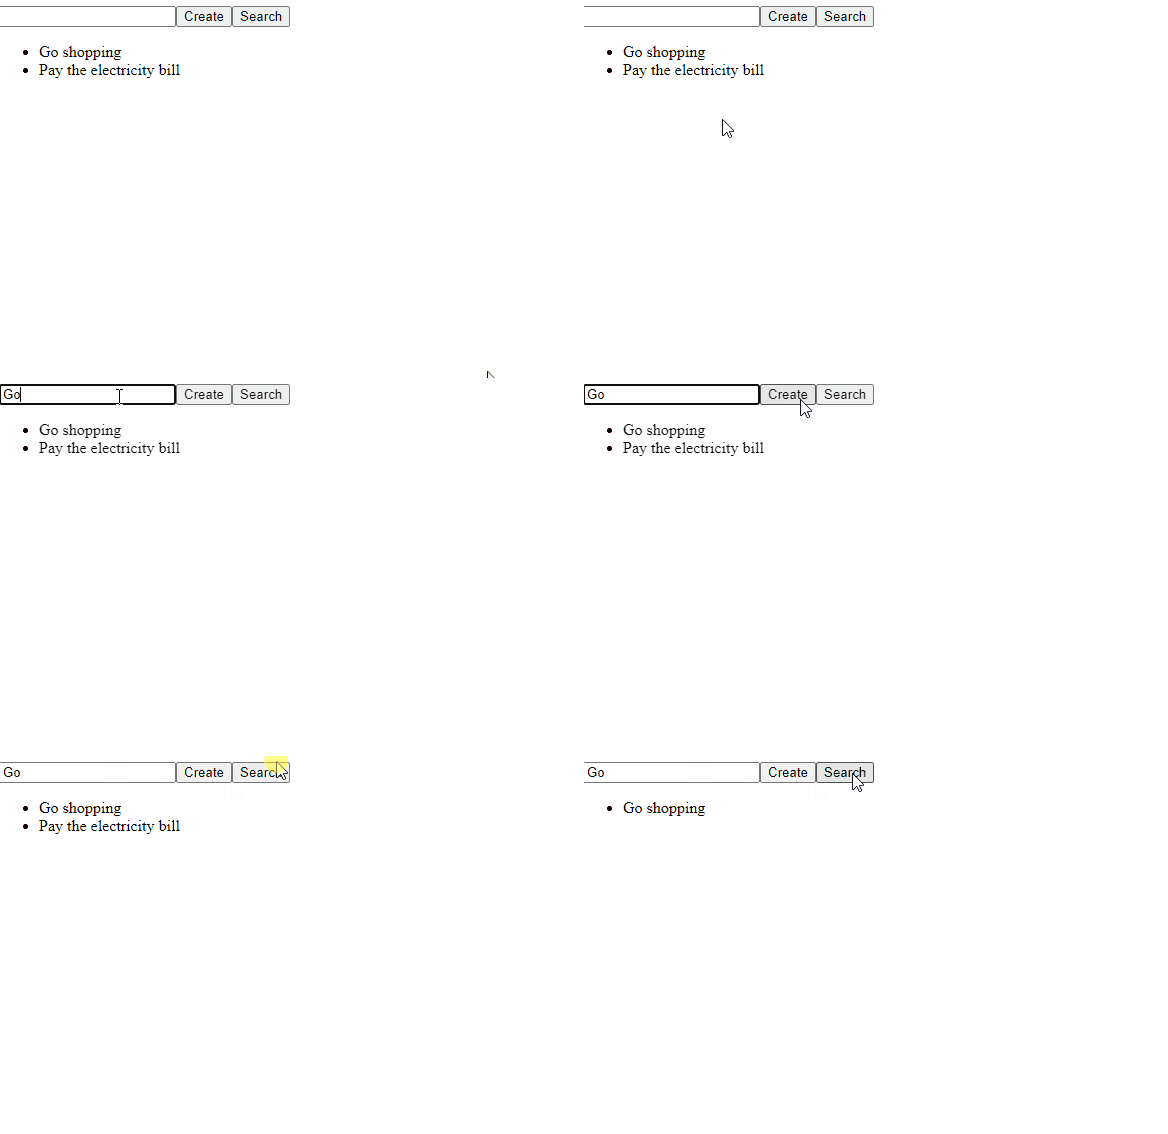
Now, let's look at performance:
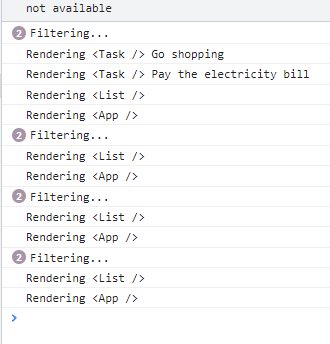
Filtering is executed twice, then the App component is rendered, and everything seems fine here, but what's the problem with this? Try typing "Go to the doctor" again in the input and see how many renders and filters you get. You will see that for every letter you type, you get two filter calls and one App render, and you don't need to be a genius to see that this is bad performance. Not to mention that if you are working with a large data table, it will be worse. So how can we solve this problem?
🦸♂️ useMemo is our hero!!! We need to move our filter inside useMemo:
 const filteredTodoList = useMemo(() => todoList.filter((todo: Todo) => {
  console.log('Filtering...')
  return todo.task.toLowerCase().includes(term.toLowerCase())
}), [])
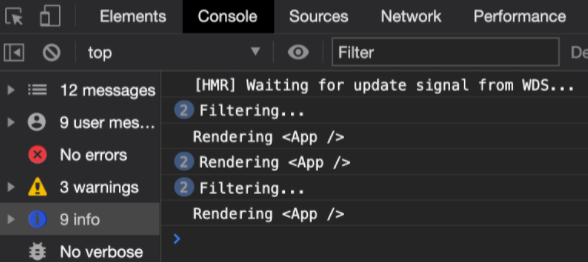
This hook will memoize the result (value) of a function and will have a few dependencies to listen to. There is still a small problem. If you try to click the "Search" button, it will not filter, and that's because we missed the dependencies. You need to add the term and todoList dependencies to the array:
 const filteredTodoList = useMemo(() => todoList.filter((todo: Todo) => {
  console.log('Filtering...')
  return todo.task.toLowerCase().includes(term.toLocaleLowerCase())
}), [term, todoList])
You should get the following performance:
⚠️ Here, we need to use the same rule we used for memo; only use it when absolutely necessary.
useCallback
We will now add a task deletion feature to learn how useCallback works. The first thing we need to do is create a new function called handleDelete in our App:
 const handleDelete = (taskId: number) => {
  const newTodoList = todoList.filter((todo: Todo) => todo.id !== taskId)
  setTodoList(newTodoList)
}
Next, we need to pass this function to the List component as a prop:
   return (
    <>
      <input
        type="text"
        value={task}
        onChange={(e) => setTask(e.target.value)}
      />

      <button onClick={handleCreate}>Create</button>
      <button onClick={handleSearch}>Search</button>

      <List todoList={filteredTodoList} handleDelete={handleDelete} />
    </>
  );
Next, in our List, you need to add the new prop:
 interface Props {
  todoList: Todo[];
  handleDelete: any;
}
Next, you need to extract this new prop and pass it down to the Task component:
 const List: FC<Props> = ({ todoList, handleDelete }) => {
  useEffect(() => {
    // This effect is executed every new render
    console.log('Rendering <List />')
  })

  return (
    <ul>
      {todoList.map((todo: Todo) => (
        <Task
          key={todo.id}
          id={todo.id}
          task={todo.task}
          handleDelete={handleDelete}
        />
      ))}
    </ul>
  )
}
Next, let's adjust the Task component so that a button triggers the delete click:
 import { FC, useEffect, memo } from "react";

interface Props {
  id: number;
  task: string;
  handleDelete: any;
}

const Task: FC<Props> = ({ id, task, handleDelete }) => {
  useEffect(() => {
    console.log("Rendering <Task />", task);
  });

  return (
    <li>
      {task} <button onClick={() => handleDelete(id)}>X</button>
    </li>
  );
};

export default memo(Task);
Let's look at performance:
Deleting seems to work fine! However, when we add text now, we have a new performance issue:
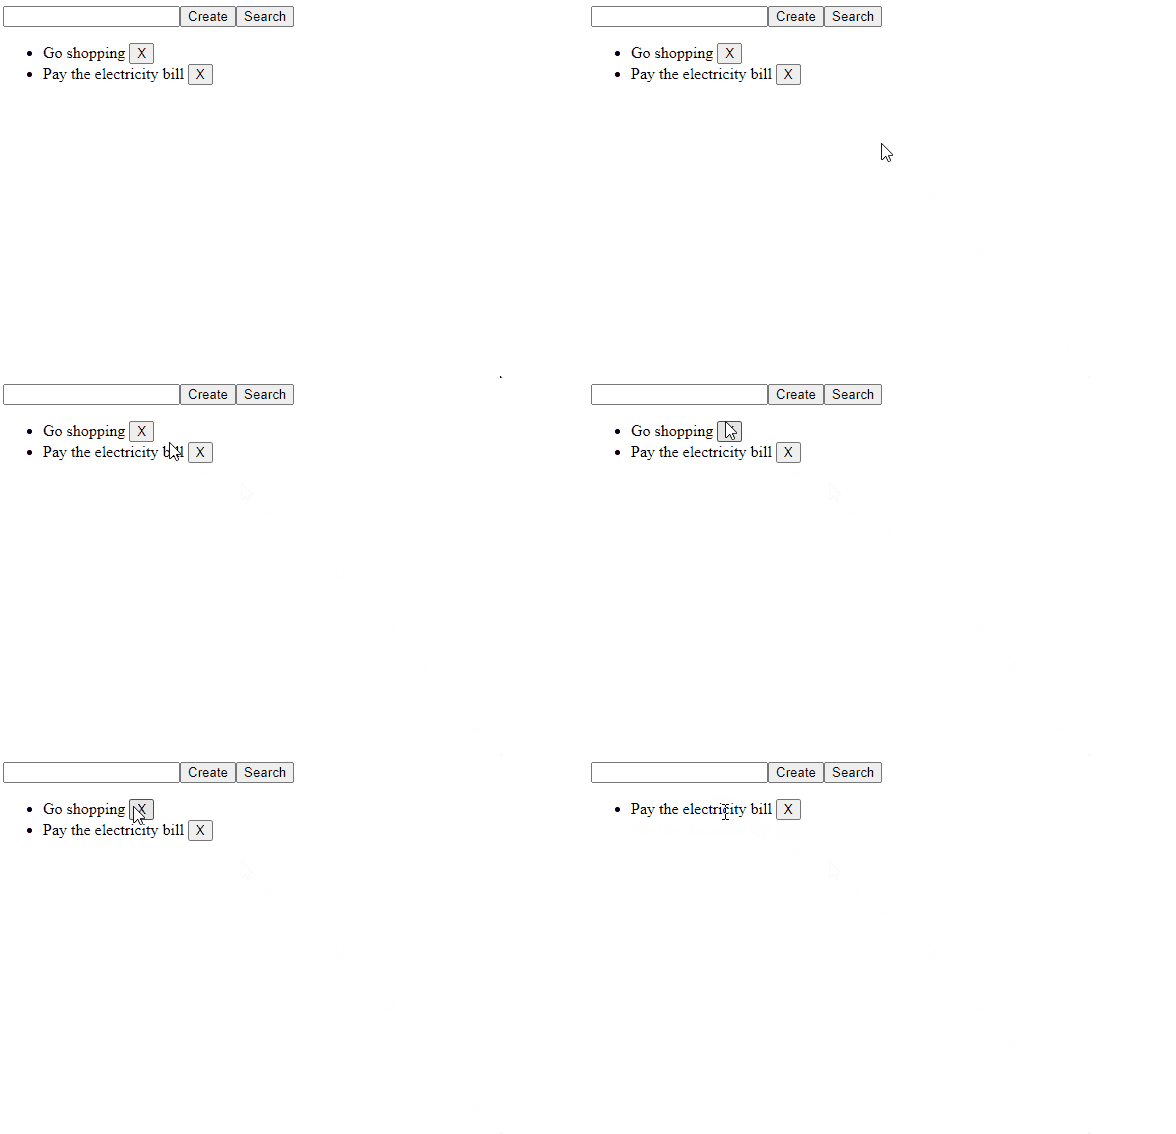
At this point, you're probably wondering, what happens if we've already implemented the memo HOC to memoize components?
The problem now is that our handleDelete function is passed to two components:
- From App to List
- From List to Task
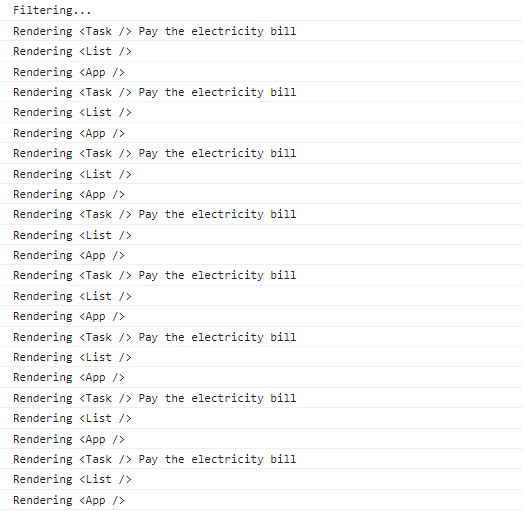
The problem is that this function is regenerated every time we have a new render, in this case, every time we type something. The useCallback hook is very similar to useMemo in syntax, but the main difference is that instead of memoizing the resulting value of a function, it memoizes the function definition:
 const handleDelete = useCallback((taskId: number) => {
  const newTodoList = todoList.filter((todo: Todo) => todo.id !== taskId)
  setTodoList(newTodoList)
}, [todoList])
We should have solved the previous issue! As you can see, useCallback helps us greatly improve performance. In the next section, you will learn how to memoize a function passed as an argument with useEffect.
There is a special case where we will need to use useCallback, and that is when we pass a function as an argument through useEffect, for example, in our App. Let's create a new useEffect:
 const printTodoList = useCallback(() => {
  console.log("Changing todoList", todoList);
}, [todoList]);

useEffect(() => {
  printTodoList();
}, [todoList, printTodoList]);
In the current case, we have:
- Use
useCallbackbecause we manipulate state - Add
printTodoListas a dependency
So we have solved the performance issue by linking useCallback and useEffect.
In summary:
memo |
useMemo |
useCallback |
|---|---|---|
| Memorizes a component | Memorizes a calculated value | Memoizes a function definition to avoid redefining it on every render. |
| Remembers when props change | For heavy processes | Use it whenever a function is passed as an effect argument. |
| Avoids re-renders | For calculated properties | Use it whenever a function is passed via props to a memoized component. |
⚠️ And finally, don't forget the golden rule: only use them when absolutely necessary.
useReducer
You probably have some experience using Redux (react-redux) with class components, and if so, you will understand how useReducer works. The concepts are fundamentally the same: actions, reducers, dispatch, store, and state. Although, in general, it sounds very similar to react-redux, they have a few differences:
react-reduxprovides middleware and wrappers such as thunk, sagas, and many more.useReducersimply gives you a dispatch method that you can use to send simple objects as actions.useReducerhas no default store; you can create one usinguseContext, but it's just reinventing the wheel.
Let's implement an example:
import { useReducer, useState, ChangeEvent} from 'react'

type Note = {
  id: number
  note: string
}

type Action = {
  type: string
  payload?: any
}

type ActionTypes = {
  ADD: 'ADD'
  UPDATE: 'UPDATE'
  DELETE: 'DELETE'
}

const actionType: ActionTypes = {
  ADD: 'ADD',
  DELETE: 'DELETE',
  UPDATE: 'UPDATE'
}

const initialNotes: Note[] = [
  {
    id: 1,
    note: 'Note 1'
  },
  {
    id: 2,
    note: 'Note 2'
  }
]

const reducer = (state: Note[], action: Action) => {
  switch (action.type) {
    case actionType.ADD:
      return [...state, action.payload]

    case actionType.DELETE:
      return state.filter(note => note.id !== action.payload)

    case actionType.UPDATE:
      const updatedNote = action.payload
      return state.map((n: Note) => n.id === updatedNote.id ? updatedNote : n)

    default:
      return state
  }
}

const Notes = () => {
  const [notes, dispatch] = useReducer(reducer, initialNotes)
  const [note, setNote] = useState('')

  const handleSubmit = (e: any) => {
    e.preventDefault()

    const newNote = {
      id: Date.now(),
      note
    }

    dispatch({ type: actionType.ADD, payload: newNote })
  }

  return (
    <div>
      <h2>Notes</h2>

      <ul>
        {notes.map((n: Note) => (
          <li key={n.id}>
            {n.note} {' '}
            <button
              onClick={() => dispatch({
                type: actionType.DELETE,
                payload: n.id
              })}
            >
              X
            </button>

            <button
              onClick={() => dispatch({
                type: actionType.UPDATE,
                payload: {...n, note}
              })}
            >
              Update
            </button>
          </li>
        ))}
      </ul>

      <form onSubmit={handleSubmit}>
        <input
          placeholder="New note"
          value={note}
          onChange={e => setNote(e.target.value)}
        />
      </form>
    </div>
  )
}

export default Notes
We have defined 3 operations: ADD, DELETE, and UPDATE.
dispatch is similar to useState, and in our case, it allows us to initially initialize our "State": const [notes, dispatch] = useReducer(reducer, initialNotes).
dispatch is then used to send actions with the type of action we want to perform: dispatch({ type: actionType.ADD, payload: newNote }).
As you can see, useReducer is pretty much the same as Redux in terms of dispatch method, actions, and reducers, but the main difference is that it's limited to the context of your component and its children. So if you need a global store to be accessible throughout your application, you should use react-redux instead.
useDebugValue
You can use useDebugValue to display a label for custom Hooks in the React development tools (React DevTools).
useDebugValue(value)
useDispatch && useSelector
Before Hooks, we always used connect(), which is a higher-order component and a wrapper to our component. connect() allows us to read values from the Redux store. connect() takes two arguments, both optional:
mapStateToProps: called every time the store state changes. It receives the entire store state and should return an object of data that this component needs.mapDispatchToProps: This parameter can be either a function or an object. If it's a function, it will be called once when the component is created. It will receivedispatchas an argument and should return an object full of functions that usedispatchto dispatch actions.
useDispatch
This is equivalent to mapDispatchToProps. We will call useDispatch and store it in a variable dispatch. This Hook returns a reference to the store's dispatch function.
 import React from "react";
//import useDispatch from react-redux
import { useDispatch} from "react-redux";
//these are actions define in redux>actions folder
import { updateFirstName } from "../redux/actions";

const Form = () => {

  const dispatch = useDispatch();

  const handleFirstName = () => {
    //dispatching the action
    dispatch(updateFirstName("Jason"));
  };

  return (
    <React.Fragment>
      <div className="container">
        <button onClick={handleFirstName}>Update First
        Name</button>
      </div>
    </React.Fragment>
  );
};

export default Form;
useSelector
This is equivalent to mapStateToProps. useSelector is a function that takes the current state as an argument and returns any data you want. It allows you to store the return values in a variable within your functional components, instead of passing them as props.
 import React from "react";
import { useDispatch, useSelector } from "react-redux";
import { updateFirstName } from "../redux/actions";

const Form = () => {
  const dispatch = useDispatch();
  const nameObj = useSelector((state) => state.nameReducer);
  const { firstName } = nameObj;
  const handleFirstName = () => {
    dispatch(updateFirstName("Jason"));
  };

  return (
    <React.Fragment>
      <div className="container">
        <label>First Name : {firstName}</label>
        <button onClick={handleFirstName}>Update First Name</button>

        <label>Last Name : {lastName}</label>
        <button type="submit" onClick={handleLastName}>
          Update First Name
        </button>
      </div>
    </React.Fragment>
  );
};

export default Form;
Lifecycle Migration
As you know, we have several lifecycles in React:
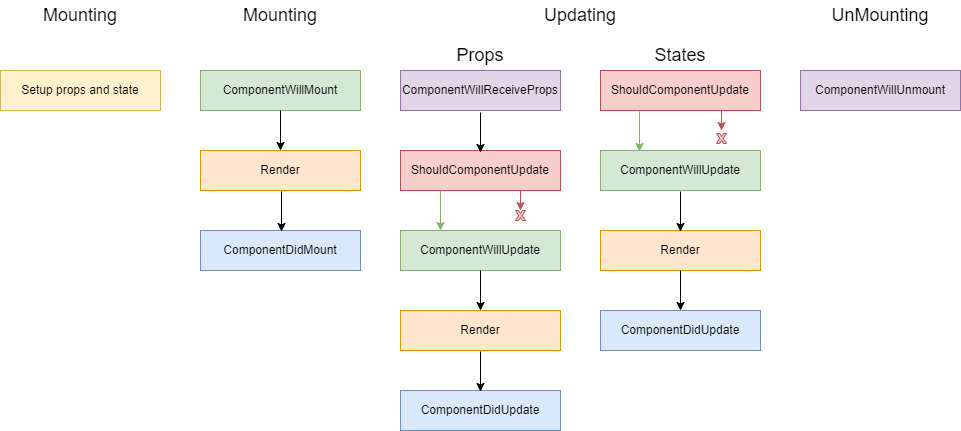
We will list how you can migrate the old lifecycles to work with the new hooks:
| Lifecycle | Hooks | Specification |
|---|---|---|
componentDidMount |
useEffect |
useEffect(() => {}, []): you need to pass an empty array as argument |
componentDidUpdate |
useEffect |
useEffect(() => {}): you should not pass any argument |
componentWillUnmount |
useEffect |
useEffect(() => { return () => {} }, []): we use the return function that returns a function that will be called on destruction |
Conclusion
I hope you enjoyed the reading that is full of great information about the new React Hooks. So far, you have learned:
- How the new Hooks work
- How to fetch data with Hooks
- How to migrate a class component to React Hooks
- How effects work
- The difference between
memo,useMemo, anduseCallback - How
useReducerworks and the main difference compared to React-Redux
All of this knowledge will help you improve the performance of your React components.

 English


