Conformity and Governance of a Kubernetes Cluster

When working with a Kubernetes cluster, it can be difficult to know how to test a YAML file before deploying it to the cluster. Additionally, it's important to verify the compliance of our Kubernetes infrastructure with Kubernetes best practices.
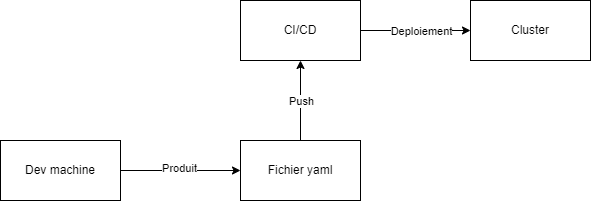
One solution to these problems is to use Polaris. Polaris is an open-source solution that checks the compliance of our Kubernetes infrastructure with Kubernetes best practices. Polaris can be integrated into our CI/CD pipeline to check the compliance of our YAML file before deploying it to our cluster. It can also be used at the development machine level to test our YAML file before it's applied to our cluster.
One of the advantages of Polaris is that it can set up webhooks that disallow non-compliant files. Thus, it allows us to ensure the conformity and governance of our cluster by testing Kubernetes best practices.
In summary, Polaris is an open-source solution that checks the compliance of our Kubernetes infrastructure with Kubernetes best practices. It can be integrated into our CI/CD pipeline to check the compliance of our YAML file before deploying it to our cluster. It can also be used at the development machine level to test our YAML file before it's applied to our cluster. Polaris sets up webhooks that disallow non-compliant files, which allows us to ensure the conformity and governance of our cluster by testing Kubernetes best practices.
Polaris
Installing Polaris:
 #Official github

https://github.com/FairwindsOps/polaris

kubectl apply -f https://github.com/fairwindsops/polaris/releases/latest/download/dashboard.yaml

#Vérifions l'installation
kubectl -n polaris get po

kubectl port-forward --namespace polaris svc/polaris-dashboard 8080:80 --address 0.0.0.0

kubectl run nginx --image=nginx

kubectl port-forward --namespace polaris svc/polaris-dashboard 8080:80 --address 0.0.0.0
Using Polaris with Kubernetes
To use Polaris with Kubernetes, follow these steps:
- Deploy the Polaris stack:
Start by deploying the Polaris stack, which contains the declaration and definition of the necessary objects. This step can be done using the kubectl apply command and the YAML files provided by Polaris.
- Expose the service externally:
Once the stack is deployed, it's necessary to expose the service externally on port 8080. This allows access to the Polaris dashboard, which lists all the warnings and dangers.
- Create an nginx pod:
Next, create an nginx pod with the corresponding YAML file. This tests the compliance of our Kubernetes infrastructure.
- Expose the pod externally:
It's also necessary to expose this pod externally in order to access it.
- Install the CLI:
To validate the manifests, it's recommended to install the Polaris CLI. The CLI allows for locally validating manifests before deploying them to the cluster. It can also be integrated into our CI/CD pipeline.
 yum install -y wget

#Get cli
wget https://github.com/FairwindsOps/polaris/releases/download/1.2.1/polaris_1.2.1_linux_amd64.tar.gz

tar -xzvf polaris_1.2.1_linux_amd64.tar.gz

chmod +x polaris

mv polaris /usr/bin/

git clone https://github.com/eazytrainingfr/simple-webapp-docker.git

cd simple-webapp-docker/kubernetes/

polaris audit --audit-path .

# On exit notre pipeline lorsque le code est dangereux

polaris audit --audit-path . \

  --set-exit-code-on-danger \

  --set-exit-code-below-score 90

https://github.com/FairwindsOps/polaris/blob/master/docs/exit-codes.md
By following these steps, it is possible to use Polaris with Kubernetes to test the compliance of our infrastructure and ensure governance of our cluster.
Creating exemptions:
 #Documentation
https://github.com/FairwindsOps/polaris/blob/master/docs/usage.md#exemptions

kubectl apply -f deployment.yml

kubectl port-forward --namespace polaris svc/polaris-dashboard 8080:80 --address 0.0.0.0

kubectl annotate deployment simple-webapp-docker-deployment polaris.fairwinds.com/tagNotSpecified-exempt=true

kubectl port-forward --namespace polaris svc/polaris-dashboard 8080:80 --address 0.0.0.0
Creating Webhooks with Polaris
Once Polaris is deployed and the service is exposed externally, it's possible to create webhooks to automate compliance testing of our Kubernetes infrastructure.
Follow these steps to create webhooks:
- Create a deployment:
Start by creating a deployment to test the compliance of our infrastructure.
- Create an annotation to exempt the test:
Next, it's necessary to create an annotation that exempts the test for the deployment in question. This annotation can be added to the corresponding YAML file.
- Refresh Polaris in the dashboard:
After creating the annotation, it's necessary to refresh Polaris in the dashboard to take this exemption into account.
- Remove the test in question:
Once Polaris has been refreshed, it's possible to remove the test in question. This avoids false positives for this specific deployment.
- Create webhooks:
Finally, it's possible to create webhooks to automate compliance testing. The webhooks can be configured to trigger a compliance check every time a new deployment is created.
 #Documentation
https://github.com/FairwindsOps/polaris/blob/master/docs/usage.md#webhook

kubectl apply -f https://github.com/fairwindsops/polaris/releases/latest/download/webhook.yaml

kubectl apply -f deployment.yml
By following these steps, it is possible to create webhooks with Polaris to automate the compliance testing of our Kubernetes infrastructure. This ensures that our infrastructure always adheres to Kubernetes best practices and maintains consistent governance across the entire cluster.
Auto DevOps Concept (GitLab + EKS)
Problem:

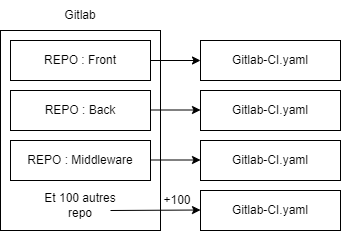
For each repository, it's necessary to apply gitlab-ci.yaml files, which can be time-consuming and complicate maintenance. Code updates can also take a lot of time.
Solution: Auto DevOps Auto DevOps automatically generates a file for continuous integration and automatically launches the pipeline. It can also control the Kubernetes infrastructure to deploy the application. Thus, it's no longer necessary to deploy pods manually, GitLab does it automatically using Helm to create deployment charts.
Architecture:

Auto DevOps can control two types of clusters: managed Kubernetes (AWS, GCP) and existing Kubernetes. It can also control and isolate each of our applications.
Implementation: To use Auto DevOps with AWS EKS and GitLab, follow these steps:
- Create a project on GitLab.
- Create access on AWS (IAM role) and policies.
- Add the connection to Kubernetes in GitLab via "Operations" -> "Kubernetes" -> "Integrate with a cluster certificate" -> "Create cluster on AWS EKS" -> enter the access.
- Create the EKS cluster by following these steps:
- Go to the AWS EC2 service -> "Network & Security" -> "Key Pairs" -> Create the EKS key to obtain the PEM file.
- Open the ports to be opened in AWS (more information on Security group).
- Create our security group in EC2 -> "Security groups" -> "Create security group".
- Add the roles in the inbound and outbound rules.
- Deploy the IAM role in Kubernetes based on the referenced role.
- Deploy the IAM role in CloudFormation and create a stack.
- Add the rest of the information in GitLab at the Kubernetes level.
- Verify that our cluster is created automatically.
Following these steps, it is possible to use Auto DevOps with AWS EKS and GitLab to simplify continuous integration and deployment of our application on Kubernetes. After deploying the EKS cluster and configuring GitLab, the deployment of our cluster can be seen at the EC2 level in AWS and also in GitLab.
To install the Ingress Controller, follow these steps:
- Go to GitLab.
- Go to "Operations" -> "Kubernetes" -> "Integrate with a cluster certificate."
- Enter the access credentials for the Kubernetes cluster.
- Add the YAML file corresponding to the installation of the Ingress Controller in the GitLab repository.
- Add the YAML file to the GitLab pipeline to automatically install it when deploying the application on the Kubernetes cluster.
By following these steps, it is possible to install the Ingress Controller on our Kubernetes cluster with GitLab and thus allow access to our application from outside.
Istio
With the rise of microservices architectures, it has become necessary to provide several functionalities for applications such as service discovery, caching for requests, security and compliance for tracing requests, authentication between services, and retry if requests fail.
Two solutions are possible for providing these functionalities:
-
Provide libraries or modules embedded in the application, but this can pose scalability and maintainability issues if multiple different languages are used.
-
Use a service mesh that allows you to retrieve microservices traffic and apply the necessary functionalities. The service mesh is composed of the deployed microservice and the service mesh. The most interesting solution is Traefik, which uses Envoy and is configurable with Kubernetes.
Here is a list of available service meshes:
- Envoyproxy: provided by SNCF, it provides most of the necessary functionalities, but it is difficult to configure and is not specific to Kubernetes.
- Linkerd: provided by SNCF, it works with Kubernetes.
- Kuma: less well-known and uses Envoy.
- AWS: integrates with different AWS products.
- Traefik: uses Envoy and is configurable with Kubernetes, it is the must for compatibility.
- Istio: another popular solution, but can be difficult to set up.
By using a service mesh such as Traefik, it is possible to simplify the development and maintenance of microservices-based applications while providing all the necessary functionalities for service discovery, caching, security, authentication, and retry.

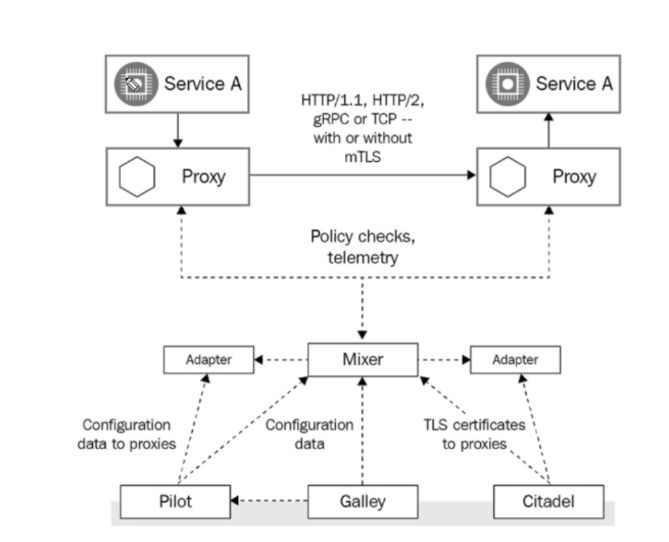
In a microservices architecture, services must communicate with each other. This communication is managed by proxies (service meshes) that control traffic. To define the rules of this traffic, we use Pilot, which adds an abstraction layer, and Mixer, which is the intermediary allowing communication with the proxies.
Citadel allows the management of security certificates and provides encryption, decryption, and authentication services for network traffic between microservices. Galley is a configuration tool that allows us to adapt our service mesh to our needs by managing configuration files and rules.
Using these different tools, it is possible to set up an effective and secure microservices architecture by managing network traffic between microservices and ensuring the compliance and security of our infrastructure.
Installation
 curl -L https://istio.io/downloadIstio | ISTIO_VERSION=1.6.3 sh -

export PATH="$PATH:/root/istio-1.6.3/bin"

istioctl manifest apply --set profile=demo
To deploy the Bookinfo application, which is a fictitious e-commerce application consisting of four microservices:
- Productpage: displays book details and user reviews.
- Details: provides additional information about the book.
- Reviews: provides comments for the book.
- Ratings: provides a rating for the book.
Follow these steps:
- Install Istio on your Kubernetes cluster.
- Download the configuration files for the Bookinfo application.
- Apply the configuration files to your Kubernetes cluster using kubectl.
- Verify that the pods are running and the application is deployed successfully.
Let's deploy this application:
 cd istio-1.6.3/samples/bookinfo

kubectl create ns bookinfo

kubectl label namespace bookinfo istio-injection=enabled

kubectl apply -f platform/kube/bookinfo.yaml -n bookinfo

kubectl get po -n bookinfo
Now let's connect to the application:
 alias kb='kubectl -n bookinfo'

kb exec -it $(kb get pod -l app=ratings -o jsonpath='{.items[0].metadata.name}') -c ratings -- curl productpage:9080/productpage | grep -o ""

kb apply -f networking/bookinfo-gateway.yaml

export INGRESS_PORT=$(kubectl -n istio-system get service istio-ingressgateway -o jsonpath='{.spec.ports[?(@.name=="http2")].nodePort}')

export GATEWAY_URL=$(minikube ip):${INGRESS_PORT}

curl http://${GATEWAY_URL}/productpage | grep -o ""
Management of traffic rules and rules to apply:
 kb apply -f networking/destination-rule-all.yaml

kb apply -f networking/virtual-service-all-v1.yaml

kb get virtualservices productpage -o yam
Management of traffic rules and rules to apply:
kb apply -f networking/virtual-service-reviews-test-v2.yaml
Velero
Velero is a tool that allows you to create backups for Kubernetes clusters, especially for pods, volumes, and other resources. This feature is particularly important to prevent human errors and to ensure data recovery in case of loss or error.
Unlike setting up an ETCD cluster, which is a full-time job that requires internal expertise, Velero manages the state of the resource and allows the restoration of resources and volumes. It can also be integrated into several storage platforms such as AWS and Google, making it a very flexible and easy-to-use tool.
By using Velero, it is possible to ensure the security and compliance of your Kubernetes infrastructure by creating regular backups for your pods and volumes. This reduces the risk of human errors and ensures data recovery in case of loss or error.
Sites:
Installation:
 curl "https://awscli.amazonaws.com/awscli-exe-linux-x86_64.zip" -o "awscliv2.zip"
yum install -y unzip
unzip awscliv2.zip
./aws/install

aws configure

aws s3api create-bucket --bucket velero-bucket-labs --region us-east-1

yum install -y wget
wget https://github.com/vmware-tanzu/velero/releases/download/v1.5.2/velero-v1.5.2-linux-amd64.tar.gz
tar -xzvf velero-v1.5.2-linux-amd64.tar.gz
mv velero-v1.5.2-linux-amd64/velero /usr/local/bin/

velero install \
--provider aws \
--bucket velero-bucket-labs \
--use-restic \
--secret-file ~/.aws/credentials \
--use-volume-snapshots=true \
--snapshot-location-config region=us-east-1 \
--plugins=velero/velero-plugin-for-aws:v1.1.0 \
--backup-location-config region=us-east-1


kubectl logs deployment/velero -n velero
kubectl get all -n velero
Deployment:
 kubectl apply -f https://k8s.io/examples/pods/storage/pv-volume.yaml -n prod
kubectl apply -f https://k8s.io/examples/pods/storage/pv-claim.yaml -n prod
kubectl apply -f https://k8s.io/examples/pods/storage/pv-pod.yaml -n prod

velero backup create my-backup-complete
velero backup create my-backup-prod --include-namespaces prod
Let's simulate an accident to test:
 kubectl delete pod task-pv-pod -n prod
kubectl delete pvc task-pv-claim -n prod
kubectl delete pv task-pv-volume -n prod
Restoration through backup:
velero restore create --from-backup my-backup-prod

 English


