Installation
I recommend using the official documentation to install Kubernetes on different environments. The documentation provides detailed and precise instructions for installing Kubernetes on various platforms, such as Amazon Web Services (AWS), Google Cloud Platform (GCP), Microsoft Azure, and many others. The official documentation is regularly updated and provides helpful advice to ensure a successful installation and optimal use of Kubernetes. In addition, it includes information on configuring and managing Kubernetes, as well as tips for resolving common issues. By following the official documentation, you can be sure of a secure and reliable installation of Kubernetes, tailored to your specific environment.
Master and worker
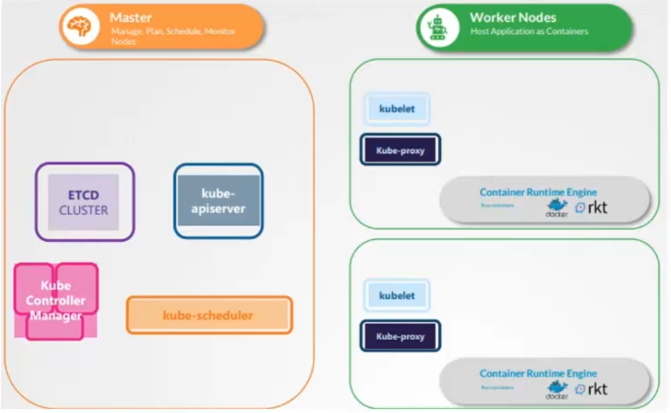
In Kubernetes, there are two types of nodes: Master nodes and Worker nodes. The Master node is responsible for managing and coordinating the cluster, while Worker nodes run workloads and applications.
The modules of the Master node are as follows:
- Kube-apiserver: it is the central component of Kubernetes that provides the API interface for interacting with the cluster.
- ETCD-cluster: it is a distributed database that stores information about the state of the cluster and configurations of Kubernetes objects.
- Kube-scheduler: it is the component that decides which Worker node workloads should be scheduled on.
- Kube controller manager: it is a set of controllers that monitor the state of the cluster and take action to maintain the desired state.
The modules of the Worker node are as follows:
- Kubelet: it is the component that runs on each Worker node and manages the state of containers.
- Kube-proxy: it is the component responsible for network communication between different nodes in the cluster and services exposed by containers.
When a command is sent to Kubernetes, it is interpreted by the Master node which decides on which Worker node the workload should be scheduled. The Kubelet of the Worker node then receives the command and creates containers using Docker. Once the containers are deployed on the Worker node, the information is updated in ETCD to reflect the current state of the cluster.
The Pod
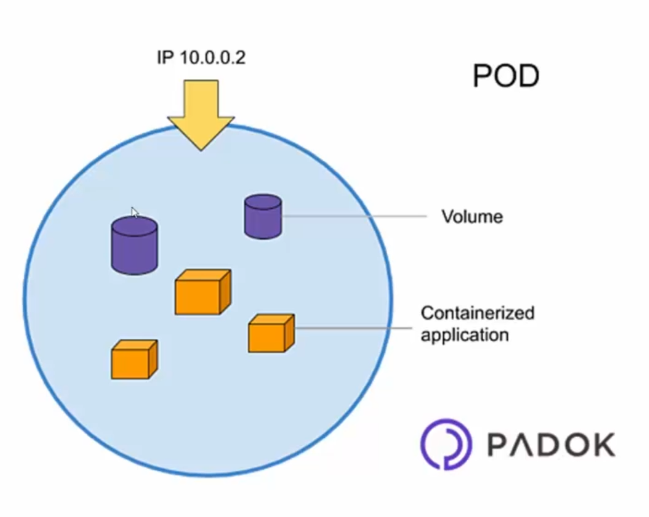
The Pod is the smallest unit of execution in Kubernetes and is used to host containers. When you create a Pod in Kubernetes, you can specify one or more containers that will be run together on the same Worker node.
Indeed, containers must be grouped into a Pod in order to be deployed in Kubernetes. This means that if you want to deploy a container, you must deploy it in a Pod.
It is important to note that each Pod has its own unique IP address and can communicate with other Pods via an internal virtual network. This means that containers that are in the same Pod can communicate with each other via "localhost", even if they are running in different containers.
When you deploy a Pod in Kubernetes, you can specify the resources (CPU, memory, etc.) required for each container, as well as other configurations such as shared storage volumes between the containers in the Pod.
Replica Set
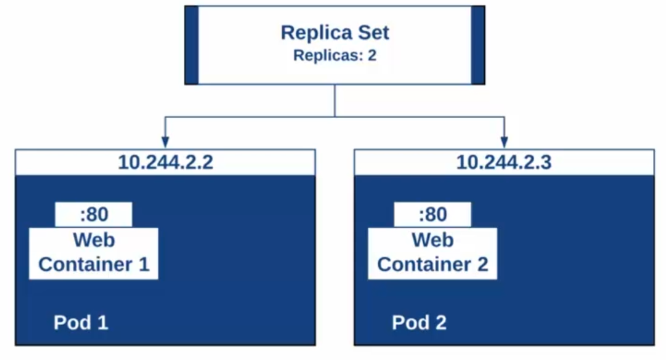
It is important to ensure the resilience and high availability of applications deployed in Kubernetes. For this, we can use the ReplicationController object, which is now replaced by the ReplicaSet object, to manage the replication of Pods.
A ReplicaSet allows you to specify the number of replicas (instances) of a Pod that you want to have running, as well as ensuring that the specified number of Pods is always available. If one of the Pods dies or is deleted, a new Pod will be automatically created to maintain the desired number of replicas.
This ensures high availability of the application even in the event of a failure or incident. In addition, ReplicaSet can also be used to dynamically increase or decrease the number of replicas based on demand, to improve application scalability.
As for version management, we can use the Deployment object to manage the deployment of different versions of an application. Thus, when updating an application, you can use Deployment to manage the progressive deployment of the new version while maintaining the availability of the old version.
The Deployer
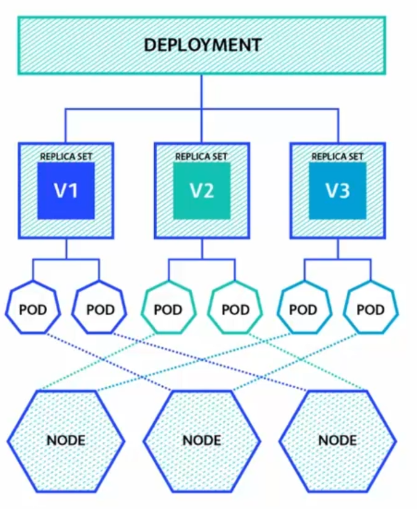
The Deployment is a Kubernetes object that allows you to manage application deployments by controlling the underlying ReplicaSets.
The Deployment allows you to specify the version of the application to be deployed, as well as associated configuration settings. It also provides version management and application update capabilities. For example, you can use Deployment to deploy a new version of an application while keeping the old version running, and then gradually switch to the new version using deployment strategies like Rolling Update.
In addition to version management, Deployment also ensures scalability by dynamically changing the number of replicas of the application based on demand. You can easily increase or decrease the number of replicas by simply modifying the Deployment configuration. For example, you can increase the number of replicas of a Deployment from 2 to 3 to better respond to increased demand.
Kubectl
There are two types of commands to control Kubernetes: imperative commands and declarative commands.
Imperative commands are command-line commands that allow you to manipulate Kubernetes resources directly from the command line. They are very useful for simple and quick operations such as creating a Pod or deleting a resource. Imperative commands are used by specifying a series of parameters and environment variables directly in the command line.
Declarative commands are commands that use a YAML or JSON configuration file to describe the desired state of the Kubernetes cluster. They allow you to create, update, or delete Kubernetes resources based on a desired state described in the configuration file. Declarative commands are particularly useful for more complex operations, such as creating multiple resources at the same time or managing the update of an application over time.
By using both types of commands, it is possible to efficiently control and manage Kubernetes. Imperative commands are useful for quick and simple operations, while declarative commands are more suitable for more complex operations and managing the state of resources over time.
 Kubectl -action -type -objet
#exemple
Kubectl get pod nginx
Kubectl delete replicaset test
Kubectl create deployment app
Manifest
In Kubernetes, a manifest is a YAML or JSON file that describes the desired state of one or more Kubernetes resources. It is a declarative configuration file that specifies configuration details for creating, updating, or deleting Kubernetes resources such as Pods, ReplicaSets, Deployments, Services, ConfigMaps, Secrets, etc.
The manifest describes the characteristics of the resource, such as volumes, ports, labels, annotations, Docker images to use, restart policies, resource quotas, etc. Once the manifest is created, it can be applied to the Kubernetes cluster using a command-line command such as kubectl apply -f manifest-file.yaml.
The advantage of using manifests is that they allow for more efficient and automated management of resources in Kubernetes, by specifying the desired state of resources in a declarative configuration file. In addition, manifests can be versioned and stored in a source control system such as Git, making it easy to manage configuration changes and updates.
Execution
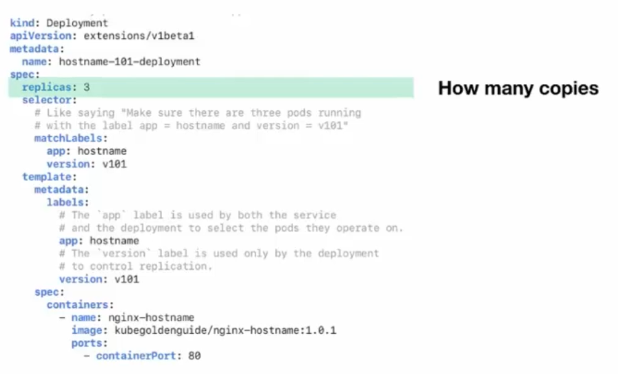
It is a YAML object, specifically a configuration file for the application we want to deploy.
- kind: type of object
- apiVersion: API version
- name: name of the object
- replicas: number of replicas
- spec: specification of the object to be deployed
- image: Docker image to launch
Example:
 apiVersion: v1
kind: Pod
metadata:
  name: simple-webapp-color
  labels:
    app: web
spec:
  containers:
  - name: web
    image: mmumshad/simple-webapp-color
    ports:
      - containerPort: 8080
    env:
      - name: APP_COLOR
        value: red
Here, it is currently being created to obtain details about the creation:
 [node1 ~]$ kubectl describe
error: You must specify the type of resource to describe. Use "kubectl api-resources" for a complete list of supported resources.
[node1 ~]$ kubectl describe po simple-webapp-color
Name:         simple-webapp-color
Namespace:    default
Priority:     0
Node:         node1/10.0.0.3
Start Time:   Mon, 20 Dec 2021 05:36:41 +0000
Labels:       app=web
Annotations:
Status:       Running
IP:           10.32.0.4
IPs:
  IP:  10.32.0.4
Containers:
  web:
    Container ID:   docker://4c65229efd830f5eb79621b34539aad27caad583ad12ff5628b9547ce0ed7b41
    Image:          mmumshad/simple-webapp-color
    Image ID:       docker-pullable://mmumshad/simple-webapp-color@sha256:637eff5492960b6620d2c86bb9a5355408ebfc69234172502049e34b6ee94057
    Port:           8080/TCP
    Host Port:      0/TCP
    State:          Running
      Started:      Mon, 20 Dec 2021 05:38:48 +0000
    Ready:          True
    Restart Count:  0
    Environment:
      APP_COLOR:  red
    Mounts:
      /var/run/secrets/kubernetes.io/serviceaccount from default-token-8x5v4 (ro)
Conditions:
  Type              Status
  Initialized       True
  Ready             True
  ContainersReady   True
  PodScheduled      True
Volumes:
  default-token-8x5v4:
    Type:        Secret (a volume populated by a Secret)
    SecretName:  default-token-8x5v4
    Optional:    false
QoS Class:       BestEffort
Node-Selectors:
Tolerations:     node.kubernetes.io/not-ready:NoExecute op=Exists for 300s
                 node.kubernetes.io/unreachable:NoExecute op=Exists for 300s
Events:
  Type    Reason     Age    From               Message
  ----    ------     ----   ----               -------
  Normal  Scheduled  2m21s  default-scheduler  Successfully assigned default/simple-webapp-color to node1
  Normal  Pulling    2m20s  kubelet, node1     Pulling image "mmumshad/simple-webapp-color"
  Normal  Pulled     35s    kubelet, node1     Successfully pulled image "mmumshad/simple-webapp-color" in 1m45.390758129s
  Normal  Created    14s    kubelet, node1     Created container web
  Normal  Started    14s    kubelet, node1     Started container web
On peut ensuite exposer notre application sur le port 8080 :
 [node1 ~]$ kubectl port-forward simple-webapp-color 8080:8080 --address 0.0.0.0
Forwarding from 0.0.0.0:8080 -> 8080
If I want to remve the pod :
 [node1 ~]$ kubectl delete -f pod.yml
pod "simple-webapp-color" deleted
That's all well and good, but it's best to create our Deployment object. To do this, we can use a manifest file:
 apiVersion: apps/v1
kind: Deployment
metadata:
  name: nginx-deployment
  labels:
    app: nginx
spec:
  replicas: 2
  strategy:
    type: RollingUpdate
    rollingUpdate:
      maxSurge: 1
      maxUnavailable: 1
  selector:
    matchLabels:
      app: nginx
  template:
    metadata:
      labels:
       app: nginx
    spec:
      containers:
      - name: nginx
        image: nginx:1.18.0
        ports:
        - containerPort: 80
Let launch our deployment :
 [node1 ~]$ kubectl apply -f nginx-deployment.yml
deployment.apps/nginx-deployment created
We can check the details image :
 [node1 ~]$ kubectl get replicaset -o wide
NAME                          DESIRED   CURRENT   READY   AGE    CONTAINERS   IMAGES         SELECTOR
nginx-deployment-67dfd6c8f9   2         2         2       110s   nginx        nginx:1.18.0   app=nginx,pod-template-hash=67dfd6c8f9
Now if we want to upgrade to the latest version of nginx, we just have to change the image version :
     spec:
      containers:
      - name: nginx
        image: nginx
        ports:
        - containerPort: 80
Let's redeploy:
 [node1 ~]$ kubectl applyl -f nginx-deployment.yml
deployment.apps/nginx-deployment configured
Here, we can see that it is reconfiguring and not redeploying the existing object. If you want more details:
 [node1 ~]$ kubectl get replicaset -o wide
NAME                          DESIRED   CURRENT   READY   AGE    CONTAINERS   IMAGES         SELECTOR
nginx-deployment-67dfd6c8f9   0         0         0       6m1s   nginx        nginx:1.18.0   app=nginx,pod-template-hash=67dfd6c8f9
nginx-deployment-845d4d9dff   2         2         2       86s    nginx        nginx          app=nginx,pod-template-hash=845d4d9dff
Network management
The management of labels is very important in Kubernetes, as it allows you to identify and select specific resources in the cluster. When you create a Kubernetes resource, you can add labels that are key-value pairs that uniquely identify the resource.
In the previous example, the app:nginx label is added to both the Deployment and the Pod created by the Deployment. This label can then be used to select the specific Pod from a set of Pods. For example, if you want to expose the Deployment as a Service, you can create a Service that selects the Pods with the app:nginx label.
Resource selection based on labels is done using selectors. Selectors are used to filter Kubernetes resources based on their labels. In the previous example, the selector specifies that the selected Pods must have the app:nginx label.
Using labels and selectors, it is possible to efficiently manage resources in Kubernetes, allowing specific sets of resources to be selected and targeted for operations such as updating, monitoring, or deleting.
Now that the concept of labels has been introduced, let's take the following case:
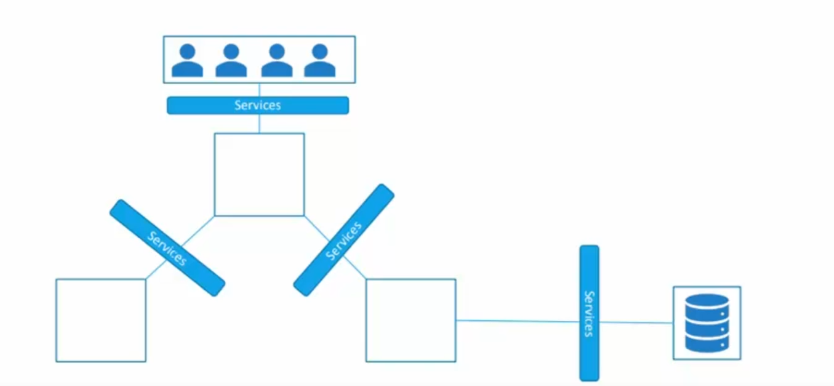
We have applications in the form of pods that users will use to connect. However, if some pods are lost, the replica will automatically redeploy new pods, but users will not be informed of the new pod addresses. Therefore, it is necessary to set up a federation mechanism to link users and pods: services. Services are Kubernetes objects that allow to expose a set of pods via an entry point, making it easier to redistribute different pod addresses.
Thus, each service in Kubernetes is responsible for federating a set of pods through an entry point. There are several types of services in Kubernetes:
- NodePort: creates a service that allows to expose all pods via a port outside the machine, to allow user access.
- ClusterIP: creates a service that allows to expose pods only within the cluster. The front-end only communicates with the back-end internally, without making it accessible from outside.
- LoadBalancer: allows to expose services directly to a Cloud service provider. The user connects to the load balancer, which is an IP provided by the Cloud, and the load balancing is delegated to the Cloud service provider.
In the case of our applications, it is important to separate environments by namespace, where each environment is independent of the other. For example, we can define a namespace for the development environment and another for the production environment, so that they cannot access each other and can share the same data securely.
 apiVersion: v1
kind: Namespace
metadata:
  name: production
Next, it is necessary to create this namespace:
[node2 ~]$ kubectl apply -f namespace.yml
We can very easily check the status of our namespace:
 [node2 ~]$ kubectl get namespaces
NAME              STATUS   AGE
default           Active   4m57s
kube-node-lease   Active   4m59s
kube-public       Active   4m59s
kube-system       Active   4m59s
production        Active   103s
To put a pod in a namespace, there are two solutions:
-
Specify the namespace in the manifest: It is possible to specify the namespace in the YAML file of the pod manifest. To do this, add the line "namespace:
" in the "metadata" section of the manifest. -
Use the kubectl apply command with the -n option: It is also possible to run the command "kubectl apply -f pod.yml -n
" to apply a pod manifest in a specific namespace.
To check that the pods have been created in the desired namespace, simply run the command "kubectl get pods -n
[node2 ~]$ kubectl get po -n production
How create a new NodePort ?
 apiVersion: v1
kind: Service
metadata:
  name: service-nodeport-web
spec:
  type: NodePort
  #selector du label
  selector:
    app: web
  ports:
  - protocol: TCP
    port: 8080
    targetPort: 8080
    #port exposé
    nodePort: 30008
And you know the drill, if we want to deploy our service but specify the namespace:
[node2 ~]$ kubectl apply -f service-nodeport-web.yml -n production
How to verify nodeport :
 [node1 ~]$ kubectl -n production describe svc service-nodeport-web
Name:                     service-nodeport-web
Namespace:                production
Labels:
Annotations:
Selector:                 app=web
Type:                     NodePort
IP:                       10.100.84.248
Port:                       8080/TCP
TargetPort:               8080/TCP
NodePort:                   30008/TCP
Endpoints:
Session Affinity:         None
External Traffic Policy:  Cluster
Events:
There is another way to expose services in Kubernetes, which is Ingress. Unlike NodePort which allows services to be exposed using an IP address, Ingress allows services to be exposed directly outside the Kubernetes cluster using a custom URL (e.g. posos.com).
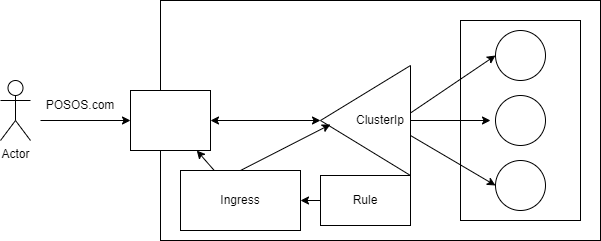
Ingress acts as a reverse proxy and routes incoming requests to the appropriate services based on defined routing rules. It supports SSL termination and allows for configuring security policies to protect exposed services.
To use Ingress, an Ingress controller must first be installed, which is a component that monitors Ingress resources and configures the reverse proxy accordingly. There are several Ingress controllers available, such as Nginx, Traefik, and Istio.
Once the Ingress controller is installed, routing rules can be defined for services to be exposed outside the cluster using Ingress annotations in the service manifest. These annotations allow specifying routing rules, as well as security policies for each service.
Storage Management
When containers are used to run applications, data persistence is a crucial issue. In general, when one of the containers disappears or is deleted, all the data stored in that container is also lost. Moreover, containers cannot natively communicate their data between each other.
To solve these problems, volumes can be used. Volumes are mechanisms for storing data that allow containers to share and persist data. Volumes can be configured to be associated with one or more containers and to be shared between them.
The use of volumes allows containers to persist their data even if the container is deleted or restarted. In addition, volumes allow containers to communicate with each other by sharing common data. This improves the portability of applications and facilitates the implementation of microservice-based architectures.
Let's create our first volume:
 apiVersion: v1
kind: Pod
metadata:
  name: mysql-volume
spec:
  containers:
  - image: mysql
    name: mysql
    volumeMounts:
    - mountPath: /var/lib/mysql
      name: mysql-data
    env:
      - name: MYSQL_ROOT_PASSWORD
        value: password
      - name: MYSQL_DATABASE
        value: eazytraining
      - name: MYSQL_USER
        value: eazy
      - name: MYSQL_PASSWORD
        value: eazy
  volumes:
  - name: mysql-data
    hostPath:
      # chemin du dossier sur l'hôte
      path: /data-volume
      # ce champ est optionnel
      type: Directory
Then we launch our volume:
[node2 ~]$ kubectl apply -f mysql-volume.yml
To see the status of our pod, we can use the command kubectl get po:
[node2 ~]$ kubectl get po
Great! We know how to mount a volume, but let's take it a step further and use persistent volumes :
 apiVersion: v1
kind: PersistentVolume
metadata:
  name: pv
  labels:
    type: local
spec:
  storageClassName: manual
  capacity:
    storage: 1Gi
  accessModes:
    - ReadWriteOnce
  hostPath:
    path: "/data-pv"
Here we are using local storage, but of course, we can use volume storage in other cloud environments as well. Now we have a PVC (Persistent Volume Claim):
 apiVersion: v1
kind: PersistentVolumeClaim
metadata:
  name: pvc
spec:
  storageClassName: manual
  accessModes:
    - ReadWriteOnce
  resources:
    requests:
      storage: 100Mi
It is important to have the same storageClassName as the PV. It is important to have the same accessModes as the PV. One PVC can only claim one PV! If the memory allocation is not correct, you may lose that memory. The storage will be valid if all the clusters agree. Let's now create the volume for this PVC:
 apiVersion: v1
kind: Pod
metadata:
  name: mysql-pv
spec:
  containers:
  - image: mysql
    name: mysql
    volumeMounts:
    - mountPath: /var/lib/mysql
      name: mysql-data
    env:
      - name: MYSQL_ROOT_PASSWORD
        value: password
      - name: MYSQL_DATABASE
        value: eazytraining
      - name: MYSQL_USER
        value: eazy
      - name: MYSQL_PASSWORD
        value: eazy
  volumes:
  - name: mysql-data
    persistentVolumeClaim:
      claimName: pvc
Prompt
Thanks to PVC, it is possible to create a link between a volume and a container so that the volume is automatically mounted in the container when it is created or restarted. This ensures the persistence of the data stored in the volume, even if the container is deleted or restarted.
Thus, by using PVC, the volume becomes persistent and is available to all pods associated with it. This facilitates the management of storage volumes in Kubernetes environments, especially in microservice-based architectures.
HELM
Helm is a tool that allows for efficient management of Kubernetes applications. Helm charts are pre-configured packages that facilitate the definition, installation, and upgrade of even the most complex Kubernetes applications.
Helm charts are easy to create, version, share, and publish. They allow Kubernetes users to standardize their deployments using YAML files that contain information about the resources to deploy, configurations to apply, and dependencies to install.
Using Helm charts also allows for versioning Kubernetes for different environments, using different charts for each environment. This helps facilitate the management of development, testing, and production environments, ensuring each environment is configured in a consistent and reusable manner.
But what do these famous charts look like:
values.yaml: contains all the default variablesrequirement.yaml: set of necessary charts as dependenciestemplates: templatizes Kubernetes files
Installing Helm
 curl -fsSL -o get_helm.sh https://raw.githubusercontent.com/helm/helm/master/scripts/get-helm-3

chmod 700 get_helm.sh

yum install openssl -y

./get_helm.sh
Le repository de bitnami permet d'ajouter des repositories de charts :
[node2 ~]$ helm repo add bitnami https://charts.bitnami.com/bitnami
If you want to install WordPress, you can follow these steps:
helm install wordpress bitnami/wordpress -f
Prompt
Let's install HELM! HELM behaves like Maven, npm, Gradle, Conda, pip to install your packages.
Tekton
Tekton is an open-source project of the Cloud Native Computing Foundation (CNCF) that provides tools for creating and managing Kubernetes application development pipelines. Tekton allows for modular pipeline creation using reusable tasks and resources.
Tasks in Tekton are atomic actions such as compiling, building images, testing, or deploying that can be reused in multiple pipelines. Resources are Kubernetes objects such as Docker images, code sources, configurations, and tools that can be used in tasks.
Tekton also provides a set of APIs for managing and executing pipelines. Pipelines can be defined using YAML files that specify the tasks to execute, resources to use, and configuration parameters. Pipelines can be automatically triggered in response to events such as code changes or code merge requests.
Tekton is designed to be extensible and compatible with other Kubernetes application development and deployment tools such as Helm, Istio, and Knative. This allows users to customize their application development environment and create pipelines that meet their specific needs.
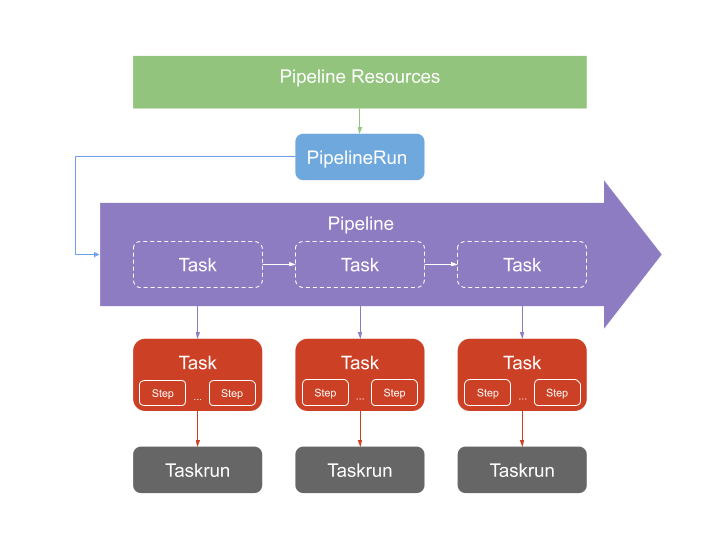
- We retrieve our resources, which are our resources (Dockerfiles) that we want to push to the cluster.
- We then have a task, which allows for the task model that we want to execute (retrieve the image, push the image).
- We execute this task with a Taskrun, so we instantiate the task, providing a certain number of parameters.
- All of these tasks are managed by a pipeline: It's a model of tasks to execute, with references to the different tasks. We are on a reference model.
- To execute this pipeline: PipelineRun. It allows for instantiating the pipeline directly.
Defining a task:
It is necessary to specify the location of our resource using the Docker file. By using parameters, we can make this specification generic and avoid hard-coded data repetitions.
The "resources" section allows for defining the location of the resources to retrieve (inputs) as well as the generated results (outputs).
In this case, we will create images from which we can deploy containers in the cluster. However, the deployment process will not be covered in the following file.
 apiVersion: tekton.dev/v1beta1
kind: Task
metadata:
  name: build-docker-image-from-git-source
spec:
  params:
    - name: pathToDockerFile
      type: string
      description: The path to the dockerfile to build
      default: $(resources.inputs.docker-source.path)/Dockerfile
    - name: pathToContext
      type: string
      description: |
        The build context used by Kaniko
        (https://github.com/GoogleContainerTools/kaniko#kaniko-build-contexts)
      default: $(resources.inputs.docker-source.path)
  resources:
    inputs:
      - name: docker-source
        type: git
    outputs:
      - name: builtImage
        type: image
  steps:
    - name: build-and-push
      image: gcr.io/kaniko-project/executor:v0.16.0
      # specifying DOCKER_CONFIG is required to allow kaniko to detect docker credential
      env:
        - name: "DOCKER_CONFIG"
          value: "/tekton/home/.docker/"
      command:
        - /kaniko/executor
      args:
        - --dockerfile=$(params.pathToDockerFile)
        - --destination=$(resources.outputs.builtImage.url)
        - --context=$(params.pathToContext)
The deployment of this task is done through our kubectl command, which will be responsible for deploying the previously built image:
 apiVersion: tekton.dev/v1beta1
kind: Task
metadata:
  name: deploy-using-kubectl
spec:
  params:
    - name: path
      type: string
      description: Path to the manifest to apply
    - name: yamlPathToImage
      type: string
      description: |
        The path to the image to replace in the yaml manifest (arg to yq)
  resources:
    inputs:
      - name: source
        type: git
      - name: image
        type: image
  steps:
    - name: replace-image
      image: mikefarah/yq:3
      command: ["yq"]
      args:
        - "w"
        - "-i"
        - "$(params.path)"
        - "$(params.yamlPathToImage)"
        - "$(resources.inputs.image.url)"
    - name: run-kubectl
      image: lachlanevenson/k8s-kubectl
      command: ["kubectl"]
      args:
        - "apply"
        - "-f"
        - "$(params.path)"
Maintenant que notre tache ainsi que son déploiement son fait, l'étape suivante consiste à lancer l'initialisation de cette tache, autrement dit le TaskRun :
 apiVersion: tekton.dev/v1beta1
kind: TaskRun
metadata:
  name: build-docker-image-from-git-source-task-run
spec:
  serviceAccountName: simple-webapp-docker-service
  taskRef:
    name: build-docker-image-from-git-source
  params:
    - name: pathToDockerFile
      value: Dockerfile
    - name: pathToContext
      value: $(resources.inputs.docker-source.path)/
  resources:
    inputs:
      - name: docker-source
        resourceRef:
          name: simple-webapp-docker-git
    outputs:
      - name: builtImage
        resourceRef:
The ServiceAccountName parameter allows you to specify the name of the service to be deployed. There are a series of parameters and resources that can be used to override the instance.
It is not always necessary to use TaskRun, as the pipeline can itself take care of passing the necessary parameters.
Once the TaskRun is defined, we can move on to the part that will launch all the tasks: the pipeline.
 apiVersion: tekton.dev/v1beta1
kind: Pipeline
metadata:
  name: simple-webapp-docker-pipeline
spec:
  resources:
    - name: source-repo
      type: git
    - name: web-image
      type: image
  tasks:
    - name: build-simple-webapp-docker-web
      taskRef:
        name: build-docker-image-from-git-source
      params:
        - name: pathToDockerFile
          value: Dockerfile
        - name: pathToContext
          value: /workspace/docker-source/ #configure: may change according to your source
      resources:
        inputs:
          - name: docker-source
            resource: source-repo
        outputs:
          - name: builtImage
            resource: web-image
    - name: deploy-web
      taskRef:
        name: deploy-using-kubectl
      resources:
        inputs:
          - name: source
            resource: source-repo
          - name: image
            resource: web-image
            from:
              - build-simple-webapp-docker-web
      params:
        - name: path
          value: /workspace/source/kubernetes/deployment.yml #configure: may change according to your source
        - name: yamlPathToImage
          value: "spec.template.spec.containers[0].image"
In the "Tasks" section, we call our task (in our case: only one task was defined previously) by passing it the necessary parameters to create a TaskRun. In other words, much of what we defined in our TaskRun can also be defined here.
We use the result obtained from running the task to launch the deployment.
Now that the pipeline is defined, we can instantiate it using the PipelineRun, which will start the execution of the pipeline.
 apiVersion: tekton.dev/v1beta1
kind: PipelineRun
metadata:
  name: simple-webapp-docker-pipeline-run-1
spec:
  serviceAccountName: simple-webapp-docker-service
  pipelineRef:
    name: simple-webapp-docker-pipeline
  resources:
    - name: source-repo
      resourceRef:
        name: simple-webapp-docker-git
    - name: web-image
      resourceRef:
        name: simple-webapp-docker-image
The PipelineRun refers to the pipeline that we defined earlier, as well as the resources and parameters to use for the execution.
Now that our files are ready, we can proceed with the installation of Tekton.
kubectl apply --filename https://storage.googleapis.com/tekton-releases/pipeline/latest/release.yaml
After installing Tekton, we need to create our credentials:
 kubectl create secret docker-registry regcred \
                --docker-server="https://index.docker.io/v1/" \
                --docker-username=dirane \
                --docker-password="mypassword" \
                --docker-email=youremail@email.com
Then we create our service account:
kubectl apply -f https://link-to.simple-webapp-docker-service.yml
Now that our service account is created, we can move on to creating our cluster role to define the set of permissions:
 kubectl create clusterrole simple-webapp-docker-role \
           --verb=* \
           --resource=deployments,deployments.apps
kubectl create clusterrolebinding simple-webapp-docker-binding \
         --clusterrole=simple-webapp-docker-role \
         --serviceaccount=default:simple-webapp-docker-service
We have created a ClusterRole for our deployment as well as a ClusterRoleBinding, each granting different permissions.
After that, we install our pipeline. But before that, it is important to create the "Git" resource as well as its image.
 kubectl apply -f code-resource.yml
kubectl apply -f image-resource.yml
We create our task and our TaskRun to automate our image build:
 kubectl apply -f task.yml
kubectl apply -f taskrun.yml
kubectl get tekton-pipelines
kubectl describe taskrun build-docker-image-from-git-source-task-run
Before continuing, we need to verify that the TaskRun is working correctly. We can check that the image is pushed to our Docker Hub repository. Let's move on to creating the pipeline that will build and deploy our application:
 kubectl apply -f deploy-using-kubectl.yml
kubectl apply -f pipeline.yml
kubectl apply -f pipelinerun.yml
kubectl get tekton-pipelines
kubectl describe pipelinerun.tekton.dev/simple-webapp-docker-pipeline-run-1
Let's verify that our application is deployed and based on our deployment file:
kubectl get pod
We check that the pod is newly created and verify that the application is responding correctly:
kubectl port-forward $(kubectl get po -l app=simple-webapp-docker -o=name) 8080:8080 --address 0.0.0.0
To confirm that the application has been deployed using the deployment file, you can check if a new pod has been created by using the command "kubectl get pod". Additionally, you can ensure that the application is properly functioning by running the command "kubectl port-forward $(kubectl get po -l app=simple-webapp-docker -o=name) 8080:8080 --address 0.0.0.0" to forward the application's port and verify that it is responding correctly.

 English


