Introduction
In the previous section, we discovered the concepts of:
- Predefined environment variables
- Use of cache
- Deployments per environment and how to create a production pipeline
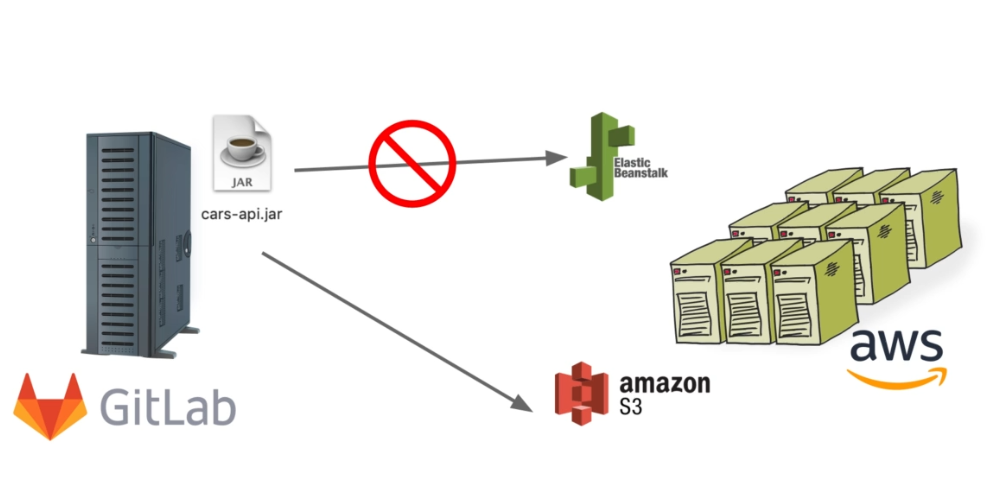
In this section, we will try to reproduce the following diagram:

This is a more complex process, but we are close to achieving a process close to reality. For this, we will switch programming languages to create a more complex application that we will deploy on AWS. Are you ready for this challenge?
Installation
To start, here are the steps to install IntelliJ, Java, and Gradle:
- To install IntelliJ, simply download the installation file corresponding to your operating system from the official website and follow the installation instructions: jetbrains
- To install Java, it is recommended to download and install the version corresponding to your operating system from the official website: java
- To install Gradle, you can follow the installation instructions available on the official website: gradle
Once these steps are completed, we can get started.
Application Context
Gitlab branch: Java-AWS/init
To access the Java project, you can go to the Java-AWS/init branch. I recommend forking the project for convenience. Once this is done, you can launch the application directly from IntelliJ. In case of an error, you can execute the following command:
mvn clean install
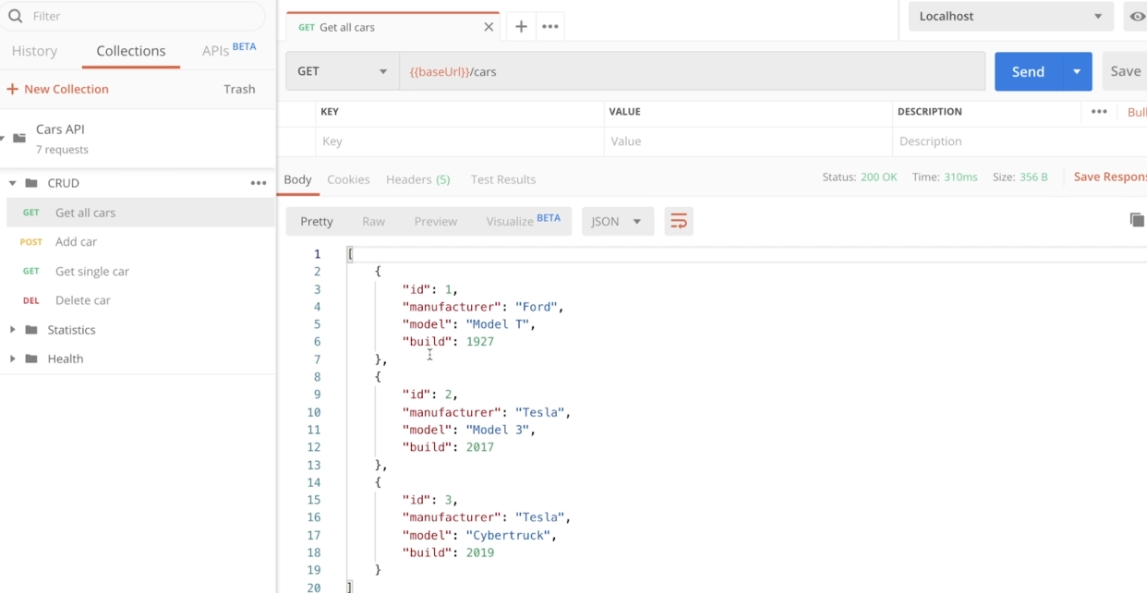
This project is an API, so there is no user interface. To test our API, you can use Postman. All possible calls are available in the repository. By importing this collection, you should find all the endpoints that our API exposes.

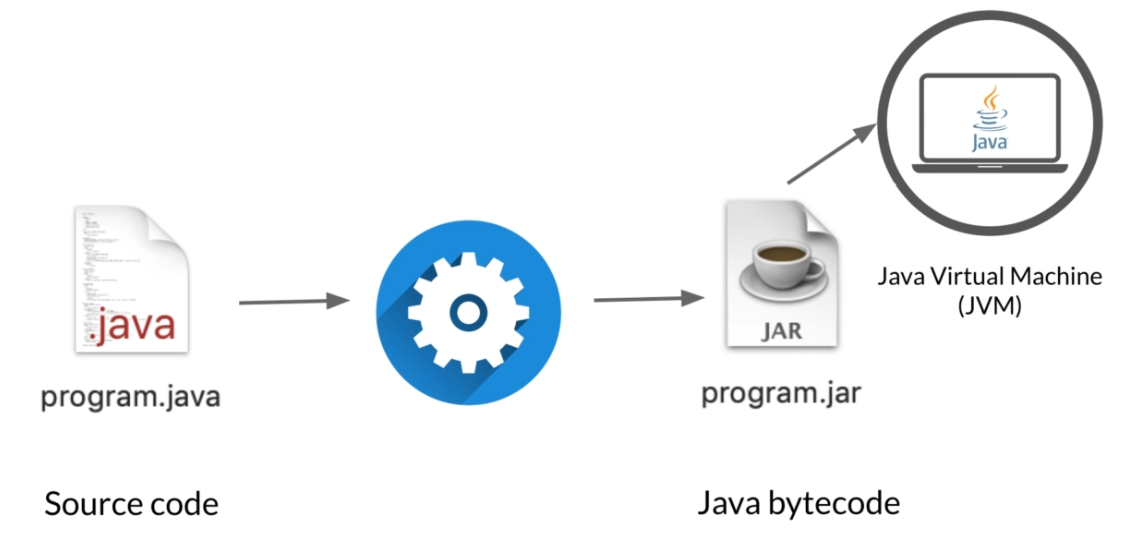
In this section, we will focus on creating the build job for our Java application. This step is essential because it transforms the source code into machine language.
Build Step
GitLab Branch: Java-AWS/build
In this section, we will emphasize the importance of creating our build job for our application. This process will take the code and translate it into machine language:

The result of the build job is a "JAR" file, which will then be interpreted by the server. For this training, we will use Gradle, but you can also use Maven if you prefer.
In this step, we need to:
- A Docker image to run Java
- Launch a build with Gradle
- Save our artifact in GitLab
 stages:
  - build
build:
  stage: build
  image: openjdk:12-alpin
  script:
    - ./gradlew build
  artifacts:
    paths:
      - ./build/libs/
Test stage
Gitlab branch: Java-AWS/test
To ensure that the application is working correctly, we will create smoke tests. Initially, we will make calls to verify that the application responds correctly.
Smoke Test Step
GitLab Branch: Java-AWS/smoke-tests
In this step, we need to:
- Create a new stage
- Use the default Alpine image
- Create a script that will launch the JAR file created in the previous artifact with Java
- Wait a few moments for the application to start
- Call the health endpoint to make sure everything is working correctly
- Create a before_script to install the dependency to use "curl"
 stages:
  - build
  - test

build:
  stage: build
  image: openjdk:12-alpine
  script:
    - ./gradlew build
  artifacts:
    paths:
      - ./build/libs/

smoke test:
  stage: test
  image: openjdk:12-alpine
  before_script:
    - apk --no-cache add curl
  script:
    - java -jar ./build/libs/cars-api.jar &
    - sleep 30
    - curl http://localhost:5000/actuator/health | grep "UP"
Deploy to AWS
Gitlab branch: Java-AWS/deploy
First, if you don't have an AWS account, I suggest creating one. Once logged in, go to "AWS Management Console":
All Services -> Compute -> Elastic Beanstalk -> Create new Application -> add the application name and create this application
We will need an environment, but for now, let's just make it work:
In the created application -> Environments -> Create one now -> Web server environment -> Environment name (production) && platform (Java) && Sample application
If we want to deploy manually, we can do it directly in the dashboard and select our project (JAR file). Now we will do this deployment automatically! AWS provides tools that make our lives easier, such as "AWS Command Line Interface". This is what we will use to interact with AWS. Another issue is that we cannot directly interact with Elastic Beanstalk, we will have to go through AWS S3. It's like a Dropbox for our AWS files that will allow us to deposit our compiled file.

To deploy our application to AWS S3, we first need to create an S3 bucket on the AWS Management Console:
- Go to the AWS Management Console.
- Select "All Services".
- Go to the "Storage" section and select "S3".
- Create a bucket by specifying a name (e.g.: cars-api-deployments), and click "Next" and then "Create bucket".
Next, to configure GitLab:
- Go to "Settings" and then "CI/CD".
- In the "Variables" section, add a variable named "S3_BUCKET" with the value "cars-api-deployment".
Finally, to interact with AWS, we will use the command line system and a Docker image. Here are the steps to follow:
- Create a new stage in your CI/CD configuration file.
- Pull the AWS Docker image.
- Configure the image to have no entry point.
- Write a script to deploy the artifact created to the S3 bucket you created earlier.
 stages:
  - build
  - test
  - deploy

build:
  stage: build
  image: openjdk:12-alpine
  script:
    - ./gradlew build
  artifacts:
    paths:
      - ./build/libs/

smoke test:
  stage: test
  image: openjdk:12-alpine
  before_script:
    - apk --no-cache add curl
  script:
    - java -jar ./build/libs/cars-api.jar &
    - sleep 30
    - curl http://localhost:5000/actuator/health | grep "UP"

deploy:
  stage: deploy
  image:
    name: amazon/aws-cli
    entrypoint: [""]
  script:
    - aws configure set region us-east-1
    - aws s3 cp ./build/libs/cars-api.jar s3://$S3_BUCKET/cars-api.jar
To access our S3 bucket, we need to generate credentials:
- Go to the AWS Management Console.
- Select "All Services".
- Go to the "IAM" section and select "Users".
- Click on "Add user".
- Give a name to the user (e.g.: gitlabci) and select "Programmatic access".
- In the "Permissions" section, click on "Attach existing policies directly".
- Search for "S3" and select "AmazonS3FullAccess".
- Click on "Attach policy".
- In the "Permissions" section, click again on "Attach existing policies directly".
- Search for "S3" and select "AdminstratorAccess-AWSElasticBeanStalk".
- Click on "Attach policy".
- Do not add tags and click on "Create user".
- Save the credentials (access key ID and secret access key).
Now we can add these credentials to GitLab variables:
- Go to "Settings" and then "CI/CD".
- In the "Variables" section, add a variable named "AWS_ACCESS_KEY_ID" with the value of the previously saved access key ID.
- Add another variable named "AWS_SECRET_ACCESS_KEY" with the value of the previously saved secret access key.
Now that we have created our pipeline to deploy our application to S3, we need to deploy it to our server using an application version in AWS. This will ensure consistency in our deployments and allow us to have a history of deployed versions.
Here are the steps to follow:
- Create local variables for the artifact name and application name.
- Use the predefined variable $CI_PIPELINE_IID to create a unique identifier for each version.
- Create an application version using the application name and the unique identifier created earlier.
- Update the environment by specifying the version you just created.
These steps will allow you to deploy your application consistently and traceably on AWS.
 variables:
  ARTIFACT_NAME: cars-api-v$CI_PIPELINE_IID.jar
  APP_NAME: cars-api

deploy:
  stage: deploy
  image:
    name: amazon/aws-cli
    entrypoint: [""]
  script:
    - aws configure set region us-east-1
    - aws s3 cp ./build/libs/$ARTIFACT_NAME s3://$S3_BUCKET/$ARTIFACT_NAME
    - aws elasticbeanstalk create-application-version --application-name $APP_NAME --version-label $CI_PIPELINE_IID --source-bundle S3Bucket=$S3_BUCKET,S3Key=$ARTIFACT_NAME
    - aws elasticbeanstalk update-environment --application-name $APP_NAME --environment-name "production" --version-label=$CI_PIPELINE_IID
Now that everything is working as expected, you can improve your code to provide useful information such as:
- The pipeline ID
- The commit ID
- The branch name
This information will help you better understand and trace your deployments. Here's how to add them:
- Use the predefined variable $CI_PIPELINE_IID to get the pipeline ID.
- Use the predefined variable $CI_COMMIT_SHA to get the commit ID.
- Use the predefined variable $CI_COMMIT_REF_NAME to get the branch name.
You can then display this information in your pipeline logs to make it more easily accessible. By adding this information, you'll be able to better track your deployments and identify issues more quickly.
 build:
  stage: build
  image: openjdk:12-alpine
  script:
    - sed -i "s/CI_PIPELINE_IID/$CI_PIPELINE_IID/" ./src/main/resources/application.yml
    - sed -i "s/CI_COMMIT_SHORT_SHA/$CI_COMMIT_SHORT_SHA/" ./src/main/resources/application.yml
    - sed -i "s/CI_COMMIT_BRANCH/$CI_COMMIT_BRANCH/" ./src/main/resources/application.yml
    - ./gradlew build
    - mv ./build/libs/cars-api.jar ./build/libs/$ARTIFACT_NAME
  artifacts:
    paths:
      - ./build/libs/
Now that your application is deployed on AWS, you can use GitLab to verify that the deployed version is the one you chose. Here are the steps to follow:
- Install the CURL dependency to make API calls.
- Install the JQ dependency to easily extract information from a JSON file.
- Use CURL to make a call to the AWS application and verify that the deployed version is the one you chose.
- Use JQ to extract the CNAME data from the JSON result.
- Verify that the application is indeed running on AWS.
 deploy:
  stage: deploy
  image:
    name: amazon/aws-cli
    entrypoint: [""]
  before_script:
    - apk --no-cache add curl
    - apk --no-cache add jq
  script:
    - aws configure set region us-east-1
    - aws s3 cp ./build/libs/$ARTIFACT_NAME s3://$S3_BUCKET/$ARTIFACT_NAME
    - aws elasticbeanstalk create-application-version --application-name $APP_NAME --version-label $CI_PIPELINE_IID --source-bundle S3Bucket=$S3_BUCKET,S3Key=$ARTIFACT_NAME
    - CNAME=$(aws elasticbeanstalk update-environment --application-name $APP_NAME --environment-name "production" --version-label=$CI_PIPELINE_IID | jq '.CNAME' --raw-output)
    - sleep 45
    - curl http://$CNAME/actuator/info | grep $CI_PIPELINE_IID
Code quality
Gitlab branch: Java-AWS/quality
When multiple developers are working together on a project, it is important to ensure that best practices and guidelines are being followed, as well as code formatting. To do this, we will use PMD, a code analysis tool.
If PMD is not already installed in your project, you can install it by following the instructions of your package management system or by downloading it directly from the PMD website.
Once PMD is installed, here's how to use it:
- Open a command terminal in the project.
- Run the PMD command to start the code analysis.
- Analyze the PMD results to identify errors and guideline violations.
- Fix the errors and guideline violations to improve the quality of your code.
By using PMD, you can ensure that your code follows best practices and guidelines, making it easier for developers to collaborate and improving the overall code quality of your project.
./gradlew pmdMain pmdTest
To use PMD and apply code quality rules to your project, you can add the rules to the "pmd-ruleset.xml" file located at the root of the project. To automate this check, you can create a new job in your pipeline.
Here's how to do it:
- Create a new job in your CI/CD configuration file.
- Link it to the test stage to check code quality before deployment.
- Write a script that runs the PMD command you used earlier.
- Save the PMD result as an artifact so that you can easily check it in case of code errors.
By adding this job to your pipeline, you can automate the check of your code quality every time you launch a deployment. This will help you quickly detect errors and guideline violations, and fix them before deploying your application.
 code quality:
  stage: test
  image: openjdk:12-alpine
  script:
    - ./gradlew pmdMain pmdTest
  artifacts:
    when: always
    paths:
      - build/reports/pmd
Unit test stage
Gitlab branch: Java-AWS/unit-test
In your application, you already have unit tests that ensure new implementations do not break old features. To integrate this constraint into your deployment pipeline, you can add a new job to run unit tests.
Here's how to do it:
- Create a new job in your CI/CD configuration file.
- Link it to the test stage to run the tests before deployment.
- Use Gradle (or another tool) to run the unit tests.
- Save the test report as an artifact so that you can easily check it.
 unit tests:
  stage: test
  image: openjdk:12-alpine
  script:
    - ./gradlew test
  artifacts:
    when: always
    paths:
      - build/reports/tests
    reports:
      junit: build/test-results/test/*.xml
API test stage
Gitlab branch: Java-AWS/api-test-stage
To ensure the proper functioning of your endpoints, you can add functional tests to your deployment pipeline. Here's how to do it:
- Create a JSON file with the data you want to use to test your endpoints.
- Add this file to your project, for example in the tests folder.
- Create a new job in your CI/CD configuration file.
- Link it to the test stage to run the tests before deployment.
- In this job, start your application and use Postman (or another tool) to send requests to your endpoints.
- Check that the results returned by your endpoints are the ones you expect.
- Save the test results as an artifact so that you can easily check them.
 {
   "info":{
      "_postman_id":"e4a42f44-a58f-4bfa-a5d0-5557a0a36247",
      "name":"Cars API",
      "schema":"https://schema.getpostman.com/json/collection/v2.1.0/collection.json"
   },
   "item":[
      {
         "name":"CRUD",
         "item":[
            {
               "name":"Get all cars",
               "event":[
                  {
                     "listen":"test",
                     "script":{
                        "id":"838290a6-f7c6-417d-a387-7df2d2c719f4",
                        "exec":[
                           "pm.test(\"Status code is 200\", function () {",
                           "    pm.response.to.have.status(200);",
                           "});"
                        ],
                        "type":"text/javascript"
                     }
                  }
               ],
               "request":{
                  "method":"GET",
                  "header":[

                  ],
                  "url":{
                     "raw":"{{baseUrl}}/cars",
                     "host":[
                        "{{baseUrl}}"
                     ],
                     "path":[
                        "cars"
                     ]
                  }
               },
               "response":[

               ]
            },
            {
               "name":"Add car",
               "request":{
                  "method":"POST",
                  "header":[
                     {
                        "key":"Content-Type",
                        "name":"Content-Type",
                        "value":"application/json",
                        "type":"text"
                     }
                  ],
                  "body":{
                     "mode":"raw",
                     "raw":"{\n    \"manufacturer\": \"Dacia\",\n    \"model\": \"Logan\",\n    \"build\": 2000\n}",
                     "options":{
                        "raw":{
                           "language":"json"
                        }
                     }
                  },
                  "url":{
                     "raw":"{{baseUrl}}/cars",
                     "host":[
                        "{{baseUrl}}"
                     ],
                     "path":[
                        "cars"
                     ]
                  }
               },
               "response":[

               ]
            },
            {
               "name":"Get single car",
               "event":[
                  {
                     "listen":"test",
                     "script":{
                        "id":"907cccdc-8da6-426d-9bef-2a618a44e8e2",
                        "exec":[
                           "pm.test(\"Status code is 200\", function () {",
                           "    pm.response.to.have.status(200);",
                           "});"
                        ],
                        "type":"text/javascript"
                     }
                  }
               ],
               "request":{
                  "method":"GET",
                  "header":[

                  ],
                  "url":{
                     "raw":"{{baseUrl}}/cars/4",
                     "host":[
                        "{{baseUrl}}"
                     ],
                     "path":[
                        "cars",
                        "4"
                     ]
                  }
               },
               "response":[

               ]
            },
            {
               "name":"Delete car",
               "request":{
                  "method":"DELETE",
                  "header":[

                  ],
                  "url":{
                     "raw":"{{baseUrl}}/cars/1",
                     "host":[
                        "{{baseUrl}}"
                     ],
                     "path":[
                        "cars",
                        "1"
                     ]
                  }
               },
               "response":[

               ]
            }
         ],
         "protocolProfileBehavior":{

         }
      },
      {
         "name":"Statistics",
         "item":[
            {
               "name":"Average fleet age",
               "event":[
                  {
                     "listen":"test",
                     "script":{
                        "id":"79b19feb-1129-451d-8d19-f8a1a512e5dd",
                        "exec":[
                           "pm.test(\"Status code is 200\", function () {",
                           "    pm.response.to.have.status(200);",
                           "});"
                        ],
                        "type":"text/javascript"
                     }
                  }
               ],
               "request":{
                  "method":"GET",
                  "header":[

                  ],
                  "url":{
                     "raw":"{{baseUrl}}/statistics/age",
                     "host":[
                        "{{baseUrl}}"
                     ],
                     "path":[
                        "statistics",
                        "age"
                     ]
                  }
               },
               "response":[

               ]
            }
         ],
         "protocolProfileBehavior":{

         }
      },
      {
         "name":"Health",
         "item":[
            {
               "name":"Health",
               "event":[
                  {
                     "listen":"test",
                     "script":{
                        "id":"1743a75d-932a-4e2d-b5d4-cf5b98c3c7f1",
                        "exec":[
                           "pm.test(\"Status code is 200\", function () {",
                           "    pm.response.to.have.status(200);",
                           "});"
                        ],
                        "type":"text/javascript"
                     }
                  }
               ],
               "request":{
                  "method":"GET",
                  "header":[

                  ],
                  "url":{
                     "raw":"{{baseUrl}}/actuator/health",
                     "host":[
                        "{{baseUrl}}"
                     ],
                     "path":[
                        "actuator",
                        "health"
                     ]
                  }
               },
               "response":[

               ]
            },
            {
               "name":"Info",
               "event":[
                  {
                     "listen":"test",
                     "script":{
                        "id":"72e253db-70d1-4fce-9d7f-a3647081b16f",
                        "exec":[
                           "pm.test(\"Status code is 200\", function () {",
                           "    pm.response.to.have.status(200);",
                           "});"
                        ],
                        "type":"text/javascript"
                     }
                  }
               ],
               "request":{
                  "method":"GET",
                  "header":[

                  ],
                  "url":{
                     "raw":"{{baseUrl}}/actuator/info",
                     "host":[
                        "{{baseUrl}}"
                     ],
                     "path":[
                        "actuator",
                        "info"
                     ]
                  }
               },
               "response":[

               ]
            }
         ],
         "protocolProfileBehavior":{

         }
      }
   ],
   "protocolProfileBehavior":{

   }
}
To add a new stage to your deployment pipeline to run functional tests for your endpoints, follow these steps:
- Add a new stage to your CI/CD configuration file and name it, for example, "api testing".
- Create a new job within this stage to run the functional tests.
- Import Newman (or another tool) to run Postman for sending HTTP requests to your API endpoints.
- Specify the version of Newman that you want to use to ensure compatibility.
- Run your test collection using Newman to execute the functional tests.
- Save the results generated by Newman as an artifact, which can be used for reviewing the tests later.
This allows you to automatically run functional tests for your endpoints during your deployment pipeline, ensuring that your API is working correctly and helping you catch issues early on.
 stages:
  - build
  - test
  - deploy
  - api testing

api testing:
  stage: post deploy
  image:
    name: vdespa/newman
    entrypoint: [""]
  script:
    - newman --version
    - newman run "Cars API.postman_collection.json" --environment Production.postman_environment.json --reporters cli,htmlextra,junit --reporter-htmlextra-export "newman/report.html" --reporter-junit-export "newman/report.xml"
  artifacts:
    when: always
    paths:
      - newman/
    reports:
      junit: newman/report.xml
 English


