Introduction
In this section, we will:
- Explain predefined environment variables
- Improve performance by using caches
- Deploy applications by environment
- Generate a manual deployment
These topics are the main themes of this section.
Predefined Variables
Git Branch: CI/CDVersion
GitLab CI/CD has default environment variables. Why should we know them? Well, we might need to modify or display them, like the SHA to display it in the HTML. Here's an example: if we want to replace the version in the index.js file of our Gatsby project:
 <main style={pageStyles}>
  <title>Home Page</title>
  <h1 style={headingStyles}>
    Congratulations
    <br />
    <span style={headingAccentStyles}>— you just made a Gatsby site! </span>
    <span role="img" aria-label="Party popper emojis">
      🎉🎉🎉
    </span>
  </h1>
  <p style={paragraphStyles}>
    Edit <code style={codeStyles}>src/pages/index.js</code> to see this page
    update in real-time.{" "}
    <span role="img" aria-label="Sunglasses smiley emoji">
      😎
    </span>
  </p>
  <ul style={listStyles}>
    <li style={docLinkStyle}>
      <a
        style={linkStyle}
        href={`${docLink.url}?utm_source=starter&utm_medium=start-page&utm_campaign=minimal-starter`}
      >
        {docLink.text}
      </a>
    </li>
    {links.map(link => (
      <li key={link.url} style={{ ...listItemStyles, color: link.color }}>
        <span>
          <a
            style={linkStyle}
            href={`${link.url}?utm_source=starter&utm_medium=start-page&utm_campaign=minimal-starter`}
          >
            {link.text}
          </a>
          {link.badge && (
            <span style={badgeStyle} aria-label="New Badge">
              NEW!
            </span>
          )}
          <p style={descriptionStyle}>{link.description}</p>
        </span>
      </li>
    ))}
  </ul>
  <img
    alt="Gatsby G Logo"
    src="data:image/svg+xml,%3Csvg width='24' height='24' fill='none' xmlns='http://www.w3.org/2000/svg'%3E%3Cpath d='M12 2a10 10 0 110 20 10 10 0 010-20zm0 2c-3.73 0-6.86 2.55-7.75 6L14 19.75c3.45-.89 6-4.02 6-7.75h-5.25v1.5h3.45a6.37 6.37 0 01-3.89 4.44L6.06 9.69C7 7.31 9.3 5.63 12 5.63c2.13 0 4 1.04 5.18 2.65l1.23-1.06A7.959 7.959 0 0012 4zm-8 8a8 8 0 008 8c.04 0 .09 0-8-8z' fill='%23639'/%3E%3C/svg%3E"
  />
  <div>Version: %%version%%</div>
</main>
We can easily replace %%version%% with the commit number by using the predefined environment variable $CI_COMMIT_SHA:
 build website:
  stage: build
  script:
    - echo $CI_COMMIT_SHORT_SHA
    - cd ./my-gatsby-site
    - npm install
    - npm run build
    - sed -i "s/%%version%%/$CI_COMMIT_SHORT_SHA/" ./my-gatsby-site/public/index.html
  artifacts:
    paths:
      - ./my-gatsby-site/public
We can create a deployment test that will check for the presence of our variable. Here's an example script that uses the predefined environment variable $CI_ENVIRONMENT_SLUG to determine the deployment URL and the custom variable $MY_VARIABLE to check for the presence of our variable:
 test deployment:
  image: alpine
  stage: deployment tests
  script:
    - apk add --no-cache curl
    - curl -s "https://curious-shock.surge.sh" | grep -q "Hi people"
    - curl -s "https://curious-shock.surge.sh" | grep -q "$CI_COMMIT_SHORT_SHA"
So we have a solution to ensure that everything works as expected.
Using Caches
Git Branch: CI/CDCache
Downloading dependencies can take a considerable amount of time. Compared to Jenkins, GitLab deletes data after each execution, which makes execution faster.
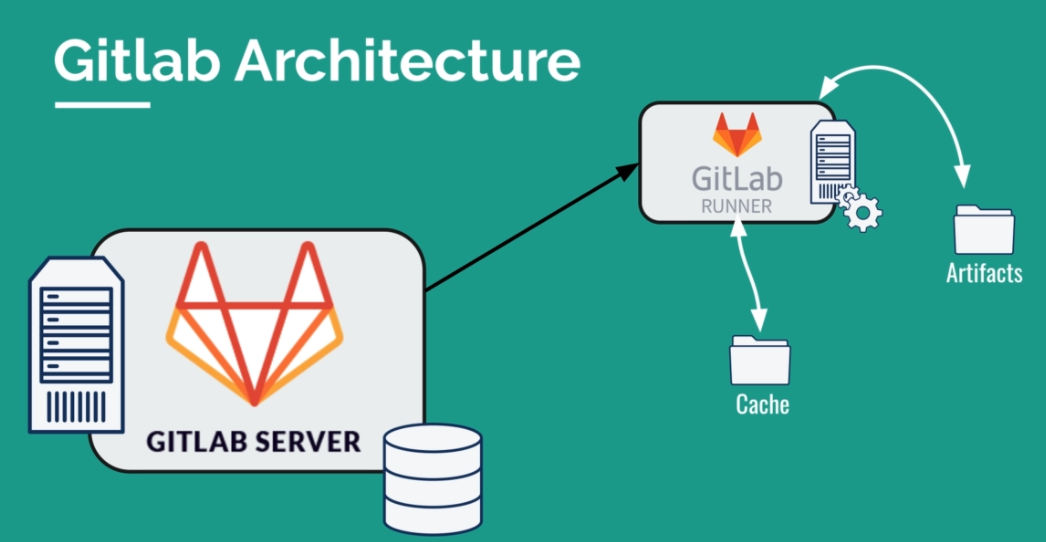
Why does GitLab delete this data? It comes from the architecture. The goal is to isolate jobs and not store external dependencies in repositories. We use caches to speed up pipeline execution.

The plan of attack is to:
- Define a "cache" object in the YAML file
- Define this object globally for each job using Node as the image
- Use a unique key to identify this object, based on the predefined commit variable "CI_COMMIT_REF_SLUG"
- Specify the paths to be saved in the cache object. In our case, we want to save "node_modules". Note that we can save multiple directories or files on demand.
Deleting data after each execution in GitLab is due to the architecture. To speed up pipeline execution, we use caches to store shared dependencies between jobs. To do this, we need to define a "cache" object in the YAML file, define it globally for each job using Node as the image, use a unique key to identify this object based on the predefined commit variable "CI_COMMIT_REF_SLUG", and specify the paths to be saved in the cache object, such as "node_modules".
 cache:

  key: ${CI_COMMIT_REF_SLUG}

  paths:

    - node_modules/
When encountering the "FATAL: file does not exist" error on GitLab, it means that GitLab is checking whether the cache exists or not. You can see in the logs that the cache file is created and added to a "cache.zip" file.
Then, for each job using Node, the cache is loaded, which improves performance.
However, what is the difference between cache and artifacts?
They have a similar configuration, but work differently:
| Artifacts | Cache |
|---|---|
| Often used to store the result of a build | Not used to store the result of a build |
| Can be used to transfer certain data from one job to another | Should be used only as a temporary storage for dependencies |
Deploying by Environment
Git Branch: CI/CDEnvs
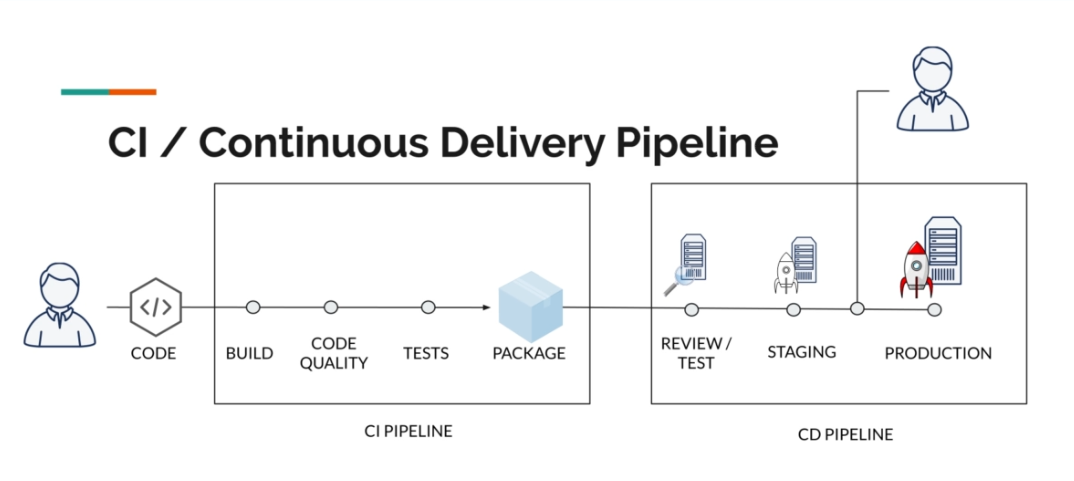
Currently, we deploy applications directly to production, but in reality, the goal is to test the application before deploying it to production. For this, we will create a "staging" environment.
 stages:
  - build
  - test
  - deploy staging
  - deploy production
  - production tests
We will deploy to staging first, before deploying to production. We can rename our different stages:
- "deploy" becomes "deploy production"
- "deployment tests" becomes "production tests"
Now, we will create a staging environment. The goal is to create a new URL that will serve as a test.
 deploy staging:
  stage: deploy staging
  script:
    - npm install --global surge
    - cd ./my-gatsby-site
    - surge --project public/ --domain https://foregoing-quiet-staging.surge.sh
The staging environment is similar to the production environment, but it deploys to a different URL before deploying to production. The goal is to create control over the deliverable and the deployment procedure. It also allows for tracking deployments, to know what has been deployed by environment and when.
However, it is important to note that GitLab does not have a notion of named environments. We need to inform GitLab of the staging environment.
 deploy staging:
  stage: deploy staging
  environment:
    name: staging
    url: https://foregoing-quiet-staging.surge.sh
  script:
    - npm install --global surge
    - cd ./my-gatsby-site
    - surge --project public/ --domain https://foregoing-quiet-staging.surge.sh

deploy production:
  stage: deploy production
  environment:
    name: production
    url: https://foregoing-quiet.surge.sh
  script:
    - npm install --global surge
    - cd ./my-gatsby-site
    - surge --project public/ --domain https://foregoing-quiet.surge.sh
Now that GitLab is aware of environments, you can see the environments on GitLab, the deployed commit, restart the build of an environment, and more. You can explore the different features and play around with them to better understand how GitLab works with environments.

One possible improvement would be to define variables to avoid duplicating code. These variables can be global or local to a job.
To improve our code, let's start by creating our variables:
 variables:
  STAGING_DOMAIN: foregoing-quiet-staging.surge.sh
  PRODUCTION_DOMAIN: foregoing-quiet.surge.sh
We can then easily use the variables instead of the different URLs:
 deploy production:
  stage: deploy production
  environment:
    name: production
    url: https://$PRODUCTION_DOMAIN
  script:
    - npm install --global surge
    - cd ./my-gatsby-site
    - surge --project public/ --domain https://$PRODUCTION_DOMAIN
So far, the system deploys to two environments, but we want to restrict deployment to production to a manual deployment. In other words, once the staging tests are done by the business, we want the deployment to production to only be done manually. Here is the desired operation:

To do this, we need to add the "when" property with a value of "manual" to inform GitLab that this job should be launched manually:
 deploy production:
  stage: deploy production
  environment:
    name: production
    url: https://$PRODUCTION_DOMAIN
  when: manual
  script:
    - npm install --global surge
    - cd ./my-gatsby-site
    - surge --project public/ --domain https://$PRODUCTION_DOMAIN
Now we should get this result:

However, an error occurs in the last step. This is because our production deployment job was not executed. To solve this problem, we need to set "allow_failure" to "false" so that the task is only launched once the deployment is launched. You can then see that the pipeline gets the "Blocked" status.
 deploy production:
  stage: deploy production
  environment:
    name: production
    url: https://$PRODUCTION_DOMAIN
  when: manual
  allow_failure: false
  script:
    - npm install --global surge
    - cd ./my-gatsby-site
    - surge --project public/ --domain https://$PRODUCTION_DOMAIN
We just created our pipeline, which is almost perfect for a production workflow. However, there is still one problem! Every time we push a branch, a build is created, which is not really logical. We need to create a deployment to staging only when we push to the "master" branch. For this, the "only" property, which takes an array as a value, allows us to specify when a job should run:
 deploy staging:
  stage: deploy staging
  environment:
    name: staging
    url: https://$STAGING_DOMAIN
  only:
    - master
  script:
    - npm install --global surge
    - cd ./my-gatsby-site
    - surge --project public/ --domain https://$STAGING_DOMAIN
Dynamic Environments
Git Branch: CI/CDDynamicEnv
It would be interesting to set up dynamic deployments for each merge request so that we can deploy a version to an environment. This allows us to review the changes made, perform additional tests, and create a "Review" environment that can be used by non-technical users. In other words, we need to create an environment per branch to validate the "feature" more quickly.
 stages:
  - build
  - test
  - deploy review
  - deploy staging
  - deploy production
  - production tests

deploy review:
  stage: deploy review
  only:
    - merge_requests
  environment:
      name: review/$CI_COMMIT_REF_NAME
      url: https://foregoing-quiet-$CI_ENVIRONMENT_SLUG.surge.sh
  script:
    - npm install --global surge
    - surge --project ./public --domain foregoing-quiet-$CI_ENVIRONMENT_SLUG.surge.sh
We will have one environment per branch! With each push, we can show our different changes and progress. We have dynamic environments, but there is no need to keep them once the branch has been merged. For this, we need to create a job:
 stop review:
  stage: deploy review
  only:
    - merge_requests
  variables:
    GIT_STRATEGY: none
  script:
    - npm install --global surge
    - surge teardown instazone-$CI_ENVIRONMENT_SLUG.surge.sh
  when: manual
  environment:
    name: review/$CI_COMMIT_REF_NAME
    action: stop
This job will run when the branch is merged. It will ask the "surge" CLI to destroy the instance using the "teardown" command. To avoid an error (GIT_STRATEGY), it is necessary to inform Gitlab not to clone this specific branch that will no longer exist. This manual action means that the job will only run on demand and conditionally. Next, we need to close the environment in Gitlab. To do this, we need to link this job to the review job using the "on_stop" event that triggers when the review is finished.
 deploy review:
  stage: deploy review
  only:
    - merge_requests
  environment:
      name: review/$CI_COMMIT_REF_NAME
      url: https://instazone-$CI_ENVIRONMENT_SLUG.surge.sh
      on_stop: stop review
  script:
    - npm install --global surge
    - surge --project ./public --domain instazone-$CI_ENVIRONMENT_SLUG.surge.sh
before_script and after_script
We will briefly go over this configuration, which allows us to perform actions before and after a job is executed. Here is an example:
   before_script:
    - npm install --global surge
  script:
    - surge --project ./public --domain instazone-$CI_ENVIRONMENT_SLUG.surge.sh
  after_script:
    - echo "Finito"
 English


