Introduction:
When developing software, it is essential to establish a CI/CD process to ensure code quality and facilitate deployment to production. Gitlab CI is a popular tool for automating this process, and pipelines are a key feature of Gitlab CI.
Pipelines in Gitlab CI:
- Pipelines in Gitlab CI allow you to define a set of actions to validate, build, test, and deploy software.
- Pipelines are composed of stages, which represent the different phases of the development and deployment process.
- Each stage is composed of jobs, which are actions to execute to validate a stage of the pipeline.
Example of a pipeline:
- The pipeline can start with a validation stage, which checks if the source code is properly formatted and does not contain syntax errors.
- If validation succeeds, a build stage can be executed to generate the application from the source code.
- Once the application is built, a test stage can be executed to verify its functionality.
- If the tests succeed, a deployment stage can be executed to deploy the application to production.

In our case, our pipeline consists of two stages: Build and Test. The first stage is to run the build of our application and the second stage is to run the functional or unit tests of the application.
Git branch: first-project
To get started, log in to GitLab and create a new empty project named "Car assembly line". The different steps of the training are available in different branches, whose link is in the sidebar to the right.
The goal of this chapter is to create two jobs for our pipeline on the "first-project" branch. The two jobs to create are as follows:
- A job for building the application
- A job for running functional or unit tests of the application.

To create a job in our pipeline, follow these steps:
- Define the name of the job you want to create.
- Create a "build" folder to store the job file.
- Create a file for the job.
- Write the different steps of the job in this file.
Pipeline Process:
To view the results of your pipeline, go to the "CI/CD" sidebar. You will find the results of your job there.
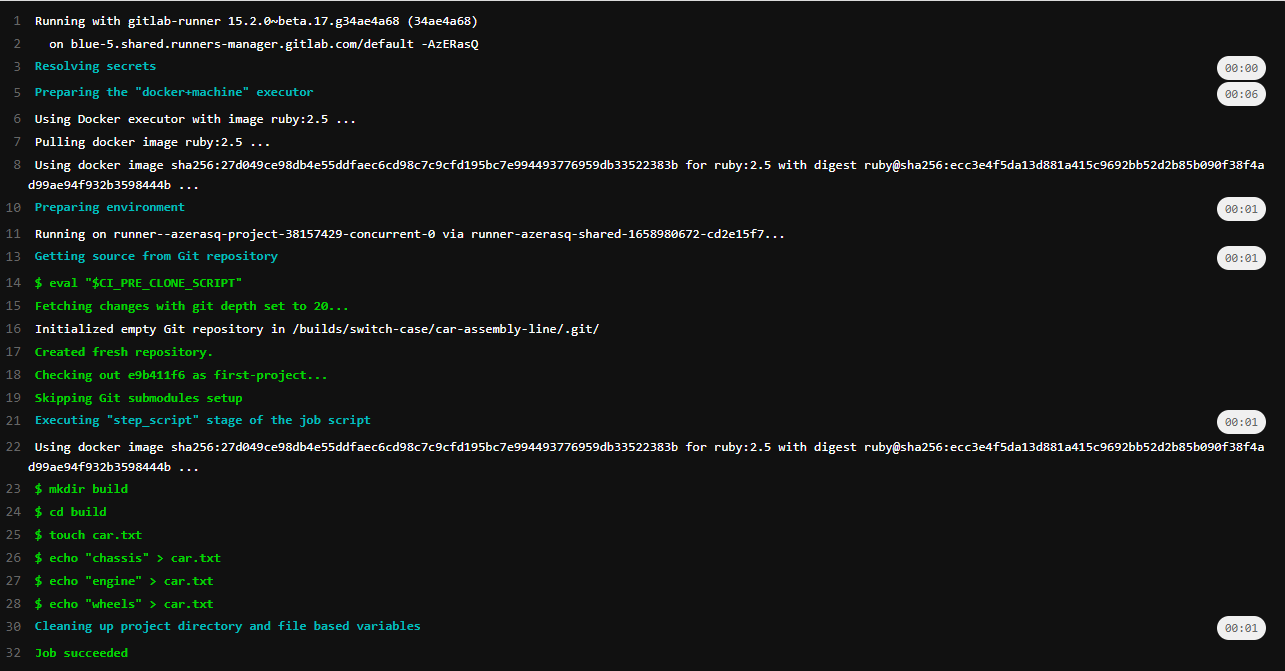
Now that the first job is created, it's time to move on to creating the next job. However, it is important to understand that each job is independent of the others, which means that each job does not know the result of the others and each execution destroys the files and folders created during its execution.
To avoid this, we can use "artifacts". Artifacts allow you to store files generated during the execution of a job and make them available to subsequent jobs.
Thus, it will be easier to create the file for the next job using the artifacts generated by the first job.

Artifacts are features that allow you to store the results of the different jobs in the pipeline. Thus, files generated during the execution of a job will be kept and can be used by subsequent jobs. This feature facilitates the creation of subsequent jobs by using the results of previous jobs.```
 build the car:
  script:
    - mkdir build
    - cd build
    - touch car.txt
    - echo "chassis" >> car.txt
    - echo "engine" >> car.txt
    - echo "wheels" >> car.txt
  artifacts:
    paths:
      - build/

test the car:
  script:
    - ls
    - test -f build/car.txt
    - cd build
    - cat car.txt
    - grep "chassis" car.txt
    - grep "engine" car.txt
    - grep "wheels" car.txt
To use artifacts, you must first define them by specifying the path where they are located.
Then, you can create the testing job that will navigate to the file and check that each line is present in the file.
However, another problem arises: it is important to specify an order for the execution of the jobs, as testing the build without a result will lead to a failure. To solve this problem, we use the concept of "stages". Each job must be identified by an ID, called a "stage", which will allow defining an order in the "stages" array. Here is an example:
 stages:
  - build
  - test

build the car:
  stage: build
  script:
    - mkdir build
    - cd build
    - touch car.txt
    - echo "chassis" >> car.txt
    - echo "engine" >> car.txt
    - echo "wheels" >> car.txt
  artifacts:
    paths:
      - build/

test the car:
  stage: test
  script:
    - ls
    - test -f build/car.txt
    - cd build
    - cat car.txt
    - grep "chassis" car.txt
    - grep "engine" car.txt
    - grep "wheels" car.txt
Defining Execution Order of Jobs
To define the execution order of jobs, you must specify the order in the "stages" array. Each job includes a "stage" identifier associated with it.
Congratulations, you have just created your first pipeline! You can pull the branch to test all the code.
Now, it is important to understand GitLab runners. Runners are agents that allow executing pipeline jobs on a remote machine. Runners can be shared between different projects or reserved for a single project. Runners can also be hosted on your own infrastructure or on GitLab's infrastructure.
GitLab Runners
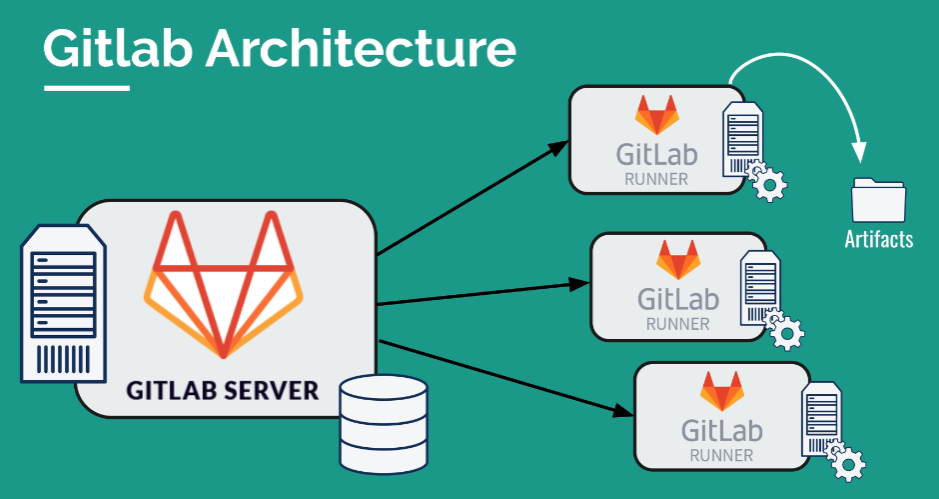
The GitLab server is a key element of its architecture. Each of our actions is recorded in a database, and each pipeline is launched by a service called "GitLab Runner". GitLab Runner allows launching pipelines, including the backup of artifacts. We can launch a large number of runners to ensure scalability, but also to respond to specific requests of pipelines that are not necessary for others.
The "coordinator" is the component responsible for receiving the files generated by the pipelines.
To share runners, you can go to the "Settings" -> "CI/CD" -> "Runners" -> "expands" page. On this page, you can configure your runners by adding new runners, creating specifications, and disabling the ability to share runners.
CI/CD
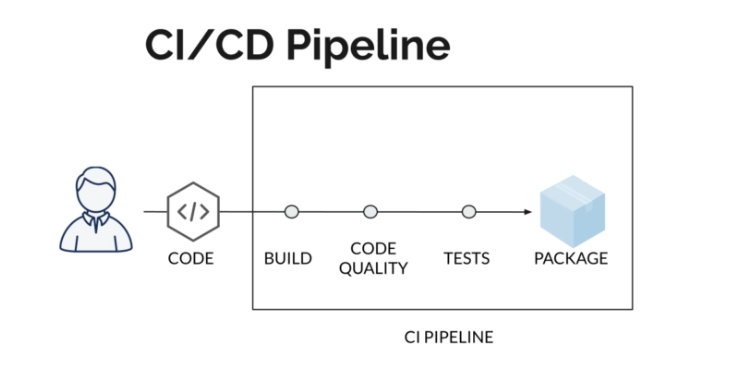
Historically, when deploying a new version of a project, most of the tasks were done manually. Today, times have changed.
Continuous Integration (CI) means that every time you change your code, that change must be integrated into the CI server. During this integration, you must ensure that the project continues to compile and meets the following criteria:
- Functional tests
- Security standards verification (dependencies, etc.)
- Guidelines
- Code compliance
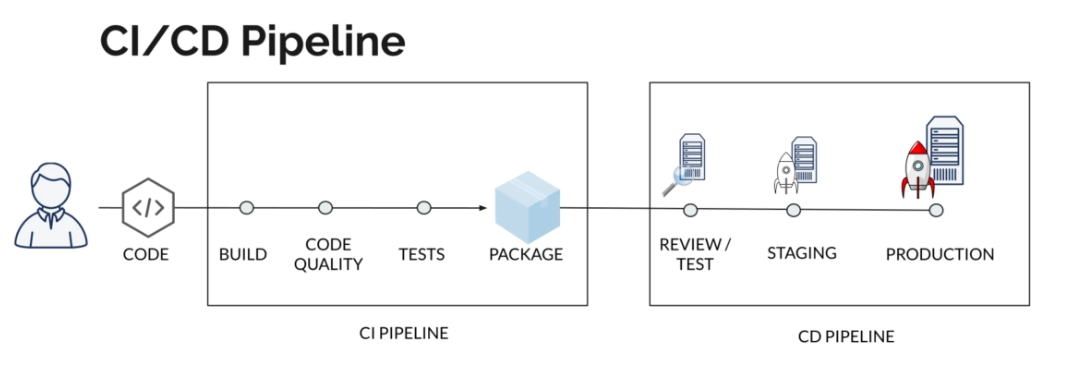
Thus, CI automates the integration process, aiming to ensure project stability and deliver new features quickly. This also allows for quick response to any problems that may arise in the future.
Continuous Deployment (CD) ensures that every change is deployed while delivering value as quickly as possible and reducing the risk of new deployments. Here is what our system looks like:
CI/CD Workflow
Git branch: CI/CD Workflow
In this exercise, we will:
- Build a project using NPM
- Compile this project into a Docker image
- Create a GitLab CI/CD pipeline
- Create parallel and background jobs
- Deploy the project with surge.sh
- Use environment variables to manage sensitive data.
We will create a new project based on Gatsby. Please follow the instructions in the link above to install Gatsby locally in your repository. Once the project is generated, you can launch the local server and see:

At this stage, we want to create a pipeline to build the project directly through GitLab CI. Therefore, we will create a ".gitlab-ci.yml" file. To build the application, we can use the "npm run build" command which is located in the "node.js" application documentation in the package.json file.
However, it is important to install the necessary libraries before they can be used. Our first test will therefore look like this:
 build website:
  script:
    - npm install
    - npm run build
Le fichier ".gitlab-ci.yml" que nous avons créé précédemment n'est pas suffisant. Par défaut, nous utilisons l'image "ruby:2.5", ce qui n'est pas adapté pour notre projet. Nous devons donc changer cette image pour une image Docker qui contient déjà Node.
Il est recommandé de fixer la version de l'image afin d'éviter tout problème de compatibilité avec l'image utilisée. Nous allons donc créer une image Docker spécifique pour notre projet.
 build website:
  image: node:16
  script:
    - cd my-gatsby-site
    - npm install
    - npm run build
The result is conclusive, our project has been successfully compiled! 🎉 However, it took longer than compiling it with Jenkins. This is because GitLab CI does not retain anything in memory after each job.
Therefore, we need to use "artifacts" to keep our compiled version. Indeed, it would be a shame to lose our build version.
 build website:
  image: node:16
  script:
    - cd my-gatsby-site
    - npm install
    - npm run build
  artifacts:
    paths:
      - ./public
Now that the build is completed, GitLab CI must ensure that the tests and other verifiable criteria are successful. For a job to fail, the status must be different from 0. This is exactly what the "npm run test" command will return if the unit tests do not work, or any UNIX command that does not work or cannot find a result.
In our case, we will check for the presence of a string in our "index.html" file. This is just an example.
 stages:
  - build
  - test

build website:
  stage: build
  image: node:16
  script:
    - cd my-gatsby-site
    - npm install
    - npm run build
  artifacts:
    paths:
      - ./public

test artifacts:
  stage: test
  script:
    - grep -q "Gatsby" ./public/index.html
We have added stages so that our test takes place after the build. We have also specified a Docker image for our tests so as not to use the Ruby image that we used previously.
We can also create builds in parallel. In this example, we will launch the rendering server proposed by Gatsby using the "npm run serve" command to get a better idea of the final rendering. If you want to test that the tests can fail, you can modify the strings.
 stages:
  - build
  - test

build website:
  stage: build
  image: node
  script:
    - npm install
    - npm install -g gatsby-cli
    - gatsby build
  artifacts:
    paths:
      - ./public

test artifact:
  image: alpine
  stage: test
  script:
    - grep -q "Gatsby" ./public/index.html

test website:
  image: node
  stage: test
  script:
    - npm install
    - npm install -g gatsby-cli
    - gatsby serve
    - curl "http://localhost:9000" | grep -q "Gatsby"
If you have followed the training, all of this should not seem difficult to you. We will now launch the site and verify that it contains the desired string.
We can see our parallel build directly in GitLab, thanks to the steps we have added in our ".gitlab-ci.yml" file.
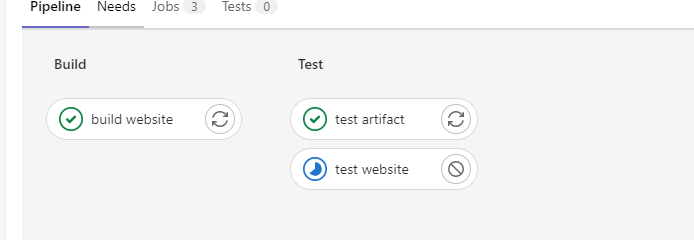
We are now able to run multiple tests at the same time, which allows us to divide complexity and optimize the time required to run certain jobs.
However, we have found that our current script is not working. Indeed, our server is launched but we do not close it. This can lead to a waiting time of about an hour before GitLab closes it and fails the job.
If we want to close the server, we must first launch the server, wait for it to start, and then create our test.
 test website:
  image: node
  stage: test
  script:
    - cd ./my-gatsby-site
    - npm install
    - npm run serve &
    - sleep 3
    - curl "http://localhost:9000" | tac | tac | grep -q "Gatsby"
In this case, the "&" symbol allows us to move on to the next command without waiting for the current command to finish. This is not the best way to do it, but it gives us a concrete example of how to move on to a next step and let a job run in the background.
We will now deploy our application using Surge, which is a cloud platform for deploying serverless applications. It's easy to set up and use, and it's great for static sites.
I invite you to follow the installation guide as before and continue the training after that. Once you have it installed, you can launch the mini-server with the corresponding command.
surge
Congratulations! Don't forget your credentials, we will need them. By pressing the "Enter" key, you should see that your mini-server is available. It's a good start, but now we need to pass sensitive data to our deployment script.
The solution is to use environment variables! With Surge, we can retrieve a token:
surge token
This will give us a token that we can directly add to GitLab:
Settings -> CI/CD -> Variables -> Expand -> Add a variable -> key: SURGE_LOGIN -> value: your email address Add a variable -> SURGE_TOKEN -> your token -> Mask variable
And there you have it, we have succeeded! Now, let's automate our deployment. We will have several images that use the Node image. We can make this image the default for all jobs by putting it at the top of the file. Don't worry, the different images to use must be specified in each job.
 stages:
  - build
  - test
  - deploy


deploy to surge:
  stage: deploy
  script:
    - npm install --global surge
    - surge --project ./my-gatsby-site/public --domain curious-shock.surge.sh
Since we have defined our variables in GitLab, we do not need to specify our credentials, GitLab will do it automatically.

 English


